Introduction to Tokens/ja: Difference between revisions
(『新しいトークンの作成』) |
|||
| Line 77: | Line 77: | ||
== | ==トークンを編集する== | ||
トークンの編集とはトークンのさまざまな特性(画像、名前、設定など)に変更を加えることだ。名前、画像、サイズの変更については[[Introduction_to_Mapping|初めての地図作成]]で説明している。 | |||
次のセクションでは、'''Edit Token'''ダイアログのさまざまなオプション、タブ、ドロップダウンボックスについて説明する。 | |||
=== | ===トークンのタイプ=== | ||
トークンはNPCとPCの2つのタイプがある。''プレイヤー・キャラクター''と''ノンプレイヤー・キャラクター''の略語であるこの言葉はロールプレイング・ゲーマーにお馴染みであり、実際のゲームでは、この''タイプ''設定の最も一般的な使い方は二つのグループを区別することである。 | |||
通常、君のプレイヤーが扱うトークンはタイプを''PC''に、''君が扱う''のであれば''NPC''に設定すれば良い。 | |||
[[Image:Edit-token.jpg|thumb| | [[Image:Edit-token.jpg|thumb|'''Edit Token''' ダイアログ]] | ||
''' | '''注''':トークンの''タイプ''はトークンの操作権限やプロパティの閲覧権限の設定と関連づいていない。それらはトークンの''owner''設定によって行われる。GM の場合は、キャンペーンにおけるマップ上の全てのトークンの所有権を持っているものとして扱われる。下記の[[Introduction_to_Tokens#Ownership|所有権(Ownership)]]に詳細があるので参照のこと。 | ||
トークンのタイプを変更するには、 | |||
1. | 1. トークンをダブルクリックして '''Edit Token''' ダイアログを表示。 | ||
2. | 2. 右上の隅のドロップダウンリストを操作してPCかNPCを選択。 | ||
3. | 3. '''OK''' をクリックする。 | ||
===Notes=== | ===Notes=== | ||
[[Image:Notes-tab.jpg|thumb| | [[Image:Notes-tab.jpg|thumb|'''Edit Token''' ダイアログの Notes タブ]] | ||
この Notes タブにはトークンについてのノートを書ける2つのエリアがある。それぞれの入力エリアは基本的なHTMLタグに対応しているので、装飾した文章を書くことが可能だ。 | |||
上側のテキスト入力エリアは、見ようとしただれからでも見ることが可能なノートを書くためにある。下側の('''GM Notes''と見出しが付けられた)エリアはGMのみが見ることができるノートを書くためのものだ。 | |||
ノートにはちょっとした仕掛けがあり、MapTool は気のきいたポップアップとして表示することができるが、、そのためには上側のノートを書く必要がある。 | |||
# | # トークンのノートの入力エリアに情報を入力する。 | ||
# | # 右クリックをして'''Change To >''' から'''Object Layer''' か '''Background Layer''' を選択。 | ||
# | # '''Token Layer''' に戻る。 | ||
マウスカーソルをトークンの上にかざしたときにカーソルの形が「手」の形になることに気づくだろう。ダブルクリックした場合、'''Edit Token''' ダイアログが表れる代わりに、ノートが記された小さなポップアップが画面の左下の隅に表示されるはずだ。 | |||
ここで重要なことは、トークンのノートを利用する方法はいくつもあるが、より一般的な使用方法は Object レイヤーか Background レイヤー上のトークンに注釈や備忘を付けることだ。 | |||
===Properties=== | ===Properties=== | ||
[[Image:Properties-tab.jpg|thumb| | [[Image:Properties-tab.jpg|thumb|'''Properties''' タブ]] | ||
'''Properties''' | '''Properties''' は、独立した案内として説明するに値するテーマであり、トークンの作成とマクロの使用に'''深く関わる'''ものだ。この案内で厄介なプロパティの詳細に触れるつもりはないが、その代わりに、ごく基本的なことについて説明することにしよう。 | ||
マップ上に配置されたトークンは、もれなく自動的に一通りの '''properties''' (基本的にはステータス、特性、特徴などのキャラクターシート上で良く見られるものだ)が与えられる。実質的に、各トークンはトークン自信に組み込まれたキャラクターシートを持ち歩いているといえる。プログラミング用語において、プロパティはさまざまな値を設定することが可能な変数であり、マクロにより再利用することができる。 | |||
* ''' | * '''注''': 皆が頻繁に''トークン・プロパティ''を参照するが、Edit Token ダイアログに表示されるプロパティはキャンペーンにおいて設定されているプロパティだけである。 | ||
'''Edit Token''' ダイアログの '''Macros''' タブをクリックしたら、君が使用している'''キャンペーン'''で、現在設定されているプロパティの一覧を確認できるだろう。新しいキャンペーンを開いた後やマップツール開始直後てあれば下記のとおり''標準のプロパティ''が表示されるはずだ。 | |||
* Strength | * Strength | ||
| Line 144: | Line 144: | ||
* Description | * Description | ||
この案内の残りの部分では、実例を示す場合は上の一覧にあるプロパティを使用する。 | |||
プロパティの一覧は、左にプロパティ名、左側に空白がある表形式(エクセルみたいな形式)になっている。右側の空白には、君の望む値をプロパティの値として入力することが可能だ。君はテキストや数値を入力でき、もっと進んだ使い方としてはマクロ文をそのプロパティの値として記述することもできる。 | |||
プロパティを編集し、 '''OK''' をクリックすると、'''そのトークンのプロパティ'''は入力した値に設定される。その後マクロを記述するのであれば、なにかを算出したり、ダイスロールのためにプロパティの値を参照することが可能になる。 | |||
ここでは簡単に紹介したが、プロパティは重要なテーマであるので、詳しい情報を得るために[[Introduction to Properties|初めてのプロパティ]]の案内を良く読んでほしい。 | |||
===State=== | ===State=== | ||
Revision as of 16:53, 11 April 2010
{{#customtitle:はじめてのトークン|はじめてのトークン}}
BEGINNER
THIS IS A BEGINNER ARTICLE
はじめての MapTool トークン
はじめての地図作成の案内で述べたように、Tトークンとは MapToolのマップ上に配置された視覚的なマーカーを表す、MapTool の用語だ。 最もわかりやすい使用例はゲーム内のキャラクターを表現したものだ。言い換えれば、トークンとは仮想ゲームテーブル上に配置されたミニチュアと言えるだろう。
前提
この案内は、はじめての地図作成を読み終え、次のことを理解していることを前提に書かれている。
- 君のリソース・ライブラリにフォルダーを追加し、リソース・ライブラリに表示する画像を追加、及び更新する。
- MapTool上に地図を作製する。
- マップ上にトークンを配置し、移動させる。
- トークンの名前、GMの名前、ラベルを変更する。
- トークンのサイズを変える。
- トークンの画像を変更する。
- トークンのレイヤーを別のレイヤーに移動させる。
以上のことが良くわからないであれば、このガイドの内容を理解することは難しいので、まず「初めての地図作成」を読んでほしい。
最後に、この案内では主にGM(トークンの設定とキャンペーン・プロパティを完全に制御できる人)視点で書かれている。 プレイヤー(ゲームにPlayerの役割で参加している人)は、キャンペーン内で変更を行うことの多くが制限される。
MapToolkのレイヤー
多くのMapToolユーザーは「トークン」という用語をマップ上に配置されたキャラクターとクリーチャーを表現した画像のことだけを指して使用しているが、実際には、「トークン」という用語はMapToolのマップ上に配置したあらゆる画像のことを示している。 各トークンの扱われ方は、トークンの置かれたマップレイヤーに依存している。 それぞれのレイヤー上でトークンがどのように作用するのかは大事なことなので、各レイヤーについて説明しておく。
- Tokenレイヤーに置いたアイテムは、一般的にゲームに登場する人々やクリーチャー達である「トークン(キャラクター、モンスター、NPCを表現したもの)」と見なされる。
- Objectレイヤーに配置するアイテムは、通常、家具や収納箱、ゲームの世界に存在する操作したり使うことができるさまざまな物を表現する画像だ。もちろん、これもトークンであるが(MapToolにとってはどれもみなトークンであることはゆるぎない)、「キャラクター」を表すトークンと混同することを避けるために、多くのユーザーがこのトークンを「オブジェクト」と呼んでいる。
- Background レイヤーに配置するアイテムは、主にマップを構成する壁、絶壁、地面、草地などである。配置されたアイテムはそれぞれ固有のものではあるが、ほとんどの場合はパターンや、同じ画像を複製したもののために、マップ上に何度も繰り返して「スタンプ」を押すように配置される(例えば、壁の画像を使用して完成した部屋を作るために)。そんな訳で、ユーザーの多くはこの画像をスタンプと呼んでいる。
Hidden レイヤー
上記の段落でHiddenレイヤーについて触れなかったことにお気づきだろう。その理由は、Hiddenレイヤーはちょっと変わった目的で使われるからだ。
Token、Object、Backgroundレイヤーは、ゲームの世界を想像することに対して、適切で直感的な関係がある。「私は人間かクリーチャー(person or creature)であり、あそこにあるのはモノ(object)だ。そして私の周りには背景(background)がある」といったように。一方、Hiddenレイヤーは見えないのだ。MapToolにおいて、Hiddenレイヤーに配置されたものはGMが他のレイヤーに移動させない限り、GMにしか見えないのである。
概ね、このレイヤーにはキャラクターとオブジェクトを置きたくなるだろう。Hiddenレイヤーに背景のスタンプを置く理由は見当たらないので。君が二つのことを考えるのは確実だが。
言うまでもないが、MapToolの地図上にトークンを配置する際は、どのレイヤーにトークンを配置しようとしているのか意識しながら配置することをお勧めしておく。
新しいトークンの作成
トークンを作成するには単にリソース・ライブラリからマップ上のトークン・レイヤーにドラッグ&ドロップで持ってくれば良い。しかし、最初の場所に画像を作るにはどうしたら良いだろうか?それにはいくつかの方法がある。
画像をダウンロードする
MapToolのユーザーが集まるコミュニティには利用可能な豊富なトークン画像が豊富にそろっている。RPTools Gallery に訪れて、そこにある大量のトークン画像を見てもらいたい。
TokenToolを使って作る
MapToolの制作者たちが作った、簡単かつ迅速にトークン画像を生成するプログラムである TokenTool を使用する方法もある。TokenTool を使用してトークン画像を作るには、
1. TokenTool をダウンロードし、拡張子が.jar(Javaプログラムを実行するJARファイル)をダブルクリックする。
2. 君のお好みの画像を見つけてきて(著作権には気をつけるように!)TokenToolの左側のペイン(黒い背景上に緑色の輪っかがあるところ)にドラッグする。
3. 画像が表示されたら、緑色の輪の中にちょうど良く収まるようにドラッグして動かしてくれ。TokenToolのウィンドウの右上にはトークンがどのように見えるか確認できるプレビューが表示されているはずだ。
- ヒント:マウスホイールやズームボタンで画像のサイズを調整することができる。
- ヒント:ウィンドウの右側にあるドロップダウンメニューから選ぶことで、トークンの枠と出力サイズを変更することができる。
4. 上手に作成できたら、File → Save Token を選択し、新しく作ったトークン画像をリソース・ライブラリか、これからリソース・ライブラリに加えようと強いる場所に保存してくれ。保存するファイル形式はPNG形式である。(透過に対応していてトークン枠の外側を透明にできるので大変便利な形式だ)
5. MapToolに戻ってリソース・ライブラリを更新すると、いましがた作成した新しいトークンが表示されるはずだ!あとはドラッグしてマップに配置するだけだ。
自分の手で描く
画像編集ソフトを使って描いた作品をリソース・ライブラリかこれからリソース・ライブラリに加えようとしている場所にPNGかJPEG形式で保存することで、トークン画像を作ることができる。MapToolトークンに使用する画像形式はPNG形式を推奨する。透過に対応しており、通常なら画質が最も良いからだ。
もちろん、自分で作った画像をそつなく仕上げるためにTokenToolで仕上げることも可能だ。
トークンを編集する
トークンの編集とはトークンのさまざまな特性(画像、名前、設定など)に変更を加えることだ。名前、画像、サイズの変更については初めての地図作成で説明している。
次のセクションでは、Edit Tokenダイアログのさまざまなオプション、タブ、ドロップダウンボックスについて説明する。
トークンのタイプ
トークンはNPCとPCの2つのタイプがある。プレイヤー・キャラクターとノンプレイヤー・キャラクターの略語であるこの言葉はロールプレイング・ゲーマーにお馴染みであり、実際のゲームでは、このタイプ設定の最も一般的な使い方は二つのグループを区別することである。
通常、君のプレイヤーが扱うトークンはタイプをPCに、君が扱うのであればNPCに設定すれば良い。
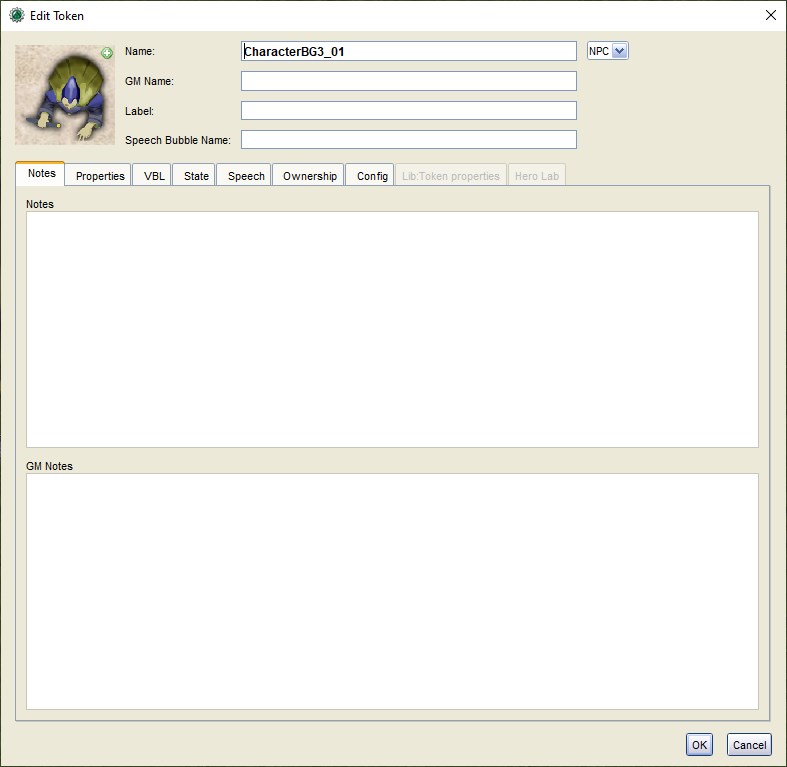
注:トークンのタイプはトークンの操作権限やプロパティの閲覧権限の設定と関連づいていない。それらはトークンのowner設定によって行われる。GM の場合は、キャンペーンにおけるマップ上の全てのトークンの所有権を持っているものとして扱われる。下記の所有権(Ownership)に詳細があるので参照のこと。
トークンのタイプを変更するには、
1. トークンをダブルクリックして Edit Token ダイアログを表示。
2. 右上の隅のドロップダウンリストを操作してPCかNPCを選択。
3. OK をクリックする。
Notes
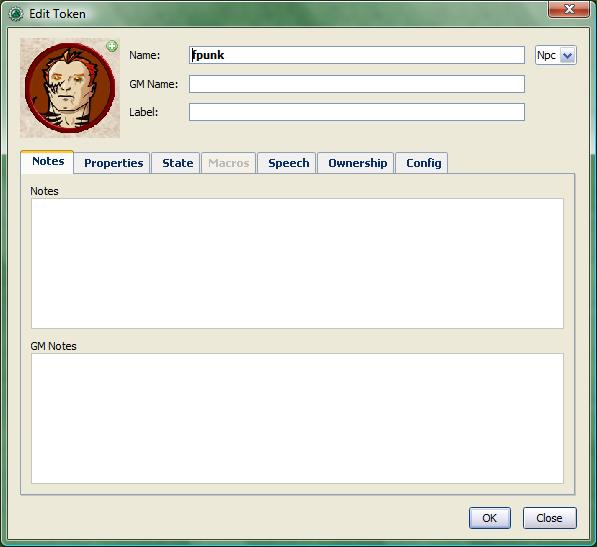
この Notes タブにはトークンについてのノートを書ける2つのエリアがある。それぞれの入力エリアは基本的なHTMLタグに対応しているので、装飾した文章を書くことが可能だ。
上側のテキスト入力エリアは、見ようとしただれからでも見ることが可能なノートを書くためにある。下側の('GM Notesと見出しが付けられた)エリアはGMのみが見ることができるノートを書くためのものだ。
ノートにはちょっとした仕掛けがあり、MapTool は気のきいたポップアップとして表示することができるが、、そのためには上側のノートを書く必要がある。
- トークンのノートの入力エリアに情報を入力する。
- 右クリックをしてChange To > からObject Layer か Background Layer を選択。
- Token Layer に戻る。
マウスカーソルをトークンの上にかざしたときにカーソルの形が「手」の形になることに気づくだろう。ダブルクリックした場合、Edit Token ダイアログが表れる代わりに、ノートが記された小さなポップアップが画面の左下の隅に表示されるはずだ。
ここで重要なことは、トークンのノートを利用する方法はいくつもあるが、より一般的な使用方法は Object レイヤーか Background レイヤー上のトークンに注釈や備忘を付けることだ。
Properties
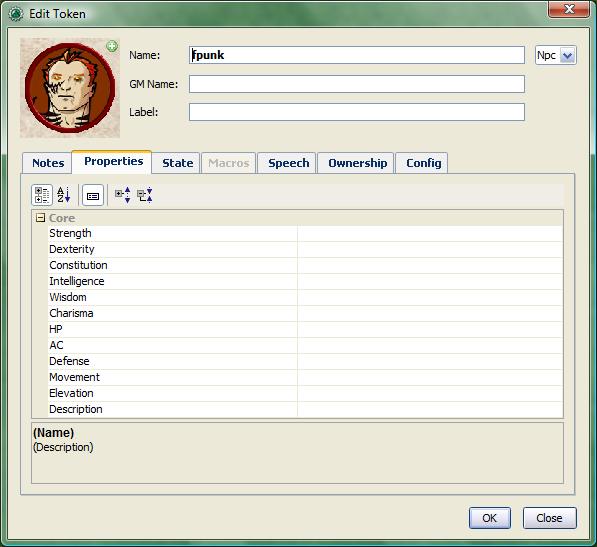
Properties は、独立した案内として説明するに値するテーマであり、トークンの作成とマクロの使用に深く関わるものだ。この案内で厄介なプロパティの詳細に触れるつもりはないが、その代わりに、ごく基本的なことについて説明することにしよう。
マップ上に配置されたトークンは、もれなく自動的に一通りの properties (基本的にはステータス、特性、特徴などのキャラクターシート上で良く見られるものだ)が与えられる。実質的に、各トークンはトークン自信に組み込まれたキャラクターシートを持ち歩いているといえる。プログラミング用語において、プロパティはさまざまな値を設定することが可能な変数であり、マクロにより再利用することができる。
- 注: 皆が頻繁にトークン・プロパティを参照するが、Edit Token ダイアログに表示されるプロパティはキャンペーンにおいて設定されているプロパティだけである。
Edit Token ダイアログの Macros タブをクリックしたら、君が使用しているキャンペーンで、現在設定されているプロパティの一覧を確認できるだろう。新しいキャンペーンを開いた後やマップツール開始直後てあれば下記のとおり標準のプロパティが表示されるはずだ。
- Strength
- Dexterity
- Constitution
- Intelligence
- Wisdom
- Charisma
- HP
- AC
- Defense
- Movement
- Elevation
- Description
この案内の残りの部分では、実例を示す場合は上の一覧にあるプロパティを使用する。
プロパティの一覧は、左にプロパティ名、左側に空白がある表形式(エクセルみたいな形式)になっている。右側の空白には、君の望む値をプロパティの値として入力することが可能だ。君はテキストや数値を入力でき、もっと進んだ使い方としてはマクロ文をそのプロパティの値として記述することもできる。
プロパティを編集し、 OK をクリックすると、そのトークンのプロパティは入力した値に設定される。その後マクロを記述するのであれば、なにかを算出したり、ダイスロールのためにプロパティの値を参照することが可能になる。
ここでは簡単に紹介したが、プロパティは重要なテーマであるので、詳しい情報を得るために初めてのプロパティの案内を良く読んでほしい。
State
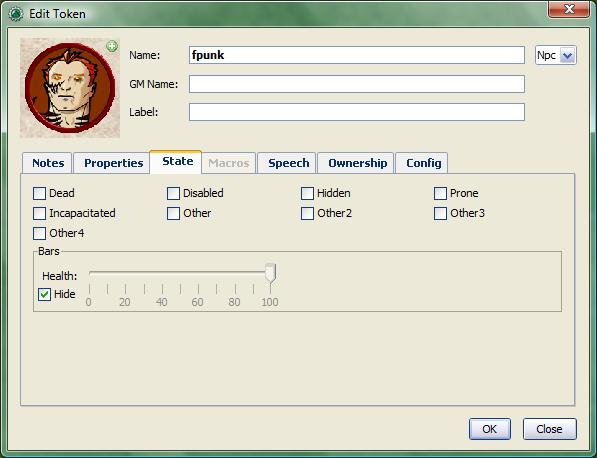
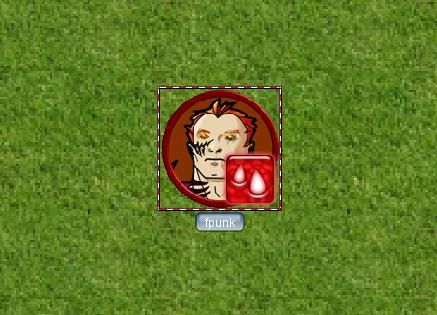
States are visual markers that can be applied to a token (typically appearing as an image superimposed on the token) that can be used for any sort of reminder that you might need in a game. For instance, if you want a marker that a particular NPC token is "dead", you can set the state "Dead" on the token, and whatever image you've selected to indicate "Dead" will appear on the token.
The default states that load when MapTool starts are:
- Dead
- Disabled
- Hidden
- Prone
- Incapacitated
- Other
- Other 2
- Other 3
- Other 4
Health Bar
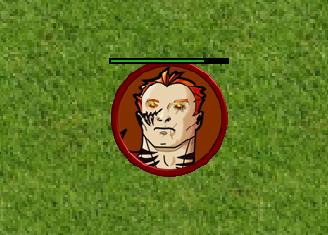
The State tab also contains the setting information for the bars that the token displays or can display. These bars are shown superimposed over the token (at the top, bottom, or sides), and can be used to track things like health (or ammunition, magic, or anything that can be lost or expended).
Macros
As of MapTool version 1.3.b54, the Macros tab is no longer enabled. This tab originally held the token macros, but as macro capabilities became more advanced, this tab became less and less useful, until finally, it was removed. It is present in earlier versions, though, if you want to take a look.
Speech
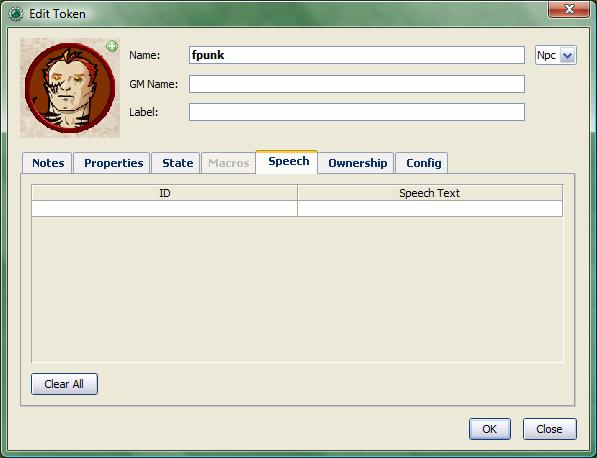
This tab contains the token's speech list. You can use this tab to configure sayings, aphorisms, battlecries, and anything you might want your token to "say" in chat. There are two fields for each speech item:
- ID: This field is the short identifier you assign to a speech item; the ID is used in chat to refer to the full text of the speech. It can be alphanumeric, so you could use number, or letters, or a mix. It cannot have any spaces in it, though!
- Speech Text: This is the actual text that will be displayed in the chat window.
To use a speech item, do the following:
- Select the token you want to have "say" something
- In the chat window, enter /tsay (ID), where "(ID)" is replaced by the actual ID of the speech item. So if you wanted to howl your battlecry - which you've cleverly given the ID "bcry" - you would select your token, and enter /tsay cry in the chat window.
Ownership
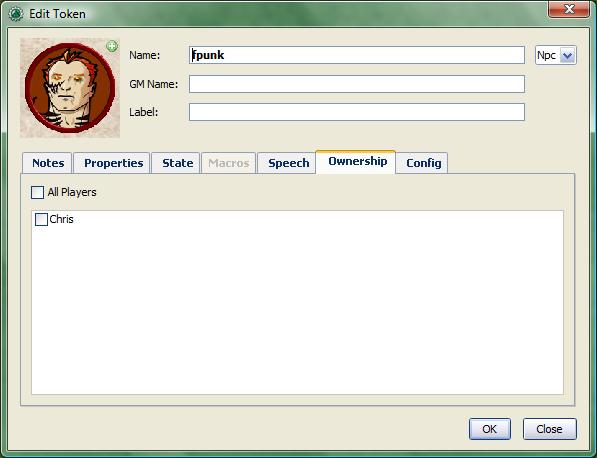
Token ownership determines who among the players connected to the game is allowed to select, move, or view the details of a given token.
If you are the owner of a token, you may select it, double-click on it to open and edit it, and move it around on the map. If you are not an owner of a particular token, you are limited to looking at it on the map -- you will not be able to select, move, or view its properties and configuration.
To set an owner, simply check the box next to that individual's name. The names shown in the box will be the names of each player (including the GM) connected to the game (so if you're looking at the Ownership tab when nobody else is connected, you'll see only your own name). If you want to give ownership to all players, just check All Players.
(Note that the selection of options when the server is started must include Strict token ownership if you want the functionality described above. See Introduction to Game Hosting#Starting Up a MapTool Server for details on server options.)
Config
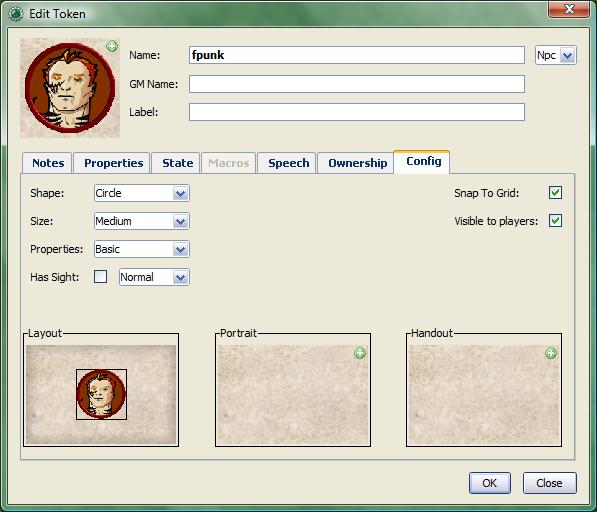
This tab contains a number of settings that affect how the token looks, moves, and interacts with MapTool.
Shape
Tokens can have three shapes in MapTool:
- Top Down: top-down tokens are usually hand-drawn or rendered images of creatures, objects, and people as if you were looking down from an aerial view. Setting the token shape to Top-down tells MapTool to allow the token image to rotate when you right-click on the token and select Change Facing (that way, your top-down token can turn to face its enemies!)
- Circle: circular tokens are like pogs or poker chips - round images that represent the creature or character. Because they are markers and not meant to be realistic "top-down" views of a creature, when you select Change Facing, instead of rotating the image - which would look bad - a small yellow arrow appears to indicate facing.
- Square: square tokens work like circular tokens, except that they are...wait for it...square.
Size
A token can be given a number of sizes, which scale the token image larger or smaller.
The available size depend on the map grid used when setting up a map. If you set a map with a grid (hexagonal or square), you will have the Free Size option (which lets you scale the token as you need), or a number of sizes from "Fine" to "Colossal" (if you play D&D, you'll probably recognize them).
If you do not set a grid when you create the map, you will be able to scale the token along a number scale, from -11 to +20.
Properties
This field allows you to indicate which of the available property sets in the campaign this token has. The designer of a campaign can set up different sets of properties to be used by different tokens (for instance, a set of properties for player character tokens, and a different set of properties for non-player character tokens). This field lets you pick which property set to use.
Has Sight
This field allows you to indicate what kind of sight the token possesses. Sight settings allow the gamemaster to simulate darkness, light, hidden objects, and hiding enemies.
Snap to Grid
This checkbox simply indicates that the token snaps to the existing grid when it is moved. If unchecked, the token does not pay any heed to the grid when it is dragged around on the map.
Visible to Players
This checkbox lets you designate a particular token as invisible to players - when checked, no player connected to the game will be able to see the token or interact with it in any way.
Layout, Portrait, and Handout
There are three fields dealing with the token's visual appearance:
- Layout: this shows how the token will look on the map
- Portrait: this is a separate image that will appear in the lower left corner of the map screen when you hover over the token
- Handout: this lets you designate an image to appear when you right-click on the token and select Show Handout