Introduction to Properties/fr: Difference between revisions
Thallaxwish (talk | contribs) |
Thallaxwish (talk | contribs) |
||
| Line 46: | Line 46: | ||
Dans ce champ, vous pouvez saisir le nom que vous souhaitez à un ensemble de propriétés. Ce nom apparaîtra dans la liste ''Token Type'', lorsque vous cliquerez sur le bouton '''update''' (mettre à jour). Vous pouvez mettre n'importe quels noms; certains utilisateurs appellent des ensembles "PNJ" lorsque les caractéristiques et les traits des PNJ diffèrent de ceux des PJ, par exemple. | Dans ce champ, vous pouvez saisir le nom que vous souhaitez à un ensemble de propriétés. Ce nom apparaîtra dans la liste ''Token Type'', lorsque vous cliquerez sur le bouton '''update''' (mettre à jour). Vous pouvez mettre n'importe quels noms; certains utilisateurs appellent des ensembles "PNJ" lorsque les caractéristiques et les traits des PNJ diffèrent de ceux des PJ, par exemple. | ||
=== | ===Propriétés=== | ||
C'est à partir d'ici que | C'est à partir d'ici que ça devient intéressant. Dans cette zone de texte, vous pouvez créer tout et n'importe quoi pour refléter tous les nombres et caractéristiques qu'un personnage de jeux de rôle peut avoir (ainsi que toutes celles qu'il n'a pas -- de nombreux utilisateurs créent des propriétés qui leurs sont utiles pour l'écriture de leur Macros mais qui n'apparaissent pas dans la feuille de personnage !). | ||
==Créer un ensemble de Propriétés== | ==Créer un ensemble de Propriétés== | ||
Revision as of 08:32, 19 June 2009
Propriétés de Campagne
Un des aspects les plus utiles dans MapTool est la capacité des Pions à emporter avec eux tout un jeu de Propriétés, attachée à ce Pion, et qui peuvent être manipulées à travers des Macros ou utilisées pour créer des aperçus rapides de certaines informations. En d'autres termes, ces jeux de propriétés ressemblent à des feuilles de personnage intégrées.
Toutefois, puisqu'ils sont si utiles, les développeurs de MapTool ont créé différents moyens pour les utiliser et les manipuler. Ce guide traitera donc de la création d'un Jeu de Propriétés de Campagne, des valeurs par défaut à saisir pour les différents paramètres et comment les utiliser pour manipuler la feuille de personnage.
Un exemple de règles : MTRPG
De manière à pouvoir disposer d'exemples concrets alors même que ce tutoriel était en cours d'écriture, de nombreux utilisateurs et contributeurs de MapTool ont développé les règles de MTRPG (MapTool Role Playing Game) -- un système de jeu simple développé spécifiquement pour illustrer les différentes parties de MapTool. Pour ce guide, nous créerons un nouveau fichier de campagne puis nous construirons quelques propriétés de campagne (campaign properties) qui correspondent aux spécificités de MTRPG
La fenêtre Propriétés de la Campagne (Campaign Properties)
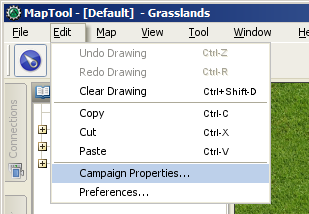
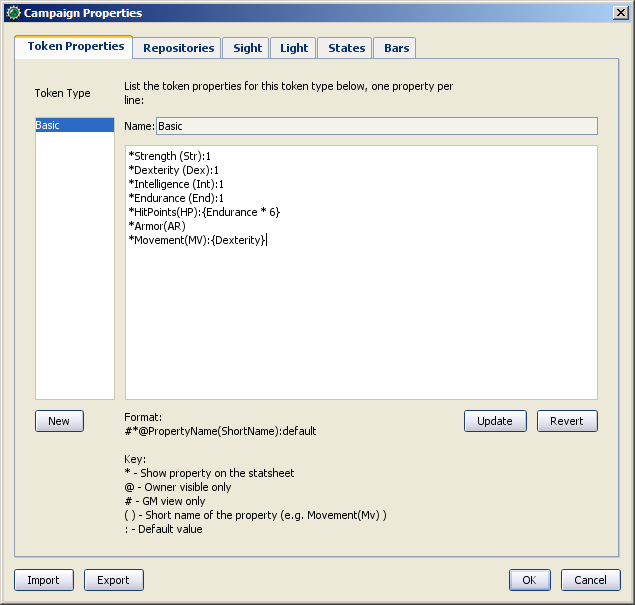
Pour intervenir sur les propriétés de la campagne, vous devez aller dans Edit > Campaign Properties..., qui ouvrira la fenêtre Propriétés de la campagne (Campaign Properties). Dans cette fenêtre, vous verrez de nombreux onglets et une foule d'informations.
Quand vous ouvrez la fenêtre Propriétés de la campagne (Campaign Properties), six onglets apparaissent et concernent :
- Token Properties (Propriétés du Pion): cet onglet héberge toutes les jeux de propriétés qu'un Pion peut avoir.
- Repositories: dans cet onglet, vous pouvez définir un site distant pour accueillir vos fichiers de campagne, et plus particulièrement les images, de manière à améliorer vos temps de chargement et votre vitesse lors des parties sur Internet.
- Sight (Vision): cet onglet est dédié au réglage et à la configuration de la vision.
- Light (Lumière): cet onglet est consacré a la configuration des sources de lumière et des auras .
- States (États): cet onglet sert à la configuration des État des Pions.
- Bars (Barres): ici vous pouvez régler les différentes barres de Pion.
Les informations affichées concernent uniquement la campagne en cours.
Ce guide est uniquement consacré au premier onglet Propriétés du Pion (Token Properties).
L'onglet Propriétés du Pion (Token Properties)
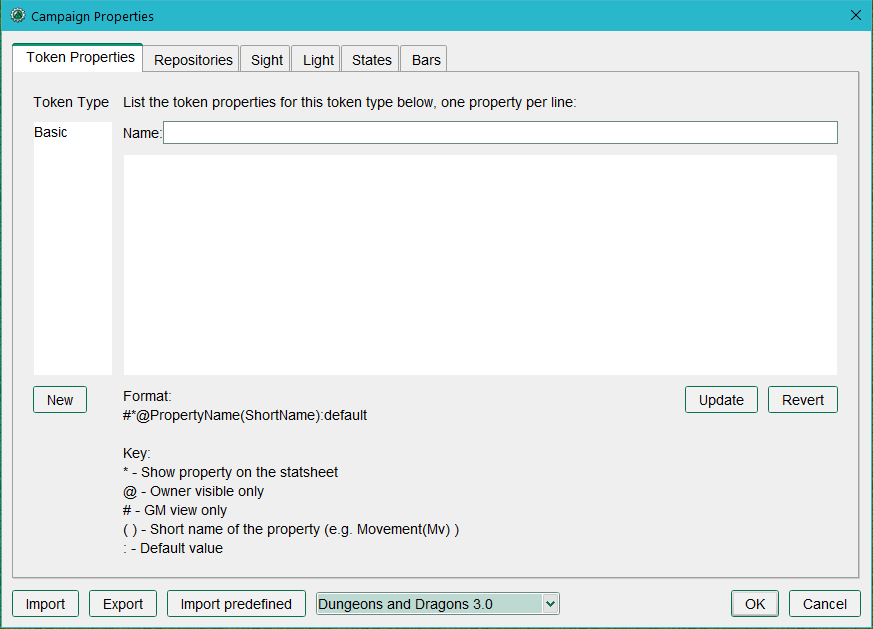
Le premier onglet visible est l'onglet Propriétés du Pion (Token Properties). cela parait relativement simple, mais il abrite quelques possibilités vraiment formidables. Il y a trois zones de texte dans cet onglet :
- Nom (Name): Il s'agit du nom de l'ensemble de propriétés que vous êtes en train de consulter. Quand vous ouvrez la fenêtre, aucun ensemble de propriétés n'est sélectionné.
- Type: cette colonne sur le coté gauche n'est pas éditable, mais fournit une liste de tous les ensembles de propriétés de la campagne courante. Si vous n'avez chargé aucune campagne, la seule entrée est Basic.
- Une large zone de texte dans laquelle vous pouvez saisir les propriétés de la campagne courante. Vide à l'ouverture de la fenêtre, vous obtenez le nom et la valeur par défaut de toutes les propriétés associées à chaque ensemble lorsque vous les sélectionnez dans la partie Type de Pion (Token Type).
Type
Dans ce champ, vous obtenez les noms des différents types de propriétés (que vous pouvez considérer comme des ensembles de propriétés) qui ont été configurés dans la campagne en cours. Si vous n'avez chargé aucune campagne, l'ensemble de propriétés par défaut affiché sera Basic. Le champ type n'est pas modifiable directement par l'utilisateur.
Nom (Name)
Dans ce champ, vous pouvez saisir le nom que vous souhaitez à un ensemble de propriétés. Ce nom apparaîtra dans la liste Token Type, lorsque vous cliquerez sur le bouton update (mettre à jour). Vous pouvez mettre n'importe quels noms; certains utilisateurs appellent des ensembles "PNJ" lorsque les caractéristiques et les traits des PNJ diffèrent de ceux des PJ, par exemple.
Propriétés
C'est à partir d'ici que ça devient intéressant. Dans cette zone de texte, vous pouvez créer tout et n'importe quoi pour refléter tous les nombres et caractéristiques qu'un personnage de jeux de rôle peut avoir (ainsi que toutes celles qu'il n'a pas -- de nombreux utilisateurs créent des propriétés qui leurs sont utiles pour l'écriture de leur Macros mais qui n'apparaissent pas dans la feuille de personnage !).
Créer un ensemble de Propriétés
Propriétés sans valeur par défaut
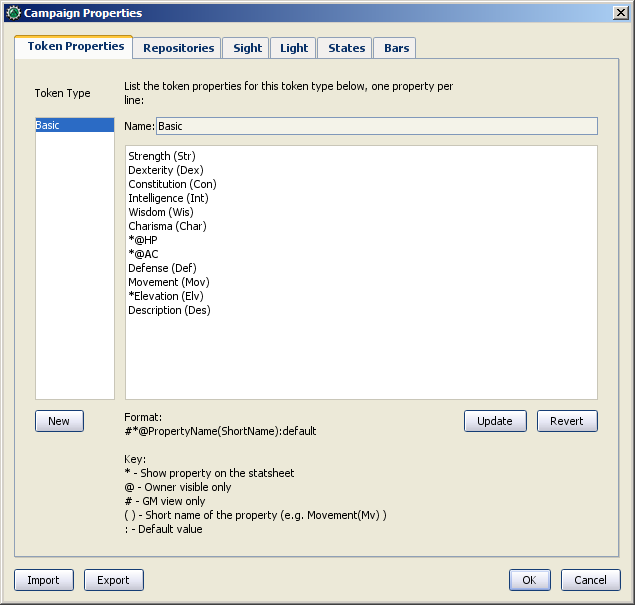
If you look at MTRPG's Primary Attributes, you will see that there are four separate attributes that are the basic attributes of a character: Strength, Dexterity, Intelligence, and Endurance. We're going to get rid of the default properties, and put new ones in their place.
1. Go to Edit > Campaign Properties. You'll see in the left side, under Token Type, that the only entry is "Basic." We're going to create a new property set.
2. In the Token Type list on the left, select Basic. When you do this, you'll see a whole bunch of properties with all kinds of symbols like @, #, and so forth.
3. In the text area with all the properties, use your mouse to highlight them all, and hit Delete on your keyboard. Go ahead - don't be shy!
4. Leave the Name field alone - MapTools must always have a Basic property set, so you can't change that name.
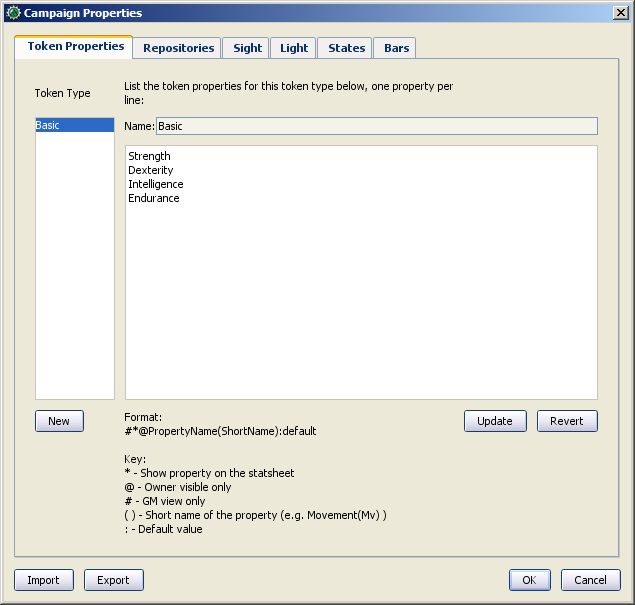
5. In the text area below the Name field, enter the name of each of the four Primary Attributes in MTRPG, like so:
Strength
Dexterity
Intelligence
Endurance
When done, your properties window should look like the screenshot on the right.
6. Once you've finished entering the properties you want, click the button labeled Update. Don't panic! The properties will disappear, but if you select the Basic list from the left, your properties will reappear in the main text area.
7. Click OK to confirm all of your changes and close the Campaign Properties window.
8. Go to File > Save Campaign As and save your campaign as MTRPG.cmpgn. You've now created a new campaign file, with a new set of campaign properties.
When you create properties like this -- just listing the values one after the other -- and then open a token, you will see that these properties have no value. That does not mean that they are equal to zero, or equal to a blank line - they literally have no value. This doesn't mean much for most purposes, but it is an important distinction in macro writing terms (in programming, there's a big difference between a blank string, and an actually empty variable!).
Once properties are updated, all of the tokens on the map will be updated with the new properties, and any new tokens you drop on the map will "inherit" the properties you set up.
NOTE: Property names cannot have spaces in them - so if you have a property called "Hit Points", you would need to enter it as HitPoints.
Creating Properties with Default Values
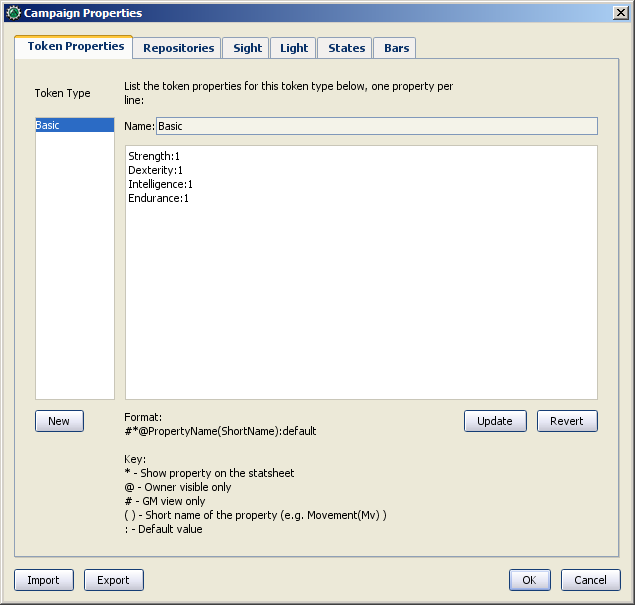
Now, in MTRPG, the minimum value an attribute can have is 1. So, it makes sense to set the default value of these properties to 1 (that way, every new token will at least have the minimum value an attribute can have). To do this:
1. Open the Campaign Properties window.
2. Select the Basic property set.
3. In the Basic Properties set, edit your properties so they now read (see the image, as well):
Strength:1
Dexterity:1
Intelligence:1
Endurance:1
4. Click Update.
By placing a colon at the end of the name of each attribute, and putting the number 1 after the colon, you have instructed MapTool that the default value for those properties is 1 (in other words, whatever value you put after the colon becomes the default value for that property). You'll note that at the bottom of the Token Properties tab there is a key describing the various options you can set on a property.
Now, if you drag a new token onto the map and look at its properties (double-click on the token and go to the Properties Tab in the Edit Token dialog), you will see that the new token has the default values.
By the way: don't worry about any tokens you may have already set the property values on - setting up or changing the default values will not override the properties you've already set. MapTool is smart enough to handle that.
Displaying Properties in the Statsheet
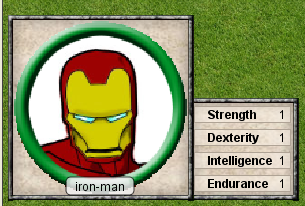
MapTool has a neat feature called the Statsheet, which is briefly mentioned in the Introduction to Tokens - basically, it is an automatic popup that appears in the lower left corner of the map, when you hover over a token.
You may be saying, "Wait...when I hover over my token, there's no statsheet! Where is it?" The reason you don't see it yet is that the Statsheet is governed by the Campaign Properties - it displays the token's properties (along with a larger version of the token's image) - but only when a couple requirements are met:
- The properties are set up to display on the statsheet; and
- The properties that are displayed actually have a value
Setting Properties to Display
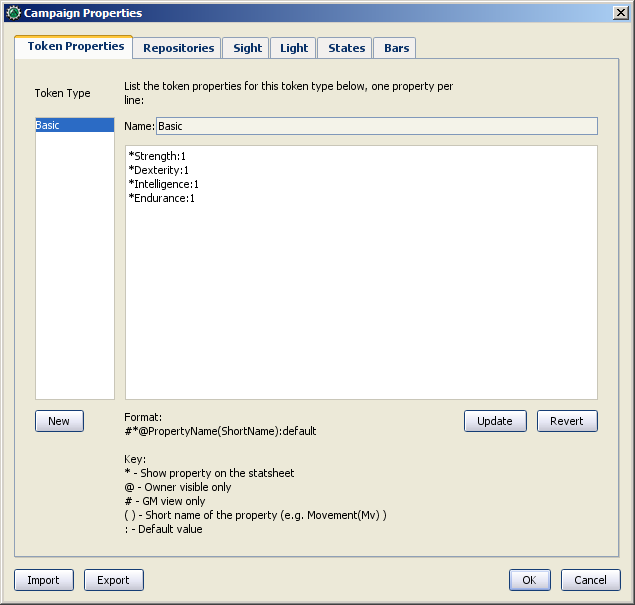
If you look at the bottom of the Token Properties tab in the Campaign Properties dialog, you'll see a key showing how to set up a property to display in the Statsheet. There are three display options, each of which is indicated by putting a symbol in front of the property name:
- *: an asterisk means "show this property on the statsheet"
- @: means "only show this property to the owner of the token (and the GM)"
- #: means "only show this property to the GM (not even the token owner can see it)"
The asterisk is required for any stat to display at all - if you don't have an asterisk first, it won't show no matter what else you put on there. The @ and # symbols, on the other hand, are optional.
So, for our new game, we're going to set all of the properties to be visible to everyone (by just using a star). To do this, open up your properties, and edit them to look like this:
*Strength:1
*Dexterity:1
*Intelligence:1
*Endurance:1
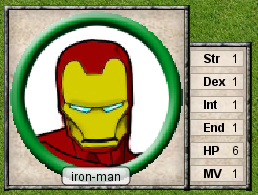
Now, when you hover over a token, you'll see the Statsheet pop up (see the screenshot, above) with the values in the Strength, Dexterity, Intelligence, and Endurance properties. Also, since even brand new tokens have a default value, the Statsheet will appear for all tokens.
Short Names
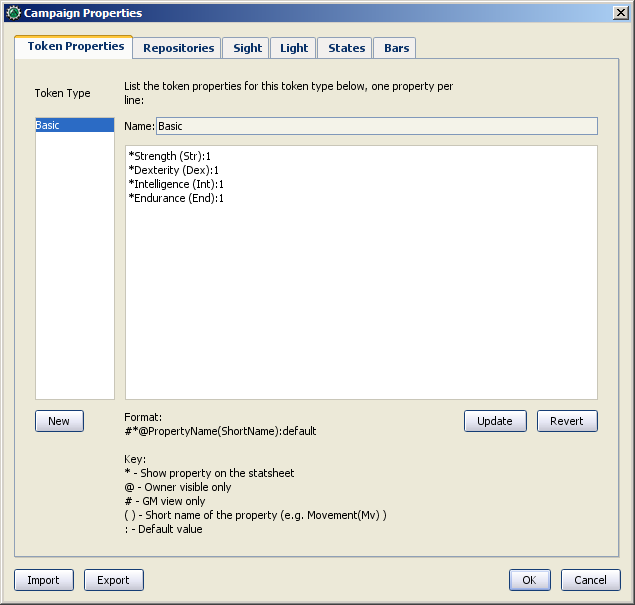
Sometimes, property names can get pretty long (or look unfriendly - no spaces, and all that). MapTool lets you put a Short Name in for each property. To do that, you just enter the short name in parentheses after the property name, like so:
*Strength(Str):1
*Dexterity(Dex):1
*Intelligence(Int):1
*Endurance(End):1
These short names are displayed in the Statsheet instead of the full name of the property
Short Names are for display purposes only - when referencing properties in macros, you must use the full property name.
Creating Derived Properties
Okay, now let's do something pretty cool. In a lot of roleplaying games, there are character attributes that are derived from other stats - for instance, in the Savage Worlds rules, your "Parry" stat is based on your Fighting ability; likewise, in Dungeons & Dragons, your "Hit Points" are derived partly from your "Constitution" score.
Now, you could create these other derived attributes as separate properties and manually enter the values in when you make a new token - but how about we allow MapTool to calculate these derived values? That's right - MapTool's campaign properties can not only be numbers and text, but also calculations and equations based on other properties that the token has.
In MTRPG, there are three derived stats: Hit Points, Armor, and Movement. These stats have the short names "HP", "AR," and "MV." For this example, we're going to set up Hit Points and Movement to be calculated from existing properties. We'll leave Armor until later (it takes a bit more complex a calculation to figure out the armor value, and we're taking it slow).
First, we need to add properties for these three derived values:
1. Open up the Basic property set.
2. Beneath Endurance, enter the following:
*HitPoints(HP)
*Armor(AR)
*Movement(MV)
You'll notice at this point, we've set no default values. Don't hit Update just yet - let's enter some macro code to create a derived value.
We can see from the MTRPG rules that Hit Points is equal to the value of Endurance multiplied by 6. Replicating this calculation in the campaign properties is very simple. Edit the Hit Points property to read:
*HitPoints(HP):{Endurance * 6}
What we've done here is enter a default value for the property (remember, default values are whatever comes after the colon), and used some macro code to instruct MapTool to perform a calculation in order to find the value for the properties. Two thing are happening here:
- We've enclosed the calculations in { }, which warns MapTool that the text enclosed inside the brackets is to be handled like a macro, and not just plain text
- Inside the brackets, we've said, "Find the value of the Endurance property, multiply it by 6, and make that result the value of the Hit Points property"
Now, to handle the Movement attribute, our job is even simpler: we need to instruct MapTool to get the value of the Dexterity property, and assign that same value to the Movement property. To do so, edit the Movement property to read:
*Movement(MV):{Dexterity}
When you are finished, your full property set should look like:
*Strength:1
*Dexterity:1
*Intelligence:1
*Endurance:1
*HitPoints(HP):{Endurance * 6}
*Armor(AR)
*Movement(MV):{Dexterity}
And when you hover your mouse over a token, the Statsheet should look like the screenshot to the right. Remember, even though we've said that Armor should be displayed on the statsheet, the statsheet only shows properties that have a value - Armor is still empty, so it won't show up until you give it a value.
Some Technical Details
A couple times in this guide and in other guides the token properties have been described as "those properties that are visible" in this campaign, or the properties set up "for this campaign." There's a reason for phrasing it like this.
See, a token - if you cut one open and looked at its inner workings - is an XML file that contains a ton of information. It has information about its image, its size, its vision, light, and shape, and - of course - its properties. What's important to understand here is that the token will remember not only the properties from the MTRPG, but if it was ever saved as an .rptok file or brought in from another campaign file, it will remember the properties from that campaign too. They won't be visible, but they're stored in the token even so.
So, in reality, a set of Campaign Properties really indicates those properties that:
- You can see if you open up a token by double-clicking on it, and
- You can directly edit by clicking in the cell next to them
This may sound like a recipe for disaster - what if you set up a property that was already set up but is hidden? Fortunately, MapTool will not, when running a macro, attempt to access any hidden properties unless you specifically instruct it to do so, using two special macro functions. So rest assured, you cannot accidentally access a property that's not set up in the Campaign Properties.
Moving On from Here
MapTool supports very elaborate properties and derived properties, with a number of math functions and operations. A couple of the most common ones you might want to use are (the examples are not necessarily part of MTRPG; they're just examples):
- Basic math operators: addition (+), subtraction (-), multiplication (*), and division (/)
- Example: HitPoints: {Endurance * 6}
- Rounding: there are some functions to let you round numbers when you divide
- Floor: the floor() function rounds down. Example: HitPoints:{floor(Constitution / 2)} would divide Constitution by two, and round down
- Ceiling: the ceil() function works like floor(), but rounds up. Example: HitPoints:{ceil(Constitution/2)}
{{#customtitle:Introduction aux Propriétés|Introduction aux Propriétés}}