MapTool User Interface: Difference between revisions
(→Toolbar Overview: Fill in section.) |
m (Added a note about hovering over a token to see the stat sheet, and a reference to a new Stat Sheet page) |
||
| (105 intermediate revisions by 10 users not shown) | |||
| Line 1: | Line 1: | ||
{{ | {{Languages|MapTool User Interface}} | ||
This is reference documentation of MapTool's user interface (UI) features including descriptions of all the menus and panels. It is intended for intermediate users who want to quickly learn about a particular feature | {{Beginner}}[[Category:Feature Guide]] | ||
This is reference documentation of MapTool's user interface (UI) features including descriptions of all the menus and panels. It is intended for beginning and intermediate MapTool users who want to quickly learn about a particular feature or explore MapTool's UI features in more detail. | |||
If you are just getting started with MapTool, it is recommended to read the [[Introduction to Mapping]], or visit the [[Main Page]] to browse for beginner articles. | If you are just getting started with MapTool, it is recommended to read the [[Introduction to Mapping]], or visit the [[Main Page]] to browse for beginner articles. | ||
| Line 11: | Line 12: | ||
The default layout also docks the `Resource Library` panel at the top left side, and a tabbed panel containing the `Map Explorer` and `Draw Explorer` in the lower left side, and the `Chat` panel. This default layout can be restored by selecting Window > Restore Layout. | The default layout also docks the `Resource Library` panel at the top left side, and a tabbed panel containing the `Map Explorer` and `Draw Explorer` in the lower left side, and the `Chat` panel. This default layout can be restored by selecting Window > Restore Layout. | ||
===Getting Help=== | |||
There are two built-in help features available to you in MapTool before you have to resort to searching the wiki or asking the [https://www.rptools.net/community/ MapTool community]. | |||
* '''Hover Tooltips''': Hovering your mouse over many menu items, buttons, and dialog box options buttons reveal helpful tooltips throughout MapTool. Even macros written by other users might have tooltips, so always take a moment to check if there is a feature you have a question about. | |||
* '''The Status Bar''': Once a tool is selected, instructional help text often appears in the lower left of the [[#Status_Bar|Status Bar]]. Glance down every once in a while to get a handle on the different tools available to you. | |||
===Multiple instances of MapTool=== | ===Multiple instances of MapTool=== | ||
Users may open multiple instances of MapTool at once | Users may open multiple instances of MapTool at once; for example to test the player view on one instance while serving a campaign file in another view on the same computer. When doing this, each instance of the program will have its own application window with its own user interface. | ||
If running multiple instances of MapTool, it is helpful to keep all panels | If running multiple instances of MapTool, it is helpful to keep all panels docked rather than floating to prevent confusion between open instances. | ||
{{Clear}} | {{Clear}} | ||
==Menu bar== | ==Menu bar== | ||
MapTool’s menu bar consists of seven dropdown menus. (Prior to version 1.12.0, there were eight. See the Themes menu below.) <u>Underlined letters</u> in a menu command indicates the hotkey that selects that command when the menu is open. {{ui shortcut|Code-styled commands|MapTool (example)}} next to a menu command indicate a default shortcut key for that command. The {{ui shortcut|Meta|'Control' on Windows and many Linux systems, often 'Command' on Mac}} shortcut key listed is usually the Control key on Windows and Linux and Command on Mac. You can always verify your shortcut keys by looking in the menus of your MapTool installation. | |||
In MapTool 1.5.8 and later, a down/up toggle on the right edge of the menu bar can be clicked to hide/show the toolbar. | |||
=== <u>F</u>ile Menu=== | === <u>F</u>ile Menu=== | ||
| Line 29: | Line 38: | ||
* '''<u>N</u>ew Campaign''' | * '''<u>N</u>ew Campaign''' | ||
: This creates a new campaign file with default properties, states, and a single map called 'Grasslands' configured according to the installation's new map defaults. | : This creates a new campaign file with default properties, states, and a single map called 'Grasslands' configured according to the installation's new map defaults. | ||
* '''<u>O</u>pen Campaign...''' | * '''<u>O</u>pen Campaign...''' {{ui shortcut|Meta-O|Open Campaign}} | ||
: Opens a file explorer window to select and open a MapTool [[Campaign File]]. | : Opens a file explorer window to select and open a MapTool [[Campaign File]]. | ||
* '''<u>S</u>ave Campaign''' | * '''<u>S</u>ave Campaign''' {{ui shortcut|Meta-S|Save Campaign}} | ||
: Saves the current campaign file. If it is a new campaign, MapTool opens a file explorer window to select a save location and name the campaign file. | : Saves the current campaign file. If it is a new campaign, MapTool opens a file explorer window to select a save location and name the campaign file. | ||
* '''S<u>a</u>ve Campaign As...''' | * '''S<u>a</u>ve Campaign As...''' {{ui shortcut|Meta-A|Save Campaign As}} | ||
: Opens a file explorer window to select a save location and name the campaign file. | : Opens a file explorer window to select a save location and name the campaign file. | ||
* '''Save C<u>h</u>at Log History...''' | * '''Save C<u>h</u>at Log History...''' | ||
| Line 40: | Line 49: | ||
* '''Export''' | * '''Export''' | ||
: Submenu containing additional options. | : Submenu containing additional options. | ||
:* '''Screenshot''' | :* '''Screenshot''' {{ui shortcut|Meta+Shift-S|Screenshot}} | ||
: Opens the [[Export Screenshot]] dialog. | : Opens the [[Introduction_to_Mapping#Exporting_Map_Images|Export Screenshot]] dialog. | ||
:* '''Screenshot As...''' | :* '''Screenshot As...''' | ||
: Opens the [[Export Screenshot]] dialog. | : Opens the [[Introduction_to_Mapping#Exporting_Map_Images|Export Screenshot]] dialog. | ||
:* '''Campaign As...''' | :* '''Campaign As...''' | ||
: Opens the Export Campaign dialog, which allows saving a campaign file in a format compatible with older versions of MapTool. | : Opens the Export Campaign dialog, which allows saving a campaign file in a format compatible with older versions of MapTool. | ||
:* '''Campaign Repository File...''' | :* '''Campaign Repository File...''' | ||
: Opens a file explorer window to select a save location and name a ZIP file containing the entire content of the campaign for use as a [[Campaign Repository]]. | : Opens a file explorer window to select a save location and name a ZIP file containing the entire content of the campaign for use as a [[Introduction to Campaign Repositories|Campaign Repository]]. | ||
* '''Add Resource to <u>L</u>ibrary...''' | * '''Add Resource to <u>L</u>ibrary...''' | ||
: Opens the Add Resource to Library dialog, which will add new resources to the Resource Library. | : Opens the Add Resource to Library dialog, which will add new resources to the Resource Library. | ||
* '''Start Server...''' | * '''Start Server...''' | ||
: Starts a new MapTool server from the current instance of | : Starts a new MapTool server from the current instance of MapTool with the currently open campaign file. See [[Introduction to Game Hosting]]. | ||
* '''Connect to Server...''' | * '''Connect to Server...''' | ||
: Connect to a local or remote MapTool server. | : Connect to a local or remote MapTool server. | ||
| Line 68: | Line 77: | ||
[[Image:UI_Menus_Edit.PNG|frame|left|MapTool's Edit Menu]]{{Clear}} | [[Image:UI_Menus_Edit.PNG|frame|left|MapTool's Edit Menu]]{{Clear}} | ||
The Edit menu contains drawing and token editing commands | The Edit menu contains drawing and token editing commands along with access to campaign settings and MapTool preferences. | ||
* '''Undo Drawing''' | * '''Undo Drawing''' {{ui shortcut|Meta-Z|Undo Drawing}} | ||
: Removes the most recent drawing object that was created via the Draw tool. | : Removes the most recent drawing object that was created via the Draw tool. | ||
: ''This menu command only affects drawings created with the Drawing Tool. Token movement can be undone by right-clicking a token and selecting 'Revert last move'. Token removal, and changes to the Vision Blocking Layer and Fog of War cannot be undone/redone. However, the key command may affect text in input areas such as the chat window and macro editor.'' | : ''This menu command only affects drawings created with the Drawing Tool. Token movement can be undone by right-clicking a token and selecting 'Revert last move'. Token removal, and changes to the Vision Blocking Layer and Fog of War cannot be undone/redone. However, the key command may affect text in input areas such as the chat window and macro editor.'' | ||
* '''Redo Drawing''' | * '''Redo Drawing''' {{ui shortcut|Meta-R|Redo Drawing}} | ||
: Re-adds the most recently drawing object that was removed via Undo Drawing. | : Re-adds the most recently drawing object that was removed via Undo Drawing. | ||
: ''This menu command only affects drawings created with the Drawing Tool. Token movement can be undone by right-clicking a token and selecting 'Revert last move'. Token removal, and changes to the Vision Blocking Layer and Fog of War cannot be undone/redone. However, the key command may affect text in input areas such as the chat window and macro editor.'' | : ''This menu command only affects drawings created with the Drawing Tool. Token movement can be undone by right-clicking a token and selecting 'Revert last move'. Token removal, and changes to the Vision Blocking Layer and Fog of War cannot be undone/redone. However, the key command may affect text in input areas such as the chat window and macro editor.'' | ||
* '''Clear All Drawings''' | * '''Clear All Drawings''' {{ui shortcut|Meta+Shift-D|Clear All Drawings}} | ||
: Removes all | : Removes all drawings on the selected layer of the current map. | ||
: ''This menu command only affects drawings created with the Drawing Tool. Tokens, the Vision Blocking Layer, and Fog of War are not affected.'' | : ''This menu command only affects drawings created with the Drawing Tool. Tokens, the Vision Blocking Layer, and Fog of War are not affected.'' | ||
* '''Copy''' | * '''Copy''' {{ui shortcut|Meta-C|Copy}} | ||
: Copies a token to the clipboard. | : Copies a token to the clipboard. | ||
: ''This menu command only affects [[Token|Tokens]], although the key command can affect text in input areas such as the chat window and macro editor.'' | : ''This menu command only affects [[Token|Tokens]], although the key command can affect text in input areas such as the chat window and macro editor.'' | ||
* '''Cut''' | * '''Cut''' {{ui shortcut|Meta-X|Cut}} | ||
: Cuts a token, removing it from the map and placing it in the clipboard. | : Cuts a token, removing it from the map and placing it in the clipboard. | ||
: ''This menu command only affects [[Token|Tokens]], although the key command can affect text in input areas such as the chat window and macro editor.'' | : ''This menu command only affects [[Token|Tokens]], although the key command can affect text in input areas such as the chat window and macro editor.'' | ||
* '''Paste''' | * '''Paste''' {{ui shortcut|Meta-V|Paste}} | ||
: Pastes any token in the clipboard to the current map underneath the current cursor position. | : Pastes any token in the clipboard to the current map underneath the current cursor position. | ||
: ''This menu command only affects [[Token|Tokens]], although the key command can affect text in input areas such as the chat window and macro editor.'' | : ''This menu command only affects [[Token|Tokens]], although the key command can affect text in input areas such as the chat window and macro editor.'' | ||
* '''Campaign Properties...''' | * '''Campaign Properties...''' | ||
: Opens the [[Campaign Properties]] dialog. These are settings which are saved with the current campaign such as token properties, states, and more. | : Opens the [[Introduction to Properties|Campaign Properties]] dialog. These are settings which are saved with the current campaign such as token properties, states, and more. | ||
* '''Preferences...''' | * '''Preferences...''' | ||
: Opens the [[MapTool Preferences|Preferences]] dialog. These are settings which are saved with the local installation of MapTool. They are not saved with a campaign, and will need to be reconfigured on any new installation of MapTool. | : Opens the [[MapTool Preferences|Preferences]] dialog. These are settings which are saved with the local installation of MapTool. They are not saved with a campaign, and will need to be reconfigured on any new installation of MapTool. | ||
| Line 98: | Line 107: | ||
When one or more macro editors is open, the Edit menu is appended with editing options useful for macro authors. These extra commands only effect the macro editor, and can't be used with text entered into the chat panel or other text input areas. If multiple Macro Editors are open, these menu items will appear once for every open Macro Editor. | When one or more macro editors is open, the Edit menu is appended with editing options useful for macro authors. These extra commands only effect the macro editor, and can't be used with text entered into the chat panel or other text input areas. If multiple Macro Editors are open, these menu items will appear once for every open Macro Editor. | ||
* '''<u>F</u>ind...''' | * '''<u>F</u>ind...''' {{ui shortcut|Meta-F|Find}} | ||
: Opens the Find dialog box to search the macro editor for some arbitrary text. Works with Regular Expressions when 'R<u>e</u>gex' is {{Checked}}. | : Opens the Find dialog box to search the macro editor for some arbitrary text. Works with Regular Expressions when 'R<u>e</u>gex' is {{Checked}}. | ||
* '''<u>R</u>eplace...''' | * '''<u>R</u>eplace...''' {{ui shortcut|Meta-H|Replace}} | ||
: Opens the Replace dialog box to search the macro editor for some arbitrary text to replace with a second string of arbitrary text. Works with Regular Expressions when 'R<u>e</u>gex' is {{Checked}}. | : Opens the Replace dialog box to search the macro editor for some arbitrary text to replace with a second string of arbitrary text. Works with Regular Expressions when 'R<u>e</u>gex' is {{Checked}}. | ||
* '''<u>G</u>o to Line...''' | * '''<u>G</u>o to Line...''' {{ui shortcut|Meta-L|Go to Line}} | ||
: Opens a simple Goto Line dialog box, letting you immediately transport the macro editor cursor to the line number provided. | : Opens a simple Goto Line dialog box, letting you immediately transport the macro editor cursor to the line number provided. | ||
* '''Show Find Search Bar...''' | * '''Show Find Search Bar...''' {{ui shortcut|Meta+Shift-F|Show Find Search Bar}} | ||
: Toggles a bar with text search functionality docked to the bottom of the Macro window. If the Replace Search Bar is visible, the Find bar takes its place. Works with Regular Expressions when 'Regex' is {{Checked}}. | : Toggles a bar with text search functionality docked to the bottom of the Macro window. If the Replace Search Bar is visible, the Find bar takes its place. Works with Regular Expressions when 'Regex' is {{Checked}}. | ||
* '''Show Replace Search Bar...''' | * '''Show Replace Search Bar...''' {{ui shortcut|Meta+Shift-H|Show Replace Search Bar}} | ||
: Toggles a bar with text search/replace functionality docked to the bottom of the Macro window. If the Find Search Bar is visible, the Replace Search Bar takes its place. Works with Regular Expressions when 'Regex' is {{Checked}}. | : Toggles a bar with text search/replace functionality docked to the bottom of the Macro window. If the Find Search Bar is visible, the Replace Search Bar takes its place. Works with Regular Expressions when 'Regex' is {{Checked}}. | ||
{{Clear}} | {{Clear}} | ||
| Line 113: | Line 122: | ||
[[Image:UI_Menus_Map.PNG|frame|left|MapTool Map Menu]]{{Clear}} | [[Image:UI_Menus_Map.PNG|frame|left|MapTool Map Menu]]{{Clear}} | ||
* '''New Map...''' | * '''New Map...''' {{ui shortcut|Meta-N|New Map}} | ||
: Opens the | : Opens the [[Map Properties]] dialog box to select options for a new map. | ||
[[Image:UI_Menus_Map_QuickMap.PNG|200px|right|frame|Quick Map Submenu]] | [[Image:UI_Menus_Map_QuickMap.PNG|200px|right|frame|Quick Map Submenu]] | ||
* '''Quick Map''' | * '''Quick Map''' | ||
: The Quick Map submenu provides a visual list of textures which, when clicked, instantly creates new maps with the settings configured in your [[MapTool_Preferences]] with the selected texture. Textures for the Quick Map submenu are automatically pulled from your [[Additional_Options|Data Directory]] in the | : The Quick Map submenu provides a visual list of textures which, when clicked, instantly creates new maps with the settings configured in your [[MapTool_Preferences]] with the selected texture. Textures for the Quick Map submenu are automatically pulled from your [[MapTool Preferences#Additional_Options|Data Directory]] in the {{code|Resources/Default/Textures}} subdirectory. | ||
: You can add or remove textures from the default resources folder to alter the Quick Map options, but it is not recommended to remove Grass.png, as it is the default texture for all new MapTool maps and campaigns. If you do remove it without replacing it, a red 'X' will populate any new maps you create until you manually set a different texture in the map properties. | : You can add or remove textures from the default resources folder to alter the Quick Map options, but it is not recommended to remove Grass.png, as it is the default texture for all new MapTool maps and campaigns. If you do remove it without replacing it, a red 'X' will populate any new maps you create until you manually set a different texture in the map properties. | ||
* '''<u>I</u>mport Map...''' | * '''<u>I</u>mport Map...''' | ||
: Imports a MapTool map with the | : Imports a MapTool map with the {{code|.rpmap}} extension via a file browser dialog into the open campaign. When importing maps with [[Fog of War|Fog of War]], an option will be given to reset the fog for the whole map. | ||
* '''<u>I</u>mport Universal VTT...''' | |||
: Imports a Universal VTT map with the {{code|.dd2vtt}} extension via a file browser dialog into the open campaign. Universal VTT (UVTT) maps can include VBL and Light definitions along with the map image. The UVTT format was created by Megasploot as an export format in [https://dungeondraft.net/ Dungeondraft]. Other map creation programs also support the format now including DungeonFog and Arkenforge's Master's Toolkit. For files with other extensions select the All File option in the dialog. | |||
* '''<u>E</u>xport Map...''' | * '''<u>E</u>xport Map...''' | ||
: Exports a | : Exports a MapTool map with the {{code|.rpmap}} extension to the local file system via a file browser dialog. | ||
* '''<u>P</u>layer Visible''' | * '''<u>P</u>layer Visible''' {{ui shortcut|Meta-H|toggling a map Player Visible}} | ||
: When {{Checked}}, the current map can be viewed by players and will be visible to them in the Select Map dropdown on the right side of the MapTool Toolbar. | : When {{Checked}}, the current map can be viewed by players and will be visible to them in the Select Map dropdown on the right side of the MapTool Toolbar. | ||
* '''Restore Fog-of-<u>W</u>ar''' | * '''Restore Fog-of-<u>W</u>ar''' {{ui shortcut|Meta+Shift-R|Restore Fog of War}} | ||
: Resets any exposed areas of | : Resets any exposed areas of [[Fog of War|Fog of War]] on the current map so they appear unexplored. | ||
* '''Fog-of-<u>W</u>ar''' | * '''Fog-of-<u>W</u>ar''' {{ui shortcut|Meta-W|toggling a map's Fog of War setting}} | ||
: Enables the display of Fog of War. | : Enables the display of [[Fog of War|Fog of War]]. | ||
* '''FoW: Expose only at way points''' | * '''FoW: Expose only at way points''' {{ui shortcut|Meta+Shift-W|toggle Expose only at Way points}} | ||
[[Image:UI_Menus_Map_Vision.PNG|right|frame|Vision Submenu]] | [[Image:UI_Menus_Map_Vision.PNG|right|frame|Vision Submenu]] | ||
* '''Vision''' | * '''Vision''' | ||
: The vision submenu has controls how players can see tokens on the current map. When Fog of War is enabled, tokens under unexplored | : The vision submenu has controls how players can see tokens on the current map. When [[Fog of War|Fog of War]] is enabled, tokens under unexplored Fog of War are always obscured regardless of which vision setting is selected. Also, these settings do not control when Fog of War is revealed, which is controlled by a combination of [[MapTool_Preferences#Map_Visuals|client preferences]] and [[Introduction_to_Game_Hosting#Ownership.2C_Vision.2C_and_Behavior|server settings]]. [[Aura|Aura effects]] are always rendered regardless of which Vision setting is checked. | ||
: Troubleshooting tip: If players cannot see on the 'Day' or 'Night' settings, make sure player tokens are both [[Introduction_to_Tokens#Ownership|owned by them]] and have '[[Introduction_to_Lights_and_Sights|Has Sight]]' checked in their properties. | : Troubleshooting tip: If players cannot see on the 'Day' or 'Night' settings, make sure player tokens are both [[Introduction_to_Tokens#Ownership|owned by them]] and have '[[Introduction_to_Lights_and_Sights|Has Sight]]' checked in their properties. | ||
: Troubleshooting tip: If players can't see anything on a map with Fog of War enabled regardless of these settings, try exposing an initial area of Fog of War around their tokens. | : Troubleshooting tip: If players can't see anything on a map with [[Fog of War|Fog of War]] enabled regardless of these settings, try exposing an initial area of Fog of War around their tokens. | ||
:* '''Off''' | :* '''Off''' | ||
:: When {{Checked}}, all tokens on the map (or explored areas of the map if Fog of War is enabled) will be shown to players regardless of [[Introduction_to_Tokens#Ownership|token ownership]], [[Introduction_to_Lights_and_Sights|vision and light]] settings, and the [[Introduction_to_Vision_Blocking|Vision Blocking Layer (VBL)]]. Hovering over Tokens with vision settings will still display a projected outline of what they can 'see' that accounts for the VBL. | :: When {{Checked}}, all tokens on the map (or explored areas of the map if [[Fog of War|Fog of War]] is enabled) will be shown to players regardless of [[Introduction_to_Tokens#Ownership|token ownership]], [[Introduction_to_Lights_and_Sights|vision and light]] settings, and the [[Introduction_to_Vision_Blocking|Vision Blocking Layer (VBL)]]. Hovering over Tokens with vision settings will still display a projected outline of what they can 'see' that accounts for the VBL. | ||
:* '''Day''' | :* '''Day''' | ||
:: When {{Checked}}, players can only see the map and other tokens through tokens they [[Introduction_to_Tokens#Ownership|own]] which have [[Introduction_to_Lights_and_Sights|sight]] enabled in their preferences. Tokens will 'see' up to the maximum distance of their vision settings, and [[Introduction_to_Vision_Blocking | :: When {{Checked}}, players can only see the map and other tokens through tokens they [[Introduction_to_Tokens#Ownership|own]] which have [[Introduction_to_Lights_and_Sights|sight]] enabled in their preferences. Tokens will 'see' up to the maximum distance of their vision settings, and [[Introduction_to_Vision_Blocking|Vision Blocking Layer]] will block tokens from 'seeing' one another. Most [[Introduction_to_Lights_and_Sights|light sources]] are ignored as all areas of the map is considered fully illuminated for vision purposes, though [[Aura|Auras]] remain visible. | ||
:* '''Night''' | :* '''Night''' | ||
:: When {{Checked}}, players can only see the map and other tokens through their own tokens' vision just as with the '''Day''' setting, but additionally can only see into [[Introduction_to_Lights_and_Sights|illuminated]] areas. | :: When {{Checked}}, players can only see the map and other tokens through their own tokens' vision just as with the '''Day''' setting, but additionally can only see into [[Introduction_to_Lights_and_Sights|illuminated]] areas. | ||
* '''Edit Map...''' | * '''Edit Map...''' | ||
: Opens the | : Opens the [[Map Properties]] dialog to adjust the map's name, background color/texture, base map, fog color, grid settings, and vision distance. | ||
* '''<u>A</u>djust Grid...''' | * '''<u>A</u>djust Grid...''' | ||
: Enters an 'Adjust Grid' Map View mode to quickly find workable grid settings for the current map. The Map View's modal panel will change and display contain controls for grid size, x-y offsets, and color, as well as a map zoom slider. Further UI features of this mode are as listed: | : Enters an 'Adjust Grid' Map View mode to quickly find workable grid settings for the current map. The Map View's modal panel will change and display contain controls for grid size, x-y offsets, and color, as well as a map zoom slider. Further UI features of this mode are as listed: | ||
:: '' '''Tip''': Also look at [[Auto Resize]] for a semi-automatic way of fitting map images to the grid.'' | |||
:* Left-clicking and dragging the Map View while this tool is open offsets the grid. | :* Left-clicking and dragging the Map View while this tool is open offsets the grid. | ||
:* Scrolling the mouse wheel or holding | :* Scrolling the mouse wheel or holding {{ui shortcut|Shift|changing the grid size in 'Adjust Grid' mode}} and hitting the arrow keys will change the grid size. | ||
:* Right-clicking and dragging will pan the Map View as usual, and holding the | :* Right-clicking and dragging will pan the Map View as usual, and holding the {{ui shortcut|Meta|zooming the map normally in 'Adjust Grid' mode}} key while scrolling the mouse wheel will zoom the map as normal. | ||
:* Clicking | :* Clicking the 'close' button will save your changes and close Adjust Grid mode. | ||
:* Hitting the Escape key will exit the Adjust Grid mode without saving your changes. | :* Hitting the Escape key will exit the Adjust Grid mode without saving your changes. | ||
* '''Adjust Map Board...''' | * '''Adjust Map Board...''' | ||
| Line 168: | Line 180: | ||
The View menu helps you control and customize the appearance of the [[#About_Map_View|Map View]]. | The View menu helps you control and customize the appearance of the [[#About_Map_View|Map View]]. | ||
* '''Show As Player''' | * '''Show As Player''' {{ui shortcut|Meta+Shift-P|Show As Player}} | ||
: Helps a GM simulate what players would see on the currently selected map when {{Checked}}. This option is very helpful when building maps with [[Introduction_to_Lights_and_Sights|vision and/or light sources]], and the [[Introduction_to_Vision_Blocking|Vision Blocking Layer]]. | : Helps a GM simulate what players would see on the currently selected map when {{Checked}}. This option is very helpful when building maps with [[Introduction_to_Lights_and_Sights|vision and/or light sources]], and the [[Introduction_to_Vision_Blocking|Vision Blocking Layer]]. | ||
:* Unexplored/Hard Fog of War will appear solid black as it appears to players. | :* Unexplored/Hard [[Fog of War|Fog of War]] will appear solid black as it appears to players. | ||
:* Selecting a token will limit vision to only the lights, exposed | :* Selecting a token will limit vision to only the lights, exposed Fog of War, and tokens that token can see. | ||
:* When no tokens are selected, any tokens matching the toolbar Fog of War display settings are shown. If all the player tokens are 'PC' tokens, selecting the 'PC' Fog of War display setting on the Toolbar can further help narrow down what players can actually see. | :* When no tokens are selected, any tokens matching the toolbar Fog of War display settings are shown. If all the player tokens are 'PC' tokens, selecting the 'PC' Fog of War display setting on the Toolbar can further help narrow down what players can actually see. | ||
[[Image:UI_Menus_View_Zoom.PNG|right|frame|Zoom Submenu]] | [[Image:UI_Menus_View_Zoom.PNG|right|frame|Zoom Submenu]] | ||
* '''<u>Z</u>oom''' | * '''<u>Z</u>oom''' | ||
The zoom menu exposes map zooming functions. The current zoom level can be seen on the right side of the [[#Status_Bar|Status Bar]]. | : The zoom menu exposes map zooming functions. The current zoom level can be seen on the right side of the [[#Status_Bar|Status Bar]]. | ||
:* '''Zoom <u>I</u>n''' {{ui shortcut|=|Zoom In}} | |||
:: Zooms the map in an increment of roughly 7% of the current zoom level. Scrolling up on the mouse wheel also does this. | |||
:* '''Zoom <u>O</u>ut''' {{ui shortcut|-|Zoom Out}} | |||
:: Zooms the map out an increment of roughly 7% of the current zoom level. Scrolling down on the mouse wheel also does this. | |||
:* '''Zoom 1:1''' {{ui shortcut|+|Zoom 1:1}} | |||
:: Resets the zoom level to 100%. | |||
* '''Show <u>T</u>oken Names''' | * '''Show <u>T</u>oken Names''' {{ui shortcut|Meta-T|toggling Token Names}} | ||
: Displays all token names beneath their tokens when {{Checked}}. PC token names are shown in black text in light grey boxes, | : Displays all token names beneath their tokens when {{Checked}}. Visible PC token names are shown in black text in light grey boxes, Visible NPC names are shown with white text on blue boxes, and No Visible token names are shown as white in dark grey boxes. | ||
* '''Show Movement <u>D</u>istances''' | * '''Show Text Labels''' | ||
: Displays text labels created with the Drawing Tools. | |||
*'''Show Movement <u>D</u>istances''' {{ui shortcut|Meta-D|toggling Show Movement Distances}} | |||
: When {{Checked}}, the current total movement distance is shown below the selected token while dragging. This accounts for terrain modifiers and the current diagonal movement rules of current server (or the MapTool installation if not connected to a server). | : When {{Checked}}, the current total movement distance is shown below the selected token while dragging. This accounts for terrain modifiers and the current diagonal movement rules of current server (or the MapTool installation if not connected to a server). | ||
* '''Show Light Sources''' | * '''Show Light Sources''' {{ui shortcut|Meta-K|toggling Show Light Sources}} | ||
: Displays a light bulb graphic over tokens with light sources attached when {{Checked}}. This option is only available to GMs, and won't work when 'Show as Player' is checked. | : Displays a light bulb graphic over tokens with light sources attached when {{Checked}}. This option is only available to GMs, and won't work when 'Show as Player' is checked. | ||
* '''Show <u>G</u>rid''' | * '''Show <u>G</u>rid''' {{ui shortcut|Meta-G|toggling Show Grid}} | ||
: Toggles the grid on or off. | : Toggles the grid on or off. | ||
* '''Show <u>C</u>oordinates''' | * '''Show <u>C</u>oordinates''' | ||
| Line 194: | Line 208: | ||
[[Image:UI_Menus_View_GridLineWidth.PNG|right|frame|Grid Line Width Submenu]] | [[Image:UI_Menus_View_GridLineWidth.PNG|right|frame|Grid Line Width Submenu]] | ||
* '''Grid <u>L</u>ine Width''' | * '''Grid <u>L</u>ine Width''' | ||
Controls how many pixels thick you prefer your grid lines to be when the Grid is enabled. This is a per-client setting. | : Controls how many pixels thick you prefer your grid lines to be when the Grid is enabled. This is a per-client setting. | ||
* '''<u>D</u>isplay Drawing Distances''' | * '''<u>D</u>isplay Drawing Distances''' | ||
: Displays distances when using the drawing and template tools (except for the Freehand and Text tools). | : Displays distances when using the drawing and template tools (except for the Freehand and Text tools). | ||
* '''<u>S</u>traight Line Width Doubled''' | * '''<u>S</u>traight Line Width Doubled''' | ||
: When {{Checked}}, the line template tool from a point will make straight lines at double width. If unchecked, you will have to choose which side of the line the template will be drawn on. | : When {{Checked}}, the line template tool from a point will make straight lines at double width. If unchecked, you will have to choose which side of the line the template will be drawn on. | ||
* '''Fullscreen Mode''' | * '''Fullscreen Mode''' {{ui shortcut|Meta+Alt-Enter|Fullscreen Mode}} | ||
: Toggles a fullscreen mode where only the Map View is visible. This hides all menus, the toolbar, and all panels. Repeating the key command or pressing Escape will return to the normal windowed view. | : Toggles a fullscreen mode where only the Map View is visible. This hides all menus, the toolbar, and all panels. Repeating the key command or pressing Escape will return to the normal windowed view. | ||
{{Clear}} | {{Clear}} | ||
| Line 206: | Line 220: | ||
[[Image:UI_Menus_Tool.PNG|frame|left|MapTool Tool Menu]]{{Clear}} | [[Image:UI_Menus_Tool.PNG|frame|left|MapTool Tool Menu]]{{Clear}} | ||
* '''C<u>h</u>at''' | * '''C<u>h</u>at''' {{ui shortcut|Meta-Enter|Toggling the Chat Panel}} | ||
: Toggles the Chat panel. Identical to the | : Toggles the Chat panel. Identical to the {{ui location|Window > Chat|the Chat Panel toggle function}} menu option. | ||
* '''<u>R</u>un Macro''' | * '''<u>R</u>un Macro''' {{ui shortcut|/|'Run a Macro', which enters a / in the Chat Panel and enters typing mode (opens the Chat Panel if it is not visible)}} | ||
: Focuses the Chat panel (toggling it visible if necessary) and begins the input with a '/' character. Using the '/' shortcut is a convenient way to access the chat at any time within MapTool and quickly enter [[Chat Commands]]. | : Focuses the Chat panel (toggling it visible if necessary) and begins the input with a '/' character. Using the '/' shortcut is a convenient way to access the chat at any time within MapTool and quickly enter [[Chat Commands]]. | ||
* '''<u>C</u>enter Players on Current View''' | * '''<u>C</u>enter Players on Current View''' {{ui shortcut|Meta-F|Center Players on Current View}} | ||
: Allows a GM on a server to move all players on the same map as the GM to pan to center on the GM's view and zoom level. | : Allows a GM on a server to move all players on the same map as the GM to pan to center on the GM's view and zoom level. | ||
* '''<u>E</u>nforce Players to Current Map''' | * '''<u>E</u>nforce Players to Current Map''' {{ui shortcut|Meta-E|Enforce Players to Current Map}} | ||
: Allows a GM on a server to pull all connected players to the GM's currently selected map (as long as it is visible to players). | : Allows a GM on a server to pull all connected players to the GM's currently selected map (as long as it is visible to players). | ||
* '''Center Players on Current View (Continuous)''' | * '''Center Players on Current View (Continuous)''' {{ui shortcut|Meta+Shift-F|Center Players on Current View (Continuous)}} | ||
: When {{Checked}}, players' views will be panned and zoomed automatically to match the GM whenever the GM moves their view. | : When {{Checked}}, players' views will be panned and zoomed automatically to match the GM whenever the GM moves their view. | ||
* '''<u>L</u>ock Player Movement''' | * '''<u>L</u>ock Player Movement''' {{ui shortcut|Meta+Shift-L|Lock Player Movement}} | ||
: When {{Checked}}, players cannot move tokens they own unless it is that token's turn on the Initiative panel. | : When {{Checked}}, players cannot move tokens they own unless it is that token's turn on the Initiative panel. | ||
* '''Lock Zoom''' | * '''Lock Zoom''' | ||
| Line 237: | Line 251: | ||
: Toggles the Connections panel. When playing on or running a server, this panel shows which players are currently connected. | : Toggles the Connections panel. When playing on or running a server, this panel shows which players are currently connected. | ||
* '''Map Explorer''' | * '''Map Explorer''' | ||
: Toggles the Map Explorer panel. This panel shows all the [[Tokens]] on the currently selected map, organized by layer. | : Toggles the Map Explorer panel. This panel shows all the [[Introduction to Tokens|Tokens]] on the currently selected map, organized by layer. | ||
* '''Draw Explorer''' | * '''Draw Explorer''' | ||
: Toggles the Draw Explorer panel. This panel shows all the drawing objects (shapes, text, and cuts) on the currently selected map, organized by layer. | : Toggles the Draw Explorer panel. This panel shows all the drawing objects (shapes, text, and cuts) on the currently selected map, organized by layer. | ||
| Line 251: | Line 265: | ||
: Toggles the Global panel, which contains any macros attached to the current installation of MapTool. | : Toggles the Global panel, which contains any macros attached to the current installation of MapTool. | ||
* '''Campaign''' | * '''Campaign''' | ||
: Toggles the Campaign | : Toggles the Campaign panel, which contains any macros attached to the currently open campaign file. | ||
* '''Selected''' | * '''Selected''' | ||
: Toggles the Selected panel, which contains any macros attached to the currently selected [[Token]]. | : Toggles the Selected panel, which contains any macros attached to the currently selected [[Token]]. | ||
| Line 257: | Line 271: | ||
: Toggles the Impersonate panel, which contains any macros attached to the currently impersonated [[Token]]. | : Toggles the Impersonate panel, which contains any macros attached to the currently impersonated [[Token]]. | ||
* '''Show Transfer Window''' | * '''Show Transfer Window''' | ||
: Opens a window showing any pending images that are currently being retrieved from the server or a repository. | |||
{{Clear}} | {{Clear}} | ||
| Line 267: | Line 282: | ||
: Fetches the default MapTool image assets and places them in the current data directory according to your [[MapTool Preferences]]. This can be helpful if you've changed the data directory but later want to restore 'Quick Map' or 'Add Default Tables' functionality. | : Fetches the default MapTool image assets and places them in the current data directory according to your [[MapTool Preferences]]. This can be helpful if you've changed the data directory but later want to restore 'Quick Map' or 'Add Default Tables' functionality. | ||
* '''Documentation''' | * '''Documentation''' | ||
: Opens a web browser to [https://www.rptools.net/toolbox/maptool/ RPTools' MapTool page]. | : Opens a web browser to the [https://www.rptools.net/toolbox/maptool/ RPTools' MapTool page]. | ||
* '''Tutorials''' | * '''Tutorials''' | ||
: Opens a web browser to [https://www.rptools.net/tutorials/ RPTools' MapTool Tutorials page]. | : Opens a web browser to the [https://www.rptools.net/tutorials/ RPTools' MapTool Tutorials page]. | ||
* '''Forums''' | * '''Forums''' | ||
: Opens a web browser to the [http://forums.rptools.net/ RPTools Forum]. | : Opens a web browser to the [http://forums.rptools.net/ RPTools Forum]. | ||
| Line 275: | Line 290: | ||
: Opens a web browser to a [http://forums.rptools.net/viewtopic.php?f=22&t=3370 Networking FAQ] thread on the RPTools forum. | : Opens a web browser to a [http://forums.rptools.net/viewtopic.php?f=22&t=3370 Networking FAQ] thread on the RPTools forum. | ||
* '''Macro Scripting''' | * '''Macro Scripting''' | ||
: Opens a web browser to this wiki's [Main_Page|main page]. | : Opens a web browser to this wiki's [[Main_Page|main page]]. | ||
* '''Frameworks''' | |||
: Opens a web browser to this wiki's [[Frameworks|frameworks page]]. | |||
* '''Gather Debug Information...''' | * '''Gather Debug Information...''' | ||
: Displays system information useful for debugging and development. If you ever report a bug, you may want to include this information in your report. | : Displays system information useful for debugging and development. If you ever report a bug, you may want to include this information in your report. | ||
=== Themes Menu === | |||
Prior to version 1.12.0, there is a Themes menu (themes are controlled in Preferences from 1.12.0 on). | |||
[[Image:Themes_Menu.png|frame|left|MapTool Themes Menu]]{{Clear}} | |||
* '''Default''' - The default MapTool theme. | |||
* '''''more themes...''''' - Other themes found in the MapTool {{code|USERDATA/themes/ui}} folder will be found here. | |||
: Add your own custom themes to this folder to have them displayed in the menu. You must restart MapTool for a theme to take effect. | |||
* '''<u>A</u>bout...''' | * '''<u>A</u>bout...''' | ||
: Displays a dialog with version information and attribution to MapTool's wonderful developers and community members. | : Displays a dialog with version information and attribution to MapTool's wonderful developers and community members. | ||
| Line 283: | Line 308: | ||
== Toolbar and Map View == | == Toolbar and Map View == | ||
The MapTool Toolbar lets you interact with the Map View in different ways. The toolbar has a handle on the left side, allowing the user to undock it from the application window. Closing the popped-out toolbar or dragging it beneath the menu bar returns it to its default position. | The MapTool Toolbar lets you interact with the Map View in different ways. The toolbar has a handle on the left side, allowing the user to undock it from the application window. Closing the popped-out toolbar or dragging it beneath the menu bar returns it to its default position. In MapTool 1.5.8 and later, the toolbar can be hidden or shown by clicking the down/up toggle on the right edge of the menu bar. | ||
=== About Map View === | === About the Map View === | ||
Beneath the Toolbar's default position, most of the application window is used to display the current map. Any docked panels will appear alongside the Map View. Map view is semi-modal, meaning its use and options change somewhat depending on the tools and menu options you select. | Beneath the Toolbar's default position, most of the application window is used to display the current map. Any docked panels will appear alongside the Map View. Map view is semi-modal, meaning its use and options change somewhat depending on the tools and menu options you select. | ||
==== Controls in the Map View ==== | ==== Controls in the Map View ==== | ||
In most modes, MapTool describes the available commands for the Map View in the [[#Status Bar]] at the bottom-left of the application window. The following controls are what are available to players and GMs using the 'Pointer' tool: | In most modes, MapTool describes the available commands for the Map View in the [[#Status Bar]] at the bottom-left of the application window. The following controls are what are available to players and GMs using the ''Pointer'' tool: | ||
* <code>Left click</code>: Select a token. | * <code>Left click</code> on a token: Select that token. A red border means an owned token is selected and can be manipulated; a green border means an unowned token is selected, which is useful for targeting when using macros. | ||
* <code>Left click + drag</code>: If no tokens are selected, drag a selection box to select multiple tokens. If a token or token(s) are selected, move selected token(s). | * <code>Left click + drag</code>: If no tokens are selected, drag a selection box to select multiple tokens. If a token or token(s) are selected, move selected token(s). | ||
:* <code> | :* Add <code>Spacebar</code> or <code>Right Click</code> while dragging a token to set waypoints to control the path taken by the token. | ||
* <code>Right click</code>: | * <code>Right click</code>: Select a token and open its right-click context menu. | ||
* <code>Right click + drag</code>: Pan the Map View. | * <code>Right click + drag</code>: Pan the Map View. | ||
* <code>Mouse Wheel</code>: Zoom the Map View in/out. | * <code>Mouse Wheel</code>: Zoom the Map View in/out. | ||
* <code>Spacebar</code>: Holding spacebar will show a blue arrow on the map pointing to your cursor position to all connected players. Your name is shown next to the arrow. | * <code>Spacebar</code>: Holding spacebar will show a blue arrow on the map pointing to your cursor position to all connected players. Your name is shown next to the arrow. | ||
* | :* <code>Meta + Spacebar</code>: Changes the pointer image to a cartoon-style speech bubble. | ||
* | :* <code>Shift + Spacebar</code>: Changes the pointer image to a cartoon-style thought bubble. | ||
* | :* <code>Meta + Shift + Spacebar</code>: Changes the pointer image to an illustrated pointing hand. This pointer has special use for GMs: | ||
::* If used by the GM, this illustrated pointer also moves the map view of all players on the same map to center on the pointing location and at the GM's zoom level. When used in this way, the GM can release the <code>Spacebar</code> first to let player views ''snap back'' to their previous location, or release either <code>Meta</code> or <code>Shift</code> first to keep the player views centered on the new location. | |||
* Hover over a token: | |||
:* When the token is on the '''Token''' layer, will display the token's [[Stat Sheet]] by default (can be turned off by the client in their ''Preferences'' settings, in which case <code>Shift</code> must also be held down to see the stat sheet). | |||
:* When the token is on the '''Object''' layer, the mouse pointer will change to the selection image and a <code>Left click</code> on the token will display the ''Notes'' from the token where the stat sheet is normally displayed. (This is for GMs to provide information about areas that players can review on their own. Also, when the GM left clicks, they see both the ''Notes'' and the ''GM Notes''.) | |||
:* When the token is on the '''Hidden''' or '''Background''' layers, no special interaction is performed. | |||
==== Modal Panel ==== | ==== Modal Panel ==== | ||
| Line 315: | Line 345: | ||
=== Toolbar Overview === | === Toolbar Overview === | ||
[[Image:UI_Toolbar.png| | [[Image:UI_Toolbar.png|left|frame|The Toolbar]]{{Clear}} | ||
Hovering your mouse over a tool will tell you what it does in a tool-tip. Reading the Status Bar in the bottom left will often tell you how to use a tool in the Map View once it is selected. | Hovering your mouse over a tool will tell you what it does in a tool-tip. Reading the Status Bar in the bottom left will often tell you how to use a tool in the Map View once it is selected. | ||
==== Tool Palettes and Tools ==== | ==== Tool Palettes and Tools ==== | ||
| Line 323: | Line 354: | ||
:* '''Measuring Tool''': Lets you click and drag to measure a distance on the map. You can use <code>Spacebar</code> while measuring to set a waypoint to measure a path. | :* '''Measuring Tool''': Lets you click and drag to measure a distance on the map. You can use <code>Spacebar</code> while measuring to set a waypoint to measure a path. | ||
:: The Measuring Tool ignores AI pathfinding, VBL, and terrain modifiers. If you want to measure distances with those modifiers, consider dragging a token with Show Movement Distances enabled in the View menu. | :: The Measuring Tool ignores AI pathfinding, VBL, and terrain modifiers. If you want to measure distances with those modifiers, consider dragging a token with Show Movement Distances enabled in the View menu. | ||
:* '''AI Toggle''': Toggles [[AI Pathfinding|AI Pathfinding]]. When enabled (green), all dragged tokens on the Token layer will try to find the shortest path from point A to point B while avoiding vision-blocked areas, accounting for terrain modifiers, and counting diagonal movement rules. '''In MapTool 1.6.0 and later, clients will now follow the server setting for this button.''' | |||
:: When dragging tokens that would have to take very long paths, or impossible paths (such as entering a space not accessible due to the vision blocking layer), there can be a few seconds of delay as the algorithm times out. If this is happening to you frequently (such as when building maps) you can disable the AI system until you want it back on. | |||
:* '''VBL Blocks Movement''': Tokens will navigate around VBL if this is enabled. '''In MapTool 1.6.0 and later, clients will now follow the server setting for this button.''' | |||
* '''Drawing Tools''' | * '''Drawing Tools''' | ||
: Selecting this palette exposes the Drawing Options in the Map View's modal panel (unless the Text tool is selected). Drawing tools create vectors that can be viewed in the Draw Explorer panel. | : Selecting this palette exposes the Drawing Options in the Map View's modal panel (unless the Text tool is selected). Drawing tools create vectors that can be viewed in the Draw Explorer panel. | ||
:* '''Text Tool''' | :* '''Text Tool''' | ||
:: The Text Tool is a little different than other drawing tools. When this tool is selected, clicking on the map will create a new text label. You can also click and drag to move existing labels, or double click a label to change its text or properties. Text labels appear for all players, are hidden by Fog of War, and do not appear on the Draw Explorer panel. | :: The Text Tool is a little different than other drawing tools. When this tool is selected, clicking on the map will create a new text label. You can also click and drag to move existing labels, or double click a label to change its text or properties. Text labels appear for all players, are hidden by [[Fog of War|Fog of War]], and do not appear on the Draw Explorer panel. | ||
* '''Template Tools''' | * '''Template Tools''' | ||
: Selecting this palette exposes the Drawing Options in the Map View's modal panel. Template tools create vectors that can be viewed in the Draw Explorer panel. | : Selecting this palette exposes the Drawing Options in the Map View's modal panel. Template tools create vectors that can be viewed in the Draw Explorer panel. | ||
: Template tools let you draw a variety of quick shapes on the map to aid with tasks such as determining areas of effect. With | : Template tools let you draw a variety of quick shapes on the map to aid with tasks such as determining areas of effect. With the line Template Tools, you must click three times; once to set an origin, a second time to set a direction of the effect, and a third time to set the distance of the effect. | ||
* '''Fog of War Tools''' | * '''Fog of War Tools''' | ||
: When Fog of War is enabled on the current map, these tools can restore or remove Fog of War. Read more in the [[Introduction_to_Lights_and_Sights]]. | : When [[Fog of War|Fog of War]] is enabled on the current map, these tools can restore or remove Fog of War. Read more in the [[Introduction_to_Lights_and_Sights]]. | ||
* '''Vision Blocking Layer (VBL) Tools''' | * '''Vision Blocking Layer (VBL) Tools''' | ||
: These tools let you designate parts of the map that block vision and AI movement. Read more in the [[Introduction_to_Vision_Blocking]]. | : These tools let you designate parts of the map that block vision and AI movement. Read more in the [[Introduction_to_Vision_Blocking]] and [[AI Pathfinding|Introduction to AI Pathfinding]]. | ||
==== Clip and Stream Volume Control ==== | ==== Clip and Stream Volume Control ==== | ||
Some macro functions can cause sounds to play on your client. Clicking the speaker icon will mute these sounds, and adjusting the slider changes their maximum volume on your system. | Some macro functions can cause sounds to play on your client. Clicking the speaker icon will mute these sounds, and adjusting the slider changes their maximum volume on your system. | ||
==== | ==== Fog of War Vision Settings ==== | ||
When | When connected to a server with [[Introduction_to_Lights_and_Sights#Individual_Views_Server_Setting|Individual Views]] {{Checked}}, these buttons filter which tokens' vision you will see when no tokens are selected. | ||
* '''ME''': Show tokens owned explicitly by you | |||
* '''All''': Show tokens owned by you OR with Owned by All {{Checked}} | |||
* '''PC''': Show tokens owned by you OR Owned by All that are PC tokens | |||
* '''NPC''': Show tokens owned by you OR Owned by All that are NPC tokens | |||
==== Select Map Dropdown ==== | |||
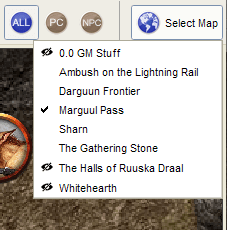
This dropdown menu contains all the maps in the current campaign in alphabetical order with the the current map {{Checked}}. Selecting a map will move your view to that map. | |||
The GM will see maps not visible to players listed with crossed-out eye icons, while players will not see these maps listed at all. | |||
When naming maps, using a numeric prefix (i.e. 1.0 Start Map, 1.2 Castle, 2.0 Forest) can help organize your Select Map drop-down considerably. | |||
[[Image:UI_Toolbar_SelectMap.png|The Select Map dropdown as of MapTool 1.7.0]] | |||
== Panels == | == Panels == | ||
| Line 358: | Line 395: | ||
===Connections=== | ===Connections=== | ||
[[Image:UI_Panels_Connections.png|frame|left|The Connections Panel]]{{Clear}} | [[Image:UI_Panels_Connections.png|frame|left|The Connections Panel]]{{Clear}} | ||
When playing on or running a server, this panel shows which players are currently connected. | When playing on or running a server, this panel shows which players are currently connected. Right-clicking on a player's name will let you whisper them (anyone), or boot them (Host only). | ||
===Map Explorer=== | ===Map Explorer=== | ||
[[Image:UI_Panels_MapExplorer.png|frame|left|The Map Explorer Panel]]{{Clear}} | [[Image:UI_Panels_MapExplorer.png|frame|left|The Map Explorer Panel]]{{Clear}} | ||
This panel shows all the [[Tokens]] on the currently selected map, organized by layer. | This panel shows all the [[Introduction to Tokens|Tokens]] on the currently selected map, organized by layer. Right-clicking on a token shows its full context menu. | ||
===Draw Explorer=== | ===Draw Explorer=== | ||
[[Image:UI_Panels_DrawExplorer.png|frame|left|The Draw Explorer Panel]]{{Clear}} | [[Image:UI_Panels_DrawExplorer.png|frame|left|The Draw Explorer Panel]]{{Clear}} | ||
This panel shows all the drawing objects (shapes, text, and cuts) on the currently selected map, organized by layer. | This panel shows all the drawing objects (shapes, text, and cuts) on the currently selected map, organized by layer. Below the layer tree is a preview of the selected drawing. | ||
Right-clicking on a drawing exposes additional options. You can change their layer, group drawings, set their style to match the current drawing options, or copy their style to the drawing options modal panel. | |||
===Initiative=== | ===Initiative=== | ||
[[Image: | [[Image:InitiativePanel.png|frame|left|The Initiative Panel]]{{Clear}} | ||
A tool to help set and track rounds, current turn, and turn order for tokens on the the current map. | A tool to help set and track rounds, current turn, and turn order for tokens on the the current map. See the [[Introduction to Initiative]]. | ||
===Library=== | ===Library=== | ||
[[Image:UI_Panels_Library.png|frame|left|The Resource Library Panel]]{{Clear}} | [[Image:UI_Panels_Library.png|frame|left|The Resource Library Panel]]{{Clear}} | ||
A file browser to drag and drop images and tokens from added folders on the file system onto the map. | A file browser to drag and drop images and tokens from added folders on the file system onto the map. To add new folders, you must use the 'Add Resources to Library' option on the File menu. | ||
* Type text into the box by the magnifying glass to only show files in the selected folder whose names anywhere match what you type. For example, typing 'gob' in the search box could return both 'goblin.jpg' and 'hobgoblin.jpg'. | |||
* Be careful when selecting 'Search subdirectories?' in very large folder trees. | |||
* The slider on the left side of the file preview changes the zoom level of the preview. | |||
For more information see [[Introduction_to_Mapping#Getting_Images_into_your_MapTool_Resource_Library|the Introduction to Mapping]]. | |||
===Chat=== | ===Chat=== | ||
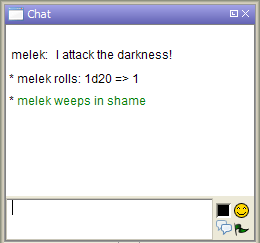
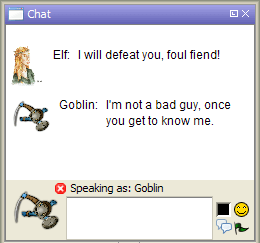
[[Image: | <div><ul style="margin:0;"><li style="display: inline-block;">[[Image:UI_Panels_ChatPanel.png|frame|left|The Chat Panel]] </li> | ||
Panel where all connected players can type, run chat commands, and run macros directly. | <li style="display: inline-block;">[[Image:UI_Panels_ChatPanel_Impersonation.png|frame|left|The Chat Panel when impersonating a token]]</li></ul></div> | ||
Panel where all connected players can type, run chat commands, and run macros directly. Additionally, provides options to change text color, insert emoticons, and toggle scroll lock and typing notifications. | |||
When impersonating a token, your chat messages will appear to come from that token. You'll see the token image to the left of the input area, and have the option to cease impersonation by clicking a red 'x'. | |||
===Tables=== | ===Tables=== | ||
[[Image:UI_Panels_Tables.png|frame|left|The Tables Panel]]{{Clear}} | [[Image:UI_Panels_Tables.png|frame|left|The Tables Panel]]{{Clear}} | ||
Tables for the current campaign are created, configured, and can be run directly from this panel. | [[Introduction to Tables|Tables]] for the current campaign are created, configured, and can be run directly from this panel by double-clicking their image. To add simple tables to your campaign and get a sense for how they work, you can create some simple default dice and playing card tables in the Help menu by selecting 'Add Default Tables...'. For more information read the [[Introduction to Tables]] article. | ||
===Macro Panels=== | ===Macro Panels=== | ||
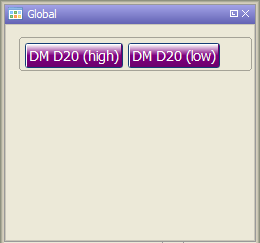
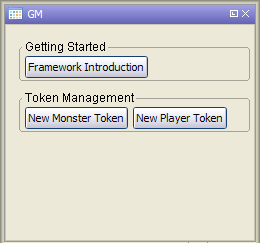
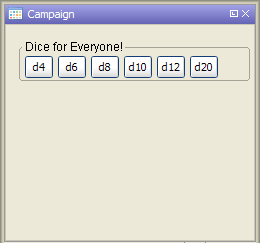
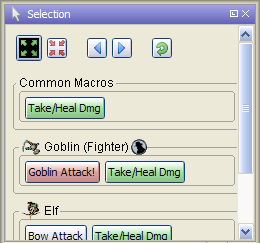
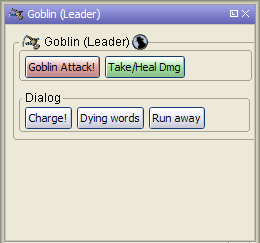
[[Image:UI_Panels_Global.png|The Global Macro Panel]] [[Image:UI_Panels_Campaign.png|The Campaign Macro Panel]] [[Image:UI_Panels_Selected.png|The Selected Macro Panel]] [[Image:UI_Panels_Impersonate.png|The Impersonate Macro Panel]] | [[Image:UI_Panels_Global.png|The Global Macro Panel]] [[Image:UI_Panels_GM.png|The GM Macro Panel]] [[Image:UI_Panels_Campaign.png|The Campaign Macro Panel]] [[Image:UI_Panels_Selected.png|The Selected Macro Panel]] [[Image:UI_Panels_Impersonate.png|The Impersonate Macro Panel]] | ||
{{Clear}} | {{Clear}} | ||
====Global==== | ====Global==== | ||
Contains any macros attached to the current installation of MapTool. Global macros are saved when MapTool is properly closed, are not available to other connected players on a server. | Contains any macros attached to the current installation of MapTool. Global macros are saved when MapTool is properly closed, but are not available to other connected players on a server. | ||
====GM==== | |||
Contains GM-only macros attached to the currently open campaign file. GM macros are saved with the campaign, and when on a server are available to all connected GMs. | |||
====Campaign==== | ====Campaign==== | ||
Contains | Contains public macros attached to the currently open campaign file. Campaign macros are saved with the campaign, and when on a server are available to all connected players, although players may not add or remove macros from this panel (see [[Managing Macros in Panels]]). | ||
====Selected==== | ====Selected==== | ||
| Line 398: | Line 449: | ||
====Impersonate==== | ====Impersonate==== | ||
Contains any macros attached to the currently impersonated [[Token]]. Token macros are saved with the token, and are available to any GMs or owners of the token on a server. | Contains any macros attached to the currently impersonated [[Introduction to Tokens|Token]], and otherwise shows an option to impersonate a selected token. Token macros are saved with the token, and are available to any GMs or owners of the token on a server. | ||
== Status Bar == | == Status Bar == | ||
[[Image:UI_Statusbar.png|frame|left|The Status Bar]]{{Clear}} | |||
* '''Instructions / Help Text''': This portion of the status bar often displays context-sensitive instructions on how to use a selected tool. If you are struggling to understand a tool, look here first. | |||
* '''Assets Cache''' and '''Image Thumbs Cache''': These numbers show, usually in megabytes (MB) the amount of disk space occupied by various image caches. Double clicking on them flushes the caches, freeing disk space (until it fills back up with more cache). '''Warning!''' Flushing the Assets Cache while a campaign file is open can result in missing assets if you then save the campaign file. Save and close any open campaign file ''before'' flushing the cache. | |||
* '''Free Space''': A quick reminder of how much free space is on the drive where the MapTool Data Directory is located, usually in gigabytes (GB). | |||
* '''Map Coordinates''': The x-y position of the cursor on the grid. This corresponds to the coordinates enabled by the Show Map Coordinates option in the View menu, except that the y value in the status bar is numeric rather than alphabetical (0 = A, -1 = -A). | |||
* '''Zoom Level''': The current zoom level as a percentage. Additionally, clicking on the zoom level allows a custom zoom level to be manually entered. | |||
* '''Used RAM''': The memory used out of the total amount allocated. Hovering over this section of the Status Bar also displays the Maximum Memory. Clicking here will reclaim some of the used memory. | |||
* '''Network Info''': The icon on the left shows the server status, while the two grey dots will light up green when sending data, or red when receiving data. | |||
==Other Important UI Components== | |||
The following additional windows and subjects are key parts of using MapTool for the majority of users. | |||
* [[Introduction_to_Properties|Campaign Properties]] | |||
* [[MapTool Preferences]] | |||
* [[Introduction to Tokens]] | |||
* [[Introduction to Game Hosting]] | |||
== | ==See Also== | ||
* [[Introduction to Mapping]] | |||
* | * [[Introduction to Tokens]] | ||
* | * [[Introduction to Macro Writing]] | ||
* | * [[Introduction to Lights and Sights]] | ||
* | * [[Introduction to Vision Blocking]] | ||
Latest revision as of 23:59, 24 December 2023
BEGINNER
THIS IS A BEGINNER ARTICLE
This is reference documentation of MapTool's user interface (UI) features including descriptions of all the menus and panels. It is intended for beginning and intermediate MapTool users who want to quickly learn about a particular feature or explore MapTool's UI features in more detail.
If you are just getting started with MapTool, it is recommended to read the Introduction to Mapping, or visit the Main Page to browse for beginner articles.
Overview of the MapTool Application Window
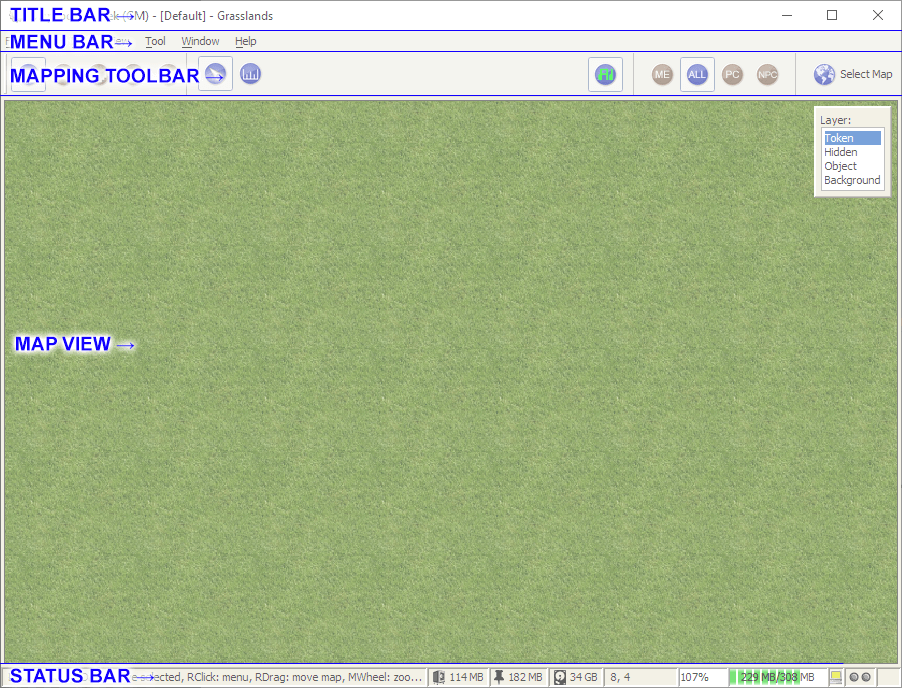
Each open instance of MapTool has an application window which contains a few ever-present components.
The application window always consists of a title bar, a menu bar, the map building and navigation tools, and the map view. One or more panels may be docked to sides of the map view or even floated seperate from the main application window.
The default layout also docks the `Resource Library` panel at the top left side, and a tabbed panel containing the `Map Explorer` and `Draw Explorer` in the lower left side, and the `Chat` panel. This default layout can be restored by selecting Window > Restore Layout.
Getting Help
There are two built-in help features available to you in MapTool before you have to resort to searching the wiki or asking the MapTool community.
- Hover Tooltips: Hovering your mouse over many menu items, buttons, and dialog box options buttons reveal helpful tooltips throughout MapTool. Even macros written by other users might have tooltips, so always take a moment to check if there is a feature you have a question about.
- The Status Bar: Once a tool is selected, instructional help text often appears in the lower left of the Status Bar. Glance down every once in a while to get a handle on the different tools available to you.
Multiple instances of MapTool
Users may open multiple instances of MapTool at once; for example to test the player view on one instance while serving a campaign file in another view on the same computer. When doing this, each instance of the program will have its own application window with its own user interface.
If running multiple instances of MapTool, it is helpful to keep all panels docked rather than floating to prevent confusion between open instances.
Menu bar
MapTool’s menu bar consists of seven dropdown menus. (Prior to version 1.12.0, there were eight. See the Themes menu below.) Underlined letters in a menu command indicates the hotkey that selects that command when the menu is open. Code-styled commands next to a menu command indicate a default shortcut key for that command. The Meta shortcut key listed is usually the Control key on Windows and Linux and Command on Mac. You can always verify your shortcut keys by looking in the menus of your MapTool installation.
In MapTool 1.5.8 and later, a down/up toggle on the right edge of the menu bar can be clicked to hide/show the toolbar.
File Menu
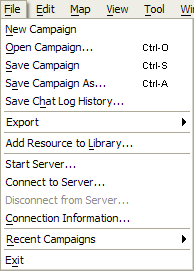
The File menu mainly contains Campaign File and networking commands, along with other miscellaneous export functions.
- New Campaign
- This creates a new campaign file with default properties, states, and a single map called 'Grasslands' configured according to the installation's new map defaults.
- Open Campaign...
Meta-O
- Opens a file explorer window to select and open a MapTool Campaign File.
- Save Campaign
Meta-S
- Saves the current campaign file. If it is a new campaign, MapTool opens a file explorer window to select a save location and name the campaign file.
- Save Campaign As...
Meta-A
- Opens a file explorer window to select a save location and name the campaign file.
- Save Chat Log History...
- Opens a file explorer window to select a save location and name an HTML file containing the entire content of the current chat panel.

- Export
- Submenu containing additional options.
- Screenshot
Meta+Shift-S
- Screenshot
- Opens the Export Screenshot dialog.
- Screenshot As...
- Opens the Export Screenshot dialog.
- Campaign As...
- Opens the Export Campaign dialog, which allows saving a campaign file in a format compatible with older versions of MapTool.
- Campaign Repository File...
- Opens a file explorer window to select a save location and name a ZIP file containing the entire content of the campaign for use as a Campaign Repository.
- Add Resource to Library...
- Opens the Add Resource to Library dialog, which will add new resources to the Resource Library.
- Start Server...
- Starts a new MapTool server from the current instance of MapTool with the currently open campaign file. See Introduction to Game Hosting.
- Connect to Server...
- Connect to a local or remote MapTool server.
- Disconnect from Server...
- Disconnect from the current server. This opens the campaign file which was open before connecting to a server.
- Connection Information...
- Displays additional connection information, such as the IP address.
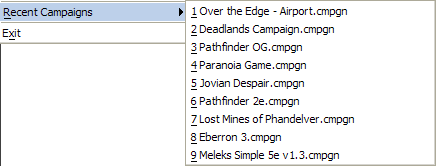
- Recent Campaigns
- Shows a list of up to 9 recently opened campaign files.
- Exit
- Will prompt the user to save the current campaign and close MapTool.
Edit Menu
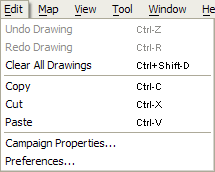
The Edit menu contains drawing and token editing commands along with access to campaign settings and MapTool preferences.
- Undo Drawing
Meta-Z
- Removes the most recent drawing object that was created via the Draw tool.
- This menu command only affects drawings created with the Drawing Tool. Token movement can be undone by right-clicking a token and selecting 'Revert last move'. Token removal, and changes to the Vision Blocking Layer and Fog of War cannot be undone/redone. However, the key command may affect text in input areas such as the chat window and macro editor.
- Redo Drawing
Meta-R
- Re-adds the most recently drawing object that was removed via Undo Drawing.
- This menu command only affects drawings created with the Drawing Tool. Token movement can be undone by right-clicking a token and selecting 'Revert last move'. Token removal, and changes to the Vision Blocking Layer and Fog of War cannot be undone/redone. However, the key command may affect text in input areas such as the chat window and macro editor.
- Clear All Drawings
Meta+Shift-D
- Removes all drawings on the selected layer of the current map.
- This menu command only affects drawings created with the Drawing Tool. Tokens, the Vision Blocking Layer, and Fog of War are not affected.
- Copy
Meta-C
- Copies a token to the clipboard.
- This menu command only affects Tokens, although the key command can affect text in input areas such as the chat window and macro editor.
- Cut
Meta-X
- Cuts a token, removing it from the map and placing it in the clipboard.
- This menu command only affects Tokens, although the key command can affect text in input areas such as the chat window and macro editor.
- Paste
Meta-V
- Pastes any token in the clipboard to the current map underneath the current cursor position.
- This menu command only affects Tokens, although the key command can affect text in input areas such as the chat window and macro editor.
- Campaign Properties...
- Opens the Campaign Properties dialog. These are settings which are saved with the current campaign such as token properties, states, and more.
- Preferences...
- Opens the Preferences dialog. These are settings which are saved with the local installation of MapTool. They are not saved with a campaign, and will need to be reconfigured on any new installation of MapTool.
Edit Menu - Expanded
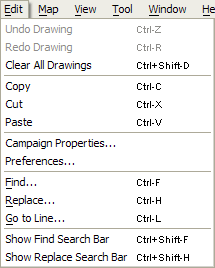
When one or more macro editors is open, the Edit menu is appended with editing options useful for macro authors. These extra commands only effect the macro editor, and can't be used with text entered into the chat panel or other text input areas. If multiple Macro Editors are open, these menu items will appear once for every open Macro Editor.
- Find...
Meta-F
- Opens the Find dialog box to search the macro editor for some arbitrary text. Works with Regular Expressions when 'Regex' is ✓checked.
- Replace...
Meta-H
- Opens the Replace dialog box to search the macro editor for some arbitrary text to replace with a second string of arbitrary text. Works with Regular Expressions when 'Regex' is ✓checked.
- Go to Line...
Meta-L
- Opens a simple Goto Line dialog box, letting you immediately transport the macro editor cursor to the line number provided.
- Show Find Search Bar...
Meta+Shift-F
- Toggles a bar with text search functionality docked to the bottom of the Macro window. If the Replace Search Bar is visible, the Find bar takes its place. Works with Regular Expressions when 'Regex' is ✓checked.
- Show Replace Search Bar...
Meta+Shift-H
- Toggles a bar with text search/replace functionality docked to the bottom of the Macro window. If the Find Search Bar is visible, the Replace Search Bar takes its place. Works with Regular Expressions when 'Regex' is ✓checked.
Map Menu
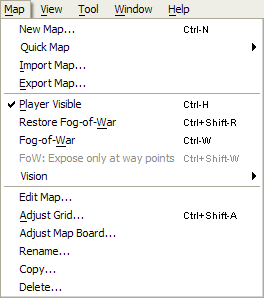
- New Map...
Meta-N
- Opens the Map Properties dialog box to select options for a new map.
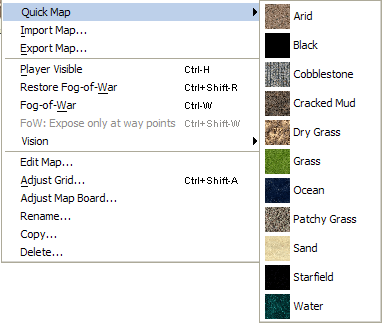
- Quick Map
- The Quick Map submenu provides a visual list of textures which, when clicked, instantly creates new maps with the settings configured in your MapTool_Preferences with the selected texture. Textures for the Quick Map submenu are automatically pulled from your Data Directory in the
Resources/Default/Texturessubdirectory. - You can add or remove textures from the default resources folder to alter the Quick Map options, but it is not recommended to remove Grass.png, as it is the default texture for all new MapTool maps and campaigns. If you do remove it without replacing it, a red 'X' will populate any new maps you create until you manually set a different texture in the map properties.
- Import Map...
- Imports a MapTool map with the
.rpmapextension via a file browser dialog into the open campaign. When importing maps with Fog of War, an option will be given to reset the fog for the whole map.
- Import Universal VTT...
- Imports a Universal VTT map with the
.dd2vttextension via a file browser dialog into the open campaign. Universal VTT (UVTT) maps can include VBL and Light definitions along with the map image. The UVTT format was created by Megasploot as an export format in Dungeondraft. Other map creation programs also support the format now including DungeonFog and Arkenforge's Master's Toolkit. For files with other extensions select the All File option in the dialog.
- Export Map...
- Exports a MapTool map with the
.rpmapextension to the local file system via a file browser dialog.
- Player Visible
Meta-H
- When ✓checked, the current map can be viewed by players and will be visible to them in the Select Map dropdown on the right side of the MapTool Toolbar.
- Restore Fog-of-War
Meta+Shift-R
- Resets any exposed areas of Fog of War on the current map so they appear unexplored.
- Fog-of-War
Meta-W
- Enables the display of Fog of War.
- FoW: Expose only at way points
Meta+Shift-W

- Vision
- The vision submenu has controls how players can see tokens on the current map. When Fog of War is enabled, tokens under unexplored Fog of War are always obscured regardless of which vision setting is selected. Also, these settings do not control when Fog of War is revealed, which is controlled by a combination of client preferences and server settings. Aura effects are always rendered regardless of which Vision setting is checked.
- Troubleshooting tip: If players cannot see on the 'Day' or 'Night' settings, make sure player tokens are both owned by them and have 'Has Sight' checked in their properties.
- Troubleshooting tip: If players can't see anything on a map with Fog of War enabled regardless of these settings, try exposing an initial area of Fog of War around their tokens.
- Off
- When ✓checked, all tokens on the map (or explored areas of the map if Fog of War is enabled) will be shown to players regardless of token ownership, vision and light settings, and the Vision Blocking Layer (VBL). Hovering over Tokens with vision settings will still display a projected outline of what they can 'see' that accounts for the VBL.
- Day
- When ✓checked, players can only see the map and other tokens through tokens they own which have sight enabled in their preferences. Tokens will 'see' up to the maximum distance of their vision settings, and Vision Blocking Layer will block tokens from 'seeing' one another. Most light sources are ignored as all areas of the map is considered fully illuminated for vision purposes, though Auras remain visible.
- Night
- When ✓checked, players can only see the map and other tokens through their own tokens' vision just as with the Day setting, but additionally can only see into illuminated areas.
- Edit Map...
- Opens the Map Properties dialog to adjust the map's name, background color/texture, base map, fog color, grid settings, and vision distance.
- Adjust Grid...
- Enters an 'Adjust Grid' Map View mode to quickly find workable grid settings for the current map. The Map View's modal panel will change and display contain controls for grid size, x-y offsets, and color, as well as a map zoom slider. Further UI features of this mode are as listed:
- Tip: Also look at Auto Resize for a semi-automatic way of fitting map images to the grid.
- Left-clicking and dragging the Map View while this tool is open offsets the grid.
- Scrolling the mouse wheel or holding
Shiftand hitting the arrow keys will change the grid size. - Right-clicking and dragging will pan the Map View as usual, and holding the
Metakey while scrolling the mouse wheel will zoom the map as normal. - Clicking the 'close' button will save your changes and close Adjust Grid mode.
- Hitting the Escape key will exit the Adjust Grid mode without saving your changes.
- Adjust Map Board...
- Enters an 'Adjust Grid' Map View mode to adjust the position of a background map if any is set. This is the only way to adjust the position of the background map. The Map View's modal panel will change to display Snap to options and background map x-y offset values.
- Left-clicking and dragging will move the background map around. Right-clicking lets you pan the Map View as usual.
- The 'Snap to' option lets you either freely drag the map ('None'), snap the background to the grid as you drag it ('Grid'), or to the set repeating texture ('Tile').
- All changes are immediately saved and cannot be automatically undone. Clicking the 'close' button OR hitting the Escape key will exit the Adjust Map Board mode.
- Rename...
- Opens a dialog box to adjust the current map's name.
- Copy...
- Opens a dialog box to create a copy of the current map in the current campaign with a new name.
- Delete...
- Opens a dialog box to irreversibly remove a map from the current campaign. It is recommended to export any maps before deleting them unless you are sure you will never need them anymore.
View Menu
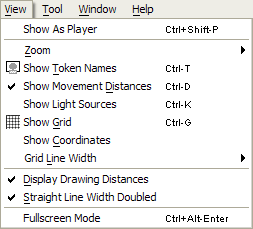
The View menu helps you control and customize the appearance of the Map View.
- Show As Player
Meta+Shift-P
- Helps a GM simulate what players would see on the currently selected map when ✓checked. This option is very helpful when building maps with vision and/or light sources, and the Vision Blocking Layer.
- Unexplored/Hard Fog of War will appear solid black as it appears to players.
- Selecting a token will limit vision to only the lights, exposed Fog of War, and tokens that token can see.
- When no tokens are selected, any tokens matching the toolbar Fog of War display settings are shown. If all the player tokens are 'PC' tokens, selecting the 'PC' Fog of War display setting on the Toolbar can further help narrow down what players can actually see.

- Zoom
- The zoom menu exposes map zooming functions. The current zoom level can be seen on the right side of the Status Bar.
- Zoom In
=
- Zooms the map in an increment of roughly 7% of the current zoom level. Scrolling up on the mouse wheel also does this.
- Zoom Out
-
- Zooms the map out an increment of roughly 7% of the current zoom level. Scrolling down on the mouse wheel also does this.
- Zoom 1:1
+
- Resets the zoom level to 100%.
- Zoom In
- Show Token Names
Meta-T
- Displays all token names beneath their tokens when ✓checked. Visible PC token names are shown in black text in light grey boxes, Visible NPC names are shown with white text on blue boxes, and No Visible token names are shown as white in dark grey boxes.
- Show Text Labels
- Displays text labels created with the Drawing Tools.
- Show Movement Distances
Meta-D
- When ✓checked, the current total movement distance is shown below the selected token while dragging. This accounts for terrain modifiers and the current diagonal movement rules of current server (or the MapTool installation if not connected to a server).
- Show Light Sources
Meta-K
- Displays a light bulb graphic over tokens with light sources attached when ✓checked. This option is only available to GMs, and won't work when 'Show as Player' is checked.
- Show Grid
Meta-G
- Toggles the grid on or off.
- Show Coordinates
- Displays large orange numbers along the top, and yellow letters along the left side designating the grid rows and columns for quick reference. This scheme can be useful to communicate a particular grid location secretly to a player over chat without pointing it out to everyone, for instance.

- Grid Line Width
- Controls how many pixels thick you prefer your grid lines to be when the Grid is enabled. This is a per-client setting.
- Display Drawing Distances
- Displays distances when using the drawing and template tools (except for the Freehand and Text tools).
- Straight Line Width Doubled
- When ✓checked, the line template tool from a point will make straight lines at double width. If unchecked, you will have to choose which side of the line the template will be drawn on.
- Fullscreen Mode
Meta+Alt-Enter
- Toggles a fullscreen mode where only the Map View is visible. This hides all menus, the toolbar, and all panels. Repeating the key command or pressing Escape will return to the normal windowed view.
Tool Menu
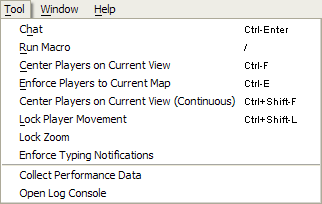
- Chat
Meta-Enter
- Toggles the Chat panel. Identical to the
Window > Chatmenu option.
- Run Macro
/
- Focuses the Chat panel (toggling it visible if necessary) and begins the input with a '/' character. Using the '/' shortcut is a convenient way to access the chat at any time within MapTool and quickly enter Chat Commands.
- Center Players on Current View
Meta-F
- Allows a GM on a server to move all players on the same map as the GM to pan to center on the GM's view and zoom level.
- Enforce Players to Current Map
Meta-E
- Allows a GM on a server to pull all connected players to the GM's currently selected map (as long as it is visible to players).
- Center Players on Current View (Continuous)
Meta+Shift-F
- When ✓checked, players' views will be panned and zoomed automatically to match the GM whenever the GM moves their view.
- Lock Player Movement
Meta+Shift-L
- When ✓checked, players cannot move tokens they own unless it is that token's turn on the Initiative panel.
- Lock Zoom
- Disables zooming functions when ✓checked. Affects only current client, not other players on a server.
- Enforce Typing Notifications
- Forces all connected players to see typing notifications, even if they are disabled in a player's local Chat panel.
- Collect Performance Data
- Opens a window displaying performance data. This feature can help advanced users with macro troubleshooting and MapTool development.
- Open Log Console
- Opens a window displaying MapTool's debugging log. To learn more about using this feature, you can explore Log Macro Functions. This feature can help advanced users with macro troubleshooting and development.
Window Menu
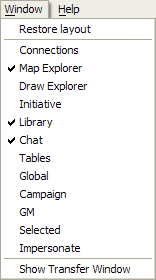
All panels will show as ✓checked when they are open. If you cannot find a panel, it may be in a tabbed panel or undocked from the Map View. Using the Restore Layout tool may help.
- Restore layout
- Resets to a default arrangement of panels docked to the left and bottom portions of the Map View. The default panels are the Map Explorer (lower left), Library (top left), and Chat (lower edge). All other panels are hidden and also have their default size and position reset.
- Connections
- Toggles the Connections panel. When playing on or running a server, this panel shows which players are currently connected.
- Map Explorer
- Toggles the Map Explorer panel. This panel shows all the Tokens on the currently selected map, organized by layer.
- Draw Explorer
- Toggles the Draw Explorer panel. This panel shows all the drawing objects (shapes, text, and cuts) on the currently selected map, organized by layer.
- Initiative
- Toggles the Initiative panel, which is a tool to help set and track rounds, current turn, and turn order for tokens on the the current map.
- Library
- Toggles the Library panel, a file browser to drag and drop images and tokens from added folders on the file system onto the map.
- Chat
- Toggles the Chat panel where all connected players can type, run chat commands, and run macros directly.
- Tables
- Toggles the Tables panel. Tables for the current campaign are created, configured, and can be run directly from this panel.
- Global
- Toggles the Global panel, which contains any macros attached to the current installation of MapTool.
- Campaign
- Toggles the Campaign panel, which contains any macros attached to the currently open campaign file.
- Selected
- Toggles the Selected panel, which contains any macros attached to the currently selected Token.
- Impersonate
- Toggles the Impersonate panel, which contains any macros attached to the currently impersonated Token.
- Show Transfer Window
- Opens a window showing any pending images that are currently being retrieved from the server or a repository.
Help Menu
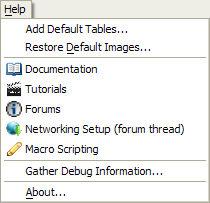
- Add Default Tables...
- Uses the default MapTool resources to create image tables for 6 dice types (D4, D6, D8, D10, D12, D20) and two playing card-decks (One with a joker, one without). If any of the default resources are missing from the default data directory (which can be set in your MapTool Preferences), the images will be shown as red Xes until they are either edited to point to new images or the default images restored.
- Restore Default Images...
- Fetches the default MapTool image assets and places them in the current data directory according to your MapTool Preferences. This can be helpful if you've changed the data directory but later want to restore 'Quick Map' or 'Add Default Tables' functionality.
- Documentation
- Opens a web browser to the RPTools' MapTool page.
- Tutorials
- Opens a web browser to the RPTools' MapTool Tutorials page.
- Forums
- Opens a web browser to the RPTools Forum.
- Networking Setup (forum thread)
- Opens a web browser to a Networking FAQ thread on the RPTools forum.
- Macro Scripting
- Opens a web browser to this wiki's main page.
- Frameworks
- Opens a web browser to this wiki's frameworks page.
- Gather Debug Information...
- Displays system information useful for debugging and development. If you ever report a bug, you may want to include this information in your report.
Themes Menu
Prior to version 1.12.0, there is a Themes menu (themes are controlled in Preferences from 1.12.0 on).
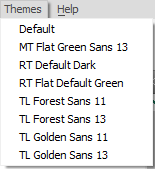
- Default - The default MapTool theme.
- more themes... - Other themes found in the MapTool
USERDATA/themes/uifolder will be found here.
- Add your own custom themes to this folder to have them displayed in the menu. You must restart MapTool for a theme to take effect.
- About...
- Displays a dialog with version information and attribution to MapTool's wonderful developers and community members.
Toolbar and Map View
The MapTool Toolbar lets you interact with the Map View in different ways. The toolbar has a handle on the left side, allowing the user to undock it from the application window. Closing the popped-out toolbar or dragging it beneath the menu bar returns it to its default position. In MapTool 1.5.8 and later, the toolbar can be hidden or shown by clicking the down/up toggle on the right edge of the menu bar.
About the Map View
Beneath the Toolbar's default position, most of the application window is used to display the current map. Any docked panels will appear alongside the Map View. Map view is semi-modal, meaning its use and options change somewhat depending on the tools and menu options you select.
Controls in the Map View
In most modes, MapTool describes the available commands for the Map View in the #Status Bar at the bottom-left of the application window. The following controls are what are available to players and GMs using the Pointer tool:
Left clickon a token: Select that token. A red border means an owned token is selected and can be manipulated; a green border means an unowned token is selected, which is useful for targeting when using macros.Left click + drag: If no tokens are selected, drag a selection box to select multiple tokens. If a token or token(s) are selected, move selected token(s).
- Add
SpacebarorRight Clickwhile dragging a token to set waypoints to control the path taken by the token.
- Add
Right click: Select a token and open its right-click context menu.Right click + drag: Pan the Map View.Mouse Wheel: Zoom the Map View in/out.Spacebar: Holding spacebar will show a blue arrow on the map pointing to your cursor position to all connected players. Your name is shown next to the arrow.
Meta + Spacebar: Changes the pointer image to a cartoon-style speech bubble.Shift + Spacebar: Changes the pointer image to a cartoon-style thought bubble.Meta + Shift + Spacebar: Changes the pointer image to an illustrated pointing hand. This pointer has special use for GMs:
- If used by the GM, this illustrated pointer also moves the map view of all players on the same map to center on the pointing location and at the GM's zoom level. When used in this way, the GM can release the
Spacebarfirst to let player views snap back to their previous location, or release eitherMetaorShiftfirst to keep the player views centered on the new location.
- If used by the GM, this illustrated pointer also moves the map view of all players on the same map to center on the pointing location and at the GM's zoom level. When used in this way, the GM can release the
- Hover over a token:
- When the token is on the Token layer, will display the token's Stat Sheet by default (can be turned off by the client in their Preferences settings, in which case
Shiftmust also be held down to see the stat sheet). - When the token is on the Object layer, the mouse pointer will change to the selection image and a
Left clickon the token will display the Notes from the token where the stat sheet is normally displayed. (This is for GMs to provide information about areas that players can review on their own. Also, when the GM left clicks, they see both the Notes and the GM Notes.) - When the token is on the Hidden or Background layers, no special interaction is performed.
- When the token is on the Token layer, will display the token's Stat Sheet by default (can be turned off by the client in their Preferences settings, in which case
Modal Panel
For GMs, the Map View usually has a small panel present in the top right. This panel most often displays the different map layers so the GM can choose which layer to interact with. Following is a rundown of the different modal panels that exist in MapTool.
- Layers Selection
- This panel lets the GM select which layer to use their pointer, draw (except the text tool), or template tools on.
- Color and Stroke Options
- This panel is displayed to GMs and Players when the Drawing and Template tools are selected, except for the Text tool. For GMs, this panel is appended with the option to select layers.
- No Panel
- The modal panel is not displayed at all when the Measure, Fog of War, Text, or Vision Blocking tools are selected. The panel is also not shown for players connected to a server using Interaction tools, since they cannot interact with anything but the Token layer.
- Adjust Grid Settings
- This is a special mode accessed by GMs under the Map Menu.
- Adjust Map board Settings
- This is a special mode accessed by GMs under the Map Menu.
Toolbar Overview

Hovering your mouse over a tool will tell you what it does in a tool-tip. Reading the Status Bar in the bottom left will often tell you how to use a tool in the Map View once it is selected.
Tool Palettes and Tools
These buttons change how you interact with the Map View and make different tools available.
- Interaction Tools
- Pointer: Lets you select and move tokens. This tool is used the vast majority of the time when playing with others.
- Measuring Tool: Lets you click and drag to measure a distance on the map. You can use
Spacebarwhile measuring to set a waypoint to measure a path.
- The Measuring Tool ignores AI pathfinding, VBL, and terrain modifiers. If you want to measure distances with those modifiers, consider dragging a token with Show Movement Distances enabled in the View menu.
- AI Toggle: Toggles AI Pathfinding. When enabled (green), all dragged tokens on the Token layer will try to find the shortest path from point A to point B while avoiding vision-blocked areas, accounting for terrain modifiers, and counting diagonal movement rules. In MapTool 1.6.0 and later, clients will now follow the server setting for this button.
- When dragging tokens that would have to take very long paths, or impossible paths (such as entering a space not accessible due to the vision blocking layer), there can be a few seconds of delay as the algorithm times out. If this is happening to you frequently (such as when building maps) you can disable the AI system until you want it back on.
- VBL Blocks Movement: Tokens will navigate around VBL if this is enabled. In MapTool 1.6.0 and later, clients will now follow the server setting for this button.
- Drawing Tools
- Selecting this palette exposes the Drawing Options in the Map View's modal panel (unless the Text tool is selected). Drawing tools create vectors that can be viewed in the Draw Explorer panel.
- Text Tool
- The Text Tool is a little different than other drawing tools. When this tool is selected, clicking on the map will create a new text label. You can also click and drag to move existing labels, or double click a label to change its text or properties. Text labels appear for all players, are hidden by Fog of War, and do not appear on the Draw Explorer panel.
- Template Tools
- Selecting this palette exposes the Drawing Options in the Map View's modal panel. Template tools create vectors that can be viewed in the Draw Explorer panel.
- Template tools let you draw a variety of quick shapes on the map to aid with tasks such as determining areas of effect. With the line Template Tools, you must click three times; once to set an origin, a second time to set a direction of the effect, and a third time to set the distance of the effect.
- Fog of War Tools
- When Fog of War is enabled on the current map, these tools can restore or remove Fog of War. Read more in the Introduction_to_Lights_and_Sights.
- Vision Blocking Layer (VBL) Tools
- These tools let you designate parts of the map that block vision and AI movement. Read more in the Introduction_to_Vision_Blocking and Introduction to AI Pathfinding.
Clip and Stream Volume Control
Some macro functions can cause sounds to play on your client. Clicking the speaker icon will mute these sounds, and adjusting the slider changes their maximum volume on your system.
Fog of War Vision Settings
When connected to a server with Individual Views ✓checked, these buttons filter which tokens' vision you will see when no tokens are selected.
- ME: Show tokens owned explicitly by you
- All: Show tokens owned by you OR with Owned by All ✓checked
- PC: Show tokens owned by you OR Owned by All that are PC tokens
- NPC: Show tokens owned by you OR Owned by All that are NPC tokens
Select Map Dropdown
This dropdown menu contains all the maps in the current campaign in alphabetical order with the the current map ✓checked. Selecting a map will move your view to that map.
The GM will see maps not visible to players listed with crossed-out eye icons, while players will not see these maps listed at all.
When naming maps, using a numeric prefix (i.e. 1.0 Start Map, 1.2 Castle, 2.0 Forest) can help organize your Select Map drop-down considerably.
Panels
Panels are windows which expose additional MapTool features. They can be toggled visible or hidden by using the Window menu, and their position is customizable; they can be docked to the edge of the Map View, resized, tabbed to share a location with other panels, and floated apart from the application window entirely.
You can reset all the panels by Selecting Restore Layout from the Window menu. MapTool saves the current panel configuration when it is closed.
Connections
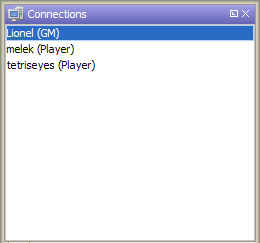
When playing on or running a server, this panel shows which players are currently connected. Right-clicking on a player's name will let you whisper them (anyone), or boot them (Host only).
Map Explorer
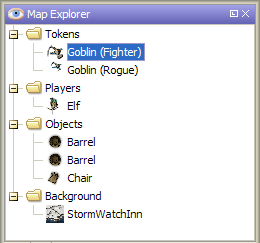
This panel shows all the Tokens on the currently selected map, organized by layer. Right-clicking on a token shows its full context menu.
Draw Explorer
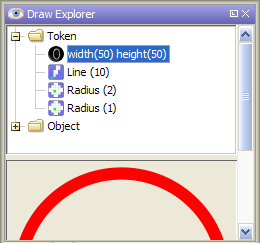
This panel shows all the drawing objects (shapes, text, and cuts) on the currently selected map, organized by layer. Below the layer tree is a preview of the selected drawing.
Right-clicking on a drawing exposes additional options. You can change their layer, group drawings, set their style to match the current drawing options, or copy their style to the drawing options modal panel.
Initiative
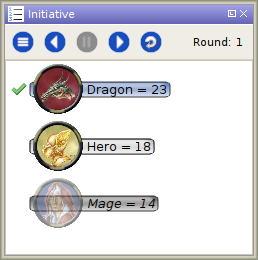
A tool to help set and track rounds, current turn, and turn order for tokens on the the current map. See the Introduction to Initiative.
Library
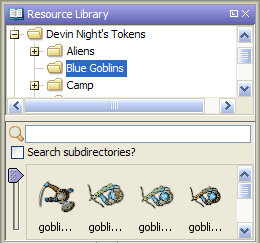
A file browser to drag and drop images and tokens from added folders on the file system onto the map. To add new folders, you must use the 'Add Resources to Library' option on the File menu.
- Type text into the box by the magnifying glass to only show files in the selected folder whose names anywhere match what you type. For example, typing 'gob' in the search box could return both 'goblin.jpg' and 'hobgoblin.jpg'.
- Be careful when selecting 'Search subdirectories?' in very large folder trees.
- The slider on the left side of the file preview changes the zoom level of the preview.
For more information see the Introduction to Mapping.
Chat
Panel where all connected players can type, run chat commands, and run macros directly. Additionally, provides options to change text color, insert emoticons, and toggle scroll lock and typing notifications.
When impersonating a token, your chat messages will appear to come from that token. You'll see the token image to the left of the input area, and have the option to cease impersonation by clicking a red 'x'.
Tables
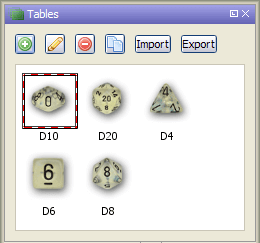
Tables for the current campaign are created, configured, and can be run directly from this panel by double-clicking their image. To add simple tables to your campaign and get a sense for how they work, you can create some simple default dice and playing card tables in the Help menu by selecting 'Add Default Tables...'. For more information read the Introduction to Tables article.
Macro Panels
Global
Contains any macros attached to the current installation of MapTool. Global macros are saved when MapTool is properly closed, but are not available to other connected players on a server.
GM
Contains GM-only macros attached to the currently open campaign file. GM macros are saved with the campaign, and when on a server are available to all connected GMs.
Campaign
Contains public macros attached to the currently open campaign file. Campaign macros are saved with the campaign, and when on a server are available to all connected players, although players may not add or remove macros from this panel (see Managing Macros in Panels).
Selected
Contains any macros attached to the currently selected Token(s). It also lists identical macros across tokens in a 'Common Macros' area at the top of the panel, if relevant. Token macros are saved with the token, and are available to any GMs or owners of the token on a server.
Impersonate
Contains any macros attached to the currently impersonated Token, and otherwise shows an option to impersonate a selected token. Token macros are saved with the token, and are available to any GMs or owners of the token on a server.
Status Bar

- Instructions / Help Text: This portion of the status bar often displays context-sensitive instructions on how to use a selected tool. If you are struggling to understand a tool, look here first.
- Assets Cache and Image Thumbs Cache: These numbers show, usually in megabytes (MB) the amount of disk space occupied by various image caches. Double clicking on them flushes the caches, freeing disk space (until it fills back up with more cache). Warning! Flushing the Assets Cache while a campaign file is open can result in missing assets if you then save the campaign file. Save and close any open campaign file before flushing the cache.
- Free Space: A quick reminder of how much free space is on the drive where the MapTool Data Directory is located, usually in gigabytes (GB).
- Map Coordinates: The x-y position of the cursor on the grid. This corresponds to the coordinates enabled by the Show Map Coordinates option in the View menu, except that the y value in the status bar is numeric rather than alphabetical (0 = A, -1 = -A).
- Zoom Level: The current zoom level as a percentage. Additionally, clicking on the zoom level allows a custom zoom level to be manually entered.
- Used RAM: The memory used out of the total amount allocated. Hovering over this section of the Status Bar also displays the Maximum Memory. Clicking here will reclaim some of the used memory.
- Network Info: The icon on the left shows the server status, while the two grey dots will light up green when sending data, or red when receiving data.
Other Important UI Components
The following additional windows and subjects are key parts of using MapTool for the majority of users.
