Introduction to Vision Blocking/ja
{{#customtitle:はじめての視覚遮断機能|はじめての視覚遮断機能}}
BEGINNER
THIS IS A BEGINNER ARTICLE
視覚遮断(Vision Blocking)
MapTool では、トークンにプログムラムがゲーム内での視覚と照明を再現した視界を与えることができる。つまり、トークンが視覚を持つように設定することで、他のトークンやマップの範囲を「見る」ことが可能となる。さらに、MapTool は照明の機能(トークンは光源の及ぶ範囲や光源の近くでなければ「見る」ことはできない)と視覚遮断の機能(トークンの視程を遮る境界を設置できる。この機能によりダンジョンの壁を再現することが可能だ)を備えている。
このガイドでは MapTool の視覚遮断レイヤー・ツール(地形学ツールとも言う)について簡単に紹介し、この機能を使いサンプルのダンジョンの環境を作る方法を紹介する。重要なことだが、視覚遮断機能は視界(Sight)、照明(Light)、不明領域(Fog of War)の各機能と密接に関係している。理解を深めるために Introduction to Lights and Sights を併せて読むことをお勧めしよう!
手始めにマップを用意する
さて、はじめる前に我々にはマップが必要だ。じめじめとしていて、何か出そうで、くねくねとした小さな通路に満ちあふれた、何の変哲も無いソレが転がってないだろうか?
まあ、別にアホほど曲がりくねった迷路を探す必要はない。右に見えるマップをこのチュートリアルの実例として使用していこう。このマップは Jonathan Roberts (RPTools Forums では Torstan として出会える)の作った見事なタイルセットを使って作り上げたものである。
視覚遮断ツールを有効にする
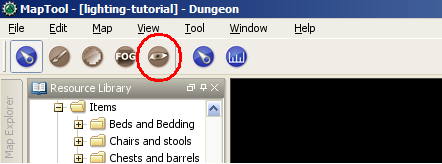

視覚遮断ツールを有効にするには、MapTool のツールバーにある「目」のアイコンをクリックする(スクリーンショット参照)。そうすることで、新しいボタンの集まりが表示される。このボタンの集まりは視覚遮断を描画するためのさまざまなツールだ。ボタンの上にマウスカーソルをかざすことでそれぞれの機能を説明するツールチップが表示される。各ボタンは左からそれぞれ:
- Draw a Rectangular VBL: this creates solid rectangular areas that block vision (these are generally called Vision Blocking Layers, or "VBL" for short). . Tokens outside the area cannot see into it or through it; tokens inside the area cannot see anything at all (it is solid and opaque).
- Draw a Hollow Rectangular VBL: this, as it implies, creates hollow VBL - if a token is inside the area, they will see everything inside it, but will not be able to see beyond the boundary; for tokens outside the VBL area, they will see everything outside, but cannot see into the rectangular area.
- Draw a Circular VBL: like the rectangular one, this creates a circular (in reality, a polygon approximating a circular area; actual circular curves are performance-intensive!) VBL
- Draw a Hollow Circular VBL: behaves like the hollow rectangle
- Draw Closed Poly Line VBL: this lets you draw an arbitrary polygonal shape using line segments, and when finished, closes it and makes a solid VBL out of it. To start the polyline shape, left-click on the map, and draw the first segment. To attach the next segment, right-click and move the mouse to create the next line segment. When finished with the full shape, left-click to close it.
- Draw Poly line VBL: as above, but creates a hollow polygon
- 長方形の視覚遮断を描画:視覚を遮る塗りつぶされた長方形(視覚遮断と呼ばれている物)を 描画する。この範囲の外側にいるトークンは範囲の内側や向こう側は見えない。範囲の内側にいるトークンは何も見えなくなる(この中は不透明で隙間なく塗りつぶされている)
- 塗りつぶされていない長方形の視覚遮断を描画:視覚遮断の囲いを描画する。描画された範囲の内側にいるトークンは内側にあるものをどれでも見ることができるが、境界線を越えた向こう側は見ることができない。視覚遮断の外側にいるトークンは、外側にあるものを見ることができるが、長方形の内側を見ることはできない。
- 円形の視覚遮断を描画:長方形の物と同様であるが、こちらは円形の視覚遮断(正確には、円に近似する多角形である。正確な円は処理速度に影響してしまう!)を描画する。
- 塗りつぶされていない円形の視覚遮断を描画:円形であることを除いて「塗りつぶされてない長方形の視覚遮断」と同じ物だ。
- 閉じた多角形の視覚遮断を描画:直線を繋いで自由な多角形を描画し、描き終えると図形を閉じて塗りつぶされた視覚遮断を作る。多角形を描き始めるにはマップ上で左クリックをし、最初の線分を描画する。次の直線を繋げて描画するには右クリックして次の線分を描画するためにマウスを動かす。多角形が完成したら左クリックして図形を閉じる。
- 塗りつぶされていない多角形の視覚遮断を描画: 上記と同じだが、枠線のみの視覚遮断を描画する。
模範的な使い方
視覚遮断と視覚は処理速度に影響を与え、視覚遮断を過度に使用すること(又は過度な複雑に使うこと)は MapTool に処理速度の低下、マップの制御不能など、さまざまな不具合を引き起こすことになる。次のことを守っていればまず大丈夫だろう:
- Use square VBL wherever possible - and minimize the use of circular or highly irregular VBL
- Use solid VBL wherever possible - this prevents gaps between polylines, which can be performance hogs. Instead, cover the map with VBL, and cut out the areas that the tokens should be able to see.
- Use as little VBL as necessary to get the effect you seek - make it efficient!
- It is frequently a good idea to set up a vision boundary at the edges of the play area on your map - maps in MapTool are theoretically infinitely sized, but if your tokens are going to be only in the dungeon area, there's no reason for MapTool to have to be calculating what they see all the way out to the edge of the universe.
- 可能な限り長方形の視覚遮断を用いる - 円形や複雑な形状の視覚遮断の使用は最小限にとどめる。
- 可能な限り塗りつぶされた視覚遮断を用いる - 線と線の間に生じる隙間は処理速度に大きな影響を与えるが、こうすることで防ぐことが可能だ。むしろマップを視覚遮断で覆いつくし、トークンが動き回る範囲だけ切り取るようにすべきだ。
- 狙った効果を再現するのに必要な最低限の数だけ視覚遮断を使用する - 無駄なく効率的に!
- マップの中でゲームで使う範囲を視覚遮断で囲むことは、よく使われるよく有る冴えたやり方だ。理論上、MapTool のマップは無限の広さを持っているが、結局のところ君のトークンはダンジョンに潜ってしまうので、世界の果てまでの視覚計算をする必要はどこにもないのだ。
以上のことは煩わしい処理落ちを防ぐ助けとなるだろう。君はあらゆる種類の視覚遮断を使用することができるが、構築した視覚遮断の複雑さには気をつけるように。
サンプルマップに視覚遮断レイヤーを配置する
ではマップに視覚遮断を追加してみよう。ここでは、マップ全体を塗りつぶされた視覚遮断で覆い、プレイヤーが探索する予定の範囲を「くり抜く」、という推奨された方法を使用する。
ダンジョン全体を塗りつぶされた視覚遮断で覆う
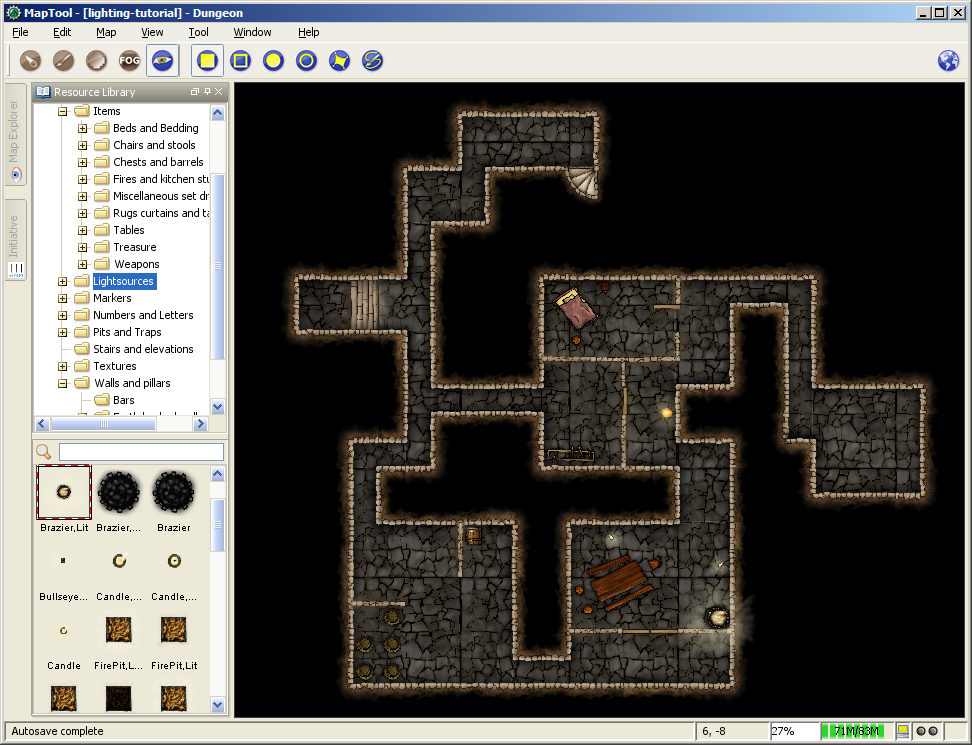
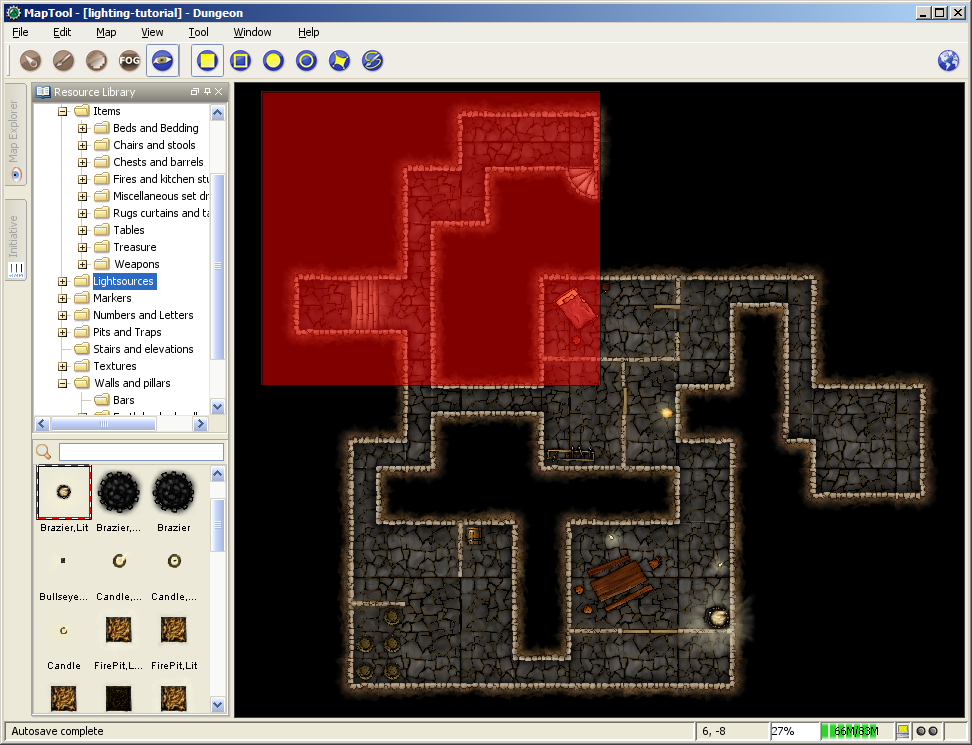
- Zoom the map so you can see the whole thing.
- Select the Draw a Rectangular VBL button.
- Left-Click to place the upper-left corner of the solid VBL. Do not hold down the left-mouse button.
- Drag the mouse to define the size of the VBL. You'll see it traced out in a transparent red color as you drag.
- Click the left mouse button again to place the lower-right corner of the VBL. The VBL will turn blue (if you go to the toolbar and select one of the other tools on the left side - switching off the VBL tools - the blue VBL indicators will disappear. They are only visible when the VBL tools are active).
- 全体が見渡せるまでマップの表示を縮小する
- 「長方形の視覚遮断を描画(Draw a Rectangular VBL)」のボタンを選択
- 塗りつぶされた視覚遮断の左上角に当る地点を左クリック。マウスの左ボタンは押したままにせず離す。
- マウスを動かして視覚遮断のサイズを決定する。マウスの移動に従い半透明の赤い長方形が描かれていくはずだ。
- 視覚遮断の右下角に当る地点でマウスを左クリック。視覚遮断は青色に着色されるはずだ。(ここでツールバーの左側から他のツールを選ぶと、視覚遮断ツールが非表示になり、青い視覚遮断レイヤーが消えたように見える。視覚遮断の図形は視覚遮断ツールが有効な時のみ表示される)
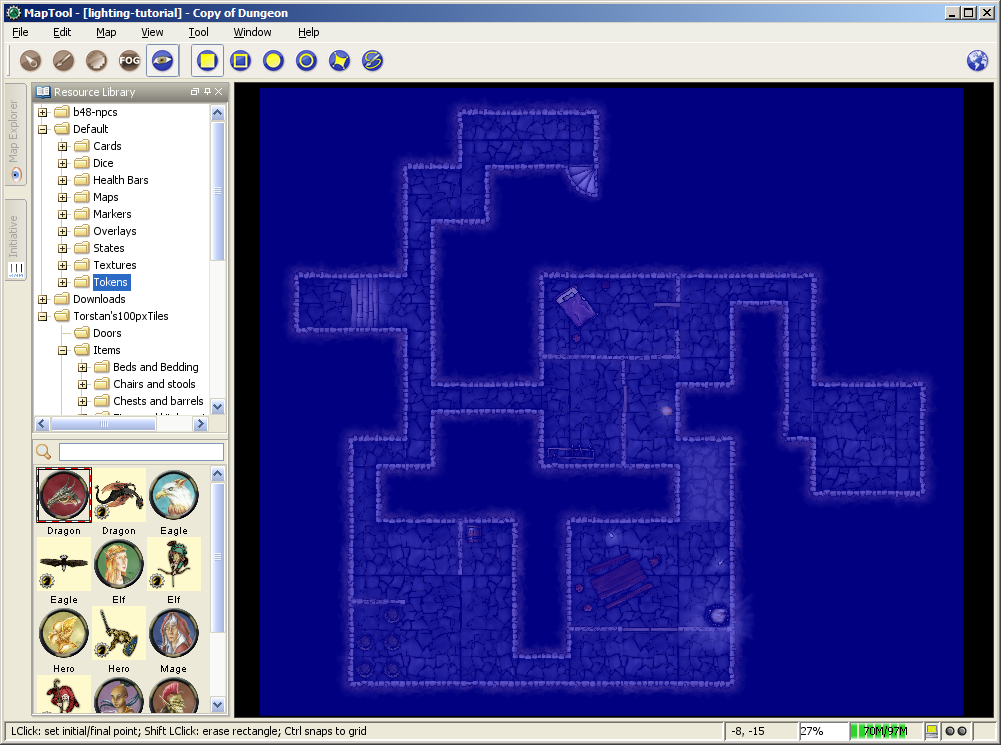
これでマップ全体を視覚遮断で覆いつくした。「視界」の設定を有効にしてトークンをこの視覚遮断の外側に配置した場合、この範囲の中を見ることはできなくなる。
遮光域の塗りつぶしから表示する範囲をくり抜く
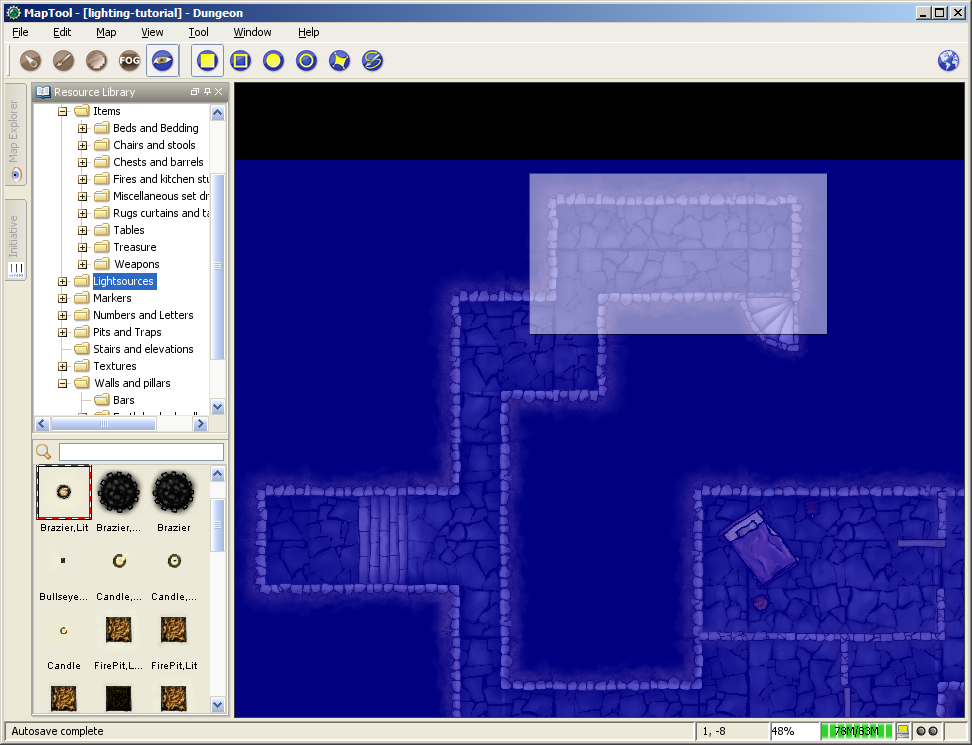
次は部屋をくり抜いていこう。この行程は少しばかりコツが要る。遮光域の効率を保つため、可能な限り最良の稜線を引いているか、部屋と部屋の間に細い隙間や遮光域の細い線が残っていないか確認すること(上手くやるコツは後述)。この行程では、外周の壁に沿って内側の遮光域を取り除く予定だ。内部の壁に付いては後ほど案内しよう。
- Zoom the map until you are comfortable with the zoom level.
- Select the Draw a Rectangular VBL tool.
- Hold down the Shift key, and left-click to mark the upper-left corner of the area of VBL you want to erase. A white, transparent box will follow the mouse cursor (if it's not white, you forgot to hold shift!)
- Drag the mouse until you've reached where you want the lower-right corner of the cleared area to be, and left-click. The blue VBL will disappear. You have now erased the VBL for that area, and tokens in that area would be able to see (their vision would be blocked, of course, once it reached any VBL!).
- Repeat this process for the rest of the rooms, tunnels, and so forth.
- 作業しやすい大きさになるようマップを拡大する。
- 「長方形遮光域を描画(Draw a Rectangular VBL)」ツールツールを選択。
- シフトキーを押しながら、消去したい遮光域の左上角に当る部分をクリックする。マウスの動きに伴い半透明の白い矩形が描画される。(シフトキーを押し忘れ ていると白くならない!)
- 消去したい範囲の右下角までマウスを動かし、左クリックすると、青い遮光域が消去される。この範囲の遮光域がなくなったので、ここに配置したトークンはこの場所を見ることができるようになる(もちろん、遮光域の向こう側を見ることはできない)。
- まだ残っている部屋やトンネルなどを、同じ作業を繰り返して作っていく。
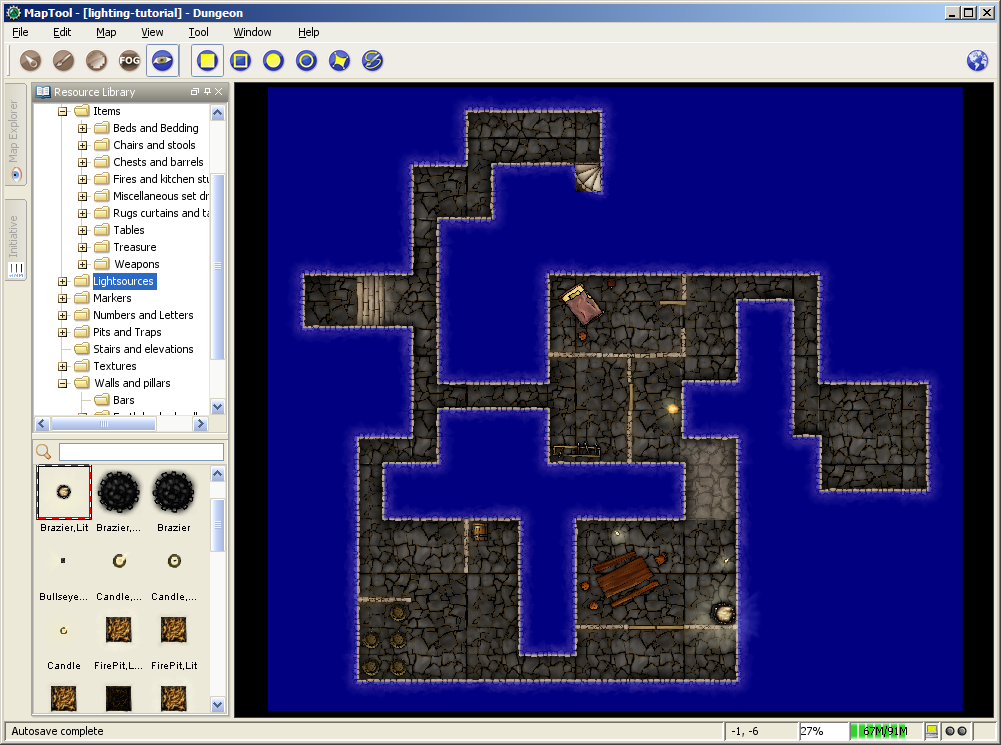
作業を終えると、ダンジョン型に「くり抜かれた」大きな青い図形が出来上がる。
ヒント:遮光域を編集するときにCTRLキーをを押すことでマップのグリッドに吸着するようになる。この機能は遮光域をきれいに描くのにとても役に立つ。このテクニックは遮光域をダンジョンの壁に沿って簡単に四角くくり抜ことができるので、前述のサンプルマップで遮光域をくり抜くのに使用している。
Interior VBL
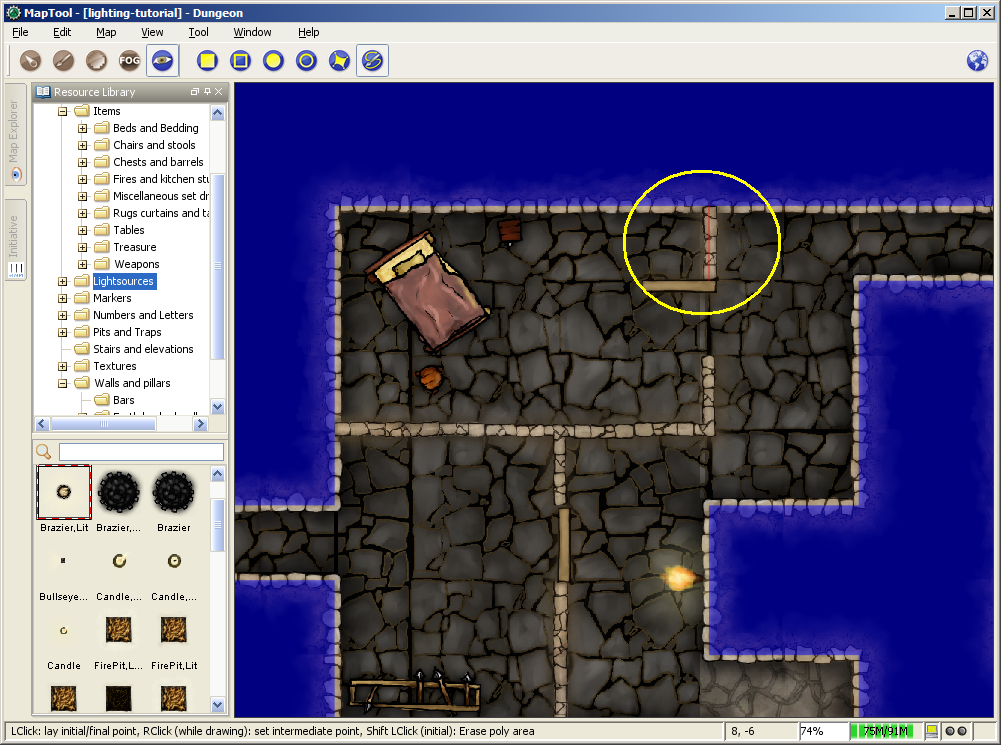
Finally, we will put VBL on the interior walls. This will make it so that the walls inside the dungeon block vision too.
- Zoom the map to focus on a particular wall.
- Select the "Draw Polyline VBL" tool.
- Hold down Ctrl, and left-click on the map to place the beginning of the line segment. I recommend starting the line somewhere in the solid VBL, so that there are no gaps at the edges of the walls.
- Drag the mouse to draw the line segment. (in the screenshot, the line segment is the thin red line inside the yellow circle; the yellow circle was drawn on the screenshot to show you where the polyline is - it's not part of the VBL process)
- Left-click to place the end of the line segment. The red line will turn blue, indicating that there is VBL now on that wall.
- Repeat the process for the other walls, until you are satisfied.
VBL and Objects
There are lots of objects in a dungeon that can block vision - doors, pillars, piles of rubble, chests...you name it. It is possible to draw VBL anywhere on a map - however, at this time, VBL is not linked to particular objects. This means that you can't, for instance, put VBL on a door and have it "open" with the door when your players open it. You can simulate this by deleting the VBL that crossed the doorway, but you can't have the VBL automatically move with an object.
You'll have to experiment with the VBL for the objects in your dungeon, but here are some tips:
- Doors: for doors, if they are closed, simply draw the VBL along the wall in which the door sits. When (if) the door is ever opened, you can rotate the door object, and use Solid Rectangular VBL to erase the vision blocking layer that covered the doorway (remember, hold down Shift to erase VBL). Make sure to use solid VBL - if you use a hollow rectangle, it will only erase where the hollow rectangle's boundary intersects the other VBL.
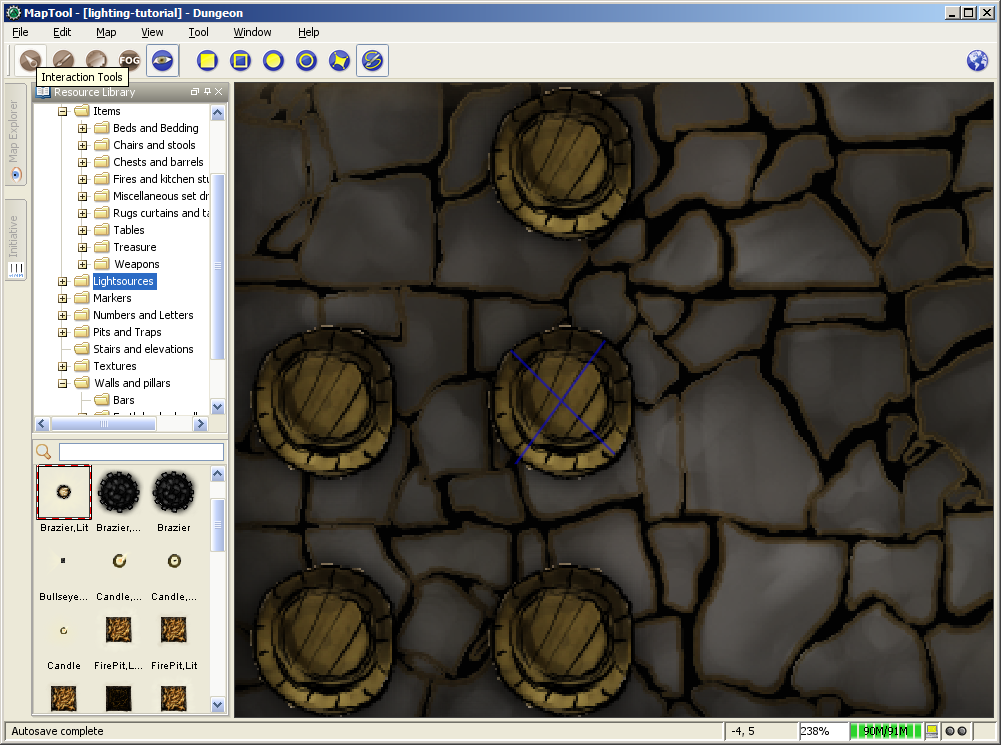
- Pillars, statues, and standing objects: remember that, when you use VBL, the tokens cannot see into or through it at all (and, because of this, the players won't see anything covered by or hidden inside VBL on their screens). If you want the players to be able to see some of an object - like a large pillar - one of the recommended tricks is to draw an "X" on the pillar using poly line VBL (instead of covering the whole pillar with a circular or rectangular solid VBL. Using an X means that the players can see some of the pillar, depending on where their tokens are. It makes for a much nicer look. If you look at the screenshot, you'll see an "X" drawn using VBL on top of one of the barrels.
VBL Limitations
The Vision Blocking Layer in MapTool is a tool for helping to simulate what a character can see during a game. However, it does have limitations, and doesn't "completely simulate vision" or anything like that. We touched on one limitation earlier, the fact that VBL cannot be attached to specific objects, and so if you open a door that is covered by VBL - the door object might move, but the VBL stays put. Here are a couple other limitations of the current (as of MapTool 1.3.b56) Vision Blocking Tools.
- Vision Blocking is Binary: VBL in MapTool is on or off. There is no "partially transparent" or "one way" VBL in the current version of MapTool.
- Vision Blocking is Total: Related to the above, VBL blocks all forms of vision. There are no vision types currently that can see through VBL.
- Vision Blocking has no Elevation: VBL cannot at this point be given a particular height - it stretches to infinity, up and down, and so there's no way to set up VBL so a tall character can see "over" it