Introduction to Lights and Sights/fr
This article is a stub, you can help the RPTools Wiki project by contributing content to expand this article.
This article needs: Traduction en cours. Elle devrait être publiée d'ici le 14 décembre 2009.
BEGINNER
THIS IS A BEGINNER ARTICLE
Qu'est-ce que la vision et la lumière ?
MapTool offre trois fonctionnalités qui donnent corps à l'idée que quand un personnage s'aventure dans un endroit, il n'est pas toujours omniscient. Ainsi, il ne peut pas voir à travers les murs, au-delà des angles ou dans les tréfonds d'obscurs donjons. S'il est difficile de le simuler quand on joue face à face, c'est plus aisé avec un ordinateur. En effet, il devient possible de restreindre la vision d'un personnage à ce qu'il peut éventuellement voir, ce qui rend le jeu plus palpitant et peut-être aussi plus immersif. Les trois fonctionnalités qu'offre MapTool sont la Vision, la Lumière et le brouillard de guerre.
La vision
La vision est la capacité d'un pion à «voir» les alentours. Dans le cas présent, ce qu'un pion d'un joueur peut voir devient visible pour le joueur sur son instance de MapTool. À noter que si le MJ peut toujours tout voir sur la carte, les joueurs peuvent, eux, être limités dans ce qu'il peuvent voir avec la Barrière de vision, la lumière et le brouillard de guerre. Cela rend le jeu plus immersif car les joueurs vont se dire : «Qu'est-ce qu'il y a derrière cet angle ?», ou encore «Qu'il fait sombre dans ce donjon... j'espère que ma torche va tenir !»
La lumière
La lumière est ce qui permet aux pions et aux objets d'éclairer les environs. Cela implique que, dans un donjon obscur, les torches des murs peuvent illuminer quelques endroits de-ci de-là (découvrant ainsi l'éventuel brouillard de guerre qui couvrirait la zone) qui seront donc visibles par les joueurs. En d'autres termes, cela signifie que toute zone illuminée devient visible aux joueurs à condition que son pion dispose de la vue et qu'il n'y a pas de barrière de vision entre lui et la zone.
La lumière est critique quand une carte se trouve en mode «vision de nuit», puisqu'en l'absence de source de lumière, un pion est perdu dans la nuit noire ! (Il ne se verra pas lui-même)
Brouillard de guerre
Le brouillard de guerre est un système qui révèle ce qu'un pion a vu tout au long de ses mouvements ainsi que les parties de la carte qu'il peut voir directement depuis là où il se trouve. Il ne faut pas confondre le brouillard ne guerre avec l'obscurité. Vous pouvez activer le brouillard de guerre sans pour autant avoir de lumières ni même utiliser le mode de vision.
Quand un pion doté de vision «voit» dans une zone brumeuse, le brouillard est dissipé et la carte est révélée. Quand une zone qu'un pion a vue n'est plus directement visible, la brume se reforme de manière moins épaisse : une couche semi-transparente recouvre la zone. Cela permet au joueur de se rappeler qu'il est déjà passé par là, mais qu'il ne peut pas la voir en ce moment. Tout pion présent dans une zone ainsi recouverte est masqué comme s'il se trouvait dans le brouillard le plus complet.
Souvenez-vous : Le brouillard de guerre indique seulement quelles parties de la carte ont déjà été vues par un pion.
Le brouillard de guerre est un sujet à lui tout seul. Aussi, même s'il est intimement lié à la vision et à la lumière, il mérite son propre tutoriel. Allez voir L'introduction au brouillard de guerre pour trouver des détails et des captures d'écran sur l'utilisation du brouillard dans vos parties.
Le donjon pris en exemple
Un donjon est pris en exemple pour l'ensemble des captures d'écrans qui illustrent ce tutoriel (ainsi que dans l'introduction à la barrière de vision). Une capture de ce donjon se trouve à droite. Vous pouvez aussi télécharger le fichier de campagne de ce donjon here.
Configuration des types de vision et de sources de lumière
Les types de vision et les types de sources de lumières peuvent être configurés dans la fenêtre des Propriétés de la campagne. Pour l'ouvrir, aller dans Edition > Propriétés de la campagne.
Types de vision
L'onglet de type de vision (Sight en anglais) vous permet de définir plusieurs types de vues (comme la vision nocturne, la vision normale, la vision dans le noir ou infrarouge, etc.). MapTool fournit quelques types par défaut quand vous l'ouvrez pour la première fois. Si vous regardez le contenu de l'onglet Vision, vous verrez ceci :
Conic Vision: cone arc=120
Normal Vision - Short Range: circle distance=10.0
Lowlight: circle x2
Darkvision: circle r60
Square Vision: square
Normal: circle
Chacun de ces éléments définit un type de vision . Il est défini avec une syntaxe précise expliquée dans la fenêtre des Propriétés de la campagne. Le plus simple consiste en une forme :
Normal: circle
Cela indique simplement que la vision «Normal» est circulaire. Il n'y a aucune limite de portée exceptée celle définie dans les propriétés de la carte (lors de la création et qui est, par défaut, de 1 000 unités).
Un second exemple un peu plus complexe est celui de la vision nocture («Lowlight» en anglais) :
Lowlight: circle x2
Dans ce cas, le nom du type de vision est Lowlight et elle est de forme circulaire. Toutefois, une option supplémentaire a été ajoutée : x2. Cette option interagit avec les sources de lumière et double (multiplie par 2, x2) leur rayon effectif pour tout pion qui a pour vision la « Lowlight vision ». Ainsi, si un pion avec la vision « Normal » peut voir 20 unités avec une torche, un pion avec la vision « Lowlight » en verra 40.
Compliquons encore un peu, regardons la vision dans le noir («Darkvision» en anglais) :
Darkvision: circle r60
Cette entrée a quatre paramètres :
- Darkvision: c'est, bien sûr, le nom du type de vue. Vous pourriez très bien l'appeler «Vision thermique» si vous le souhaitiez). Ce nom apparaît dans la fenêtre de configuration du pion quand vous activez sa vision.
- circle: cela signifie que la forme de la zone de vision est un cercle.
- r: c'est un code qui indique que le pion dispose d'une source de lumière intrinsèque que lui et lui seul peut voir. Même ses alliés ne profiteront pas de cette zone de vision.
- 60: c'est la portée de la zone de lumière intrinsèque, exprimée en unité de carte depuis le centre du pion (si votre carte a 5 unités par cellule, vous couvrirez un peu moins de 12 cellules; si votre carte est de 1 unité par cellule, vous couvrirez un peu moins de 60 cellules). Le un peu moins est dû au calcul de la zone qui s'effectue depuis le centre du pion. De nombreux utilisateurs ajouent une fractions afin que la vision s'achève proprement sur une frontière de cellule.
La configuration des types de vues est propre au jeu auquel vous jouez, c'est pourquoi les détails sont laissés aux mains du concepteur de la campagne. Cependant, vous pouvez simplement retenir que la vision est paramétrable et vous offre une grande souplesse.
Limites des types de vues
Malgré sa souplesse, ce système connaît quelques limites.
- Un seul type de vue à la fois : les pions ne peuvent avoir qu'un seul type de vue actif à un moment donné (un pion ne peut donc pas avoir à la fois la vision dans le noir et la vision normale d'activée en même temps).
- La vision est incolore: les types de vision ne sont pas colorés. Toute les couleurs visibles par les joueurs dépendront de la couleur de la source de lumière et non du type de vision. Toutefois, il y a une exception : vous pouvez demander à ce que la couleur de la vision d'un pion soit celle de son aura dans les Préférences de MapTool (Use halo color for vision dans l'onglet Application).
Light Sources
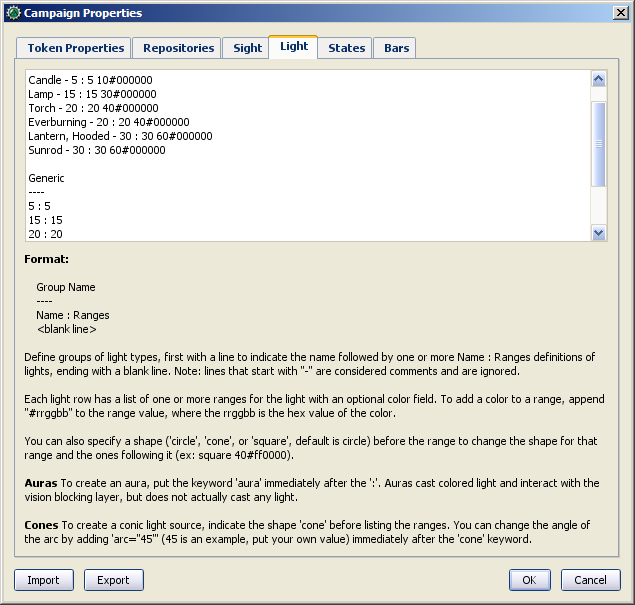
The Light tab provides an interface very similar to the Sight tab - a text window with a number of different items defined as a simple string of text. The default MapTool campaign properties show the following light sources:
D20
----
Candle - 5 : 5 10#000000
Lamp - 15 : 15 30#000000
Torch - 20 : 20 40#000000
Everburning - 20 : 20 40#000000
Lantern, Hooded - 30 : 30 60#000000
Sunrod - 30 : 30 60#000000
Generic
----
5 : 5
15 : 15
20 : 20
30 : 30
40 : 40
60 : 60
Groups
In the above default lights, there are two groups: D20 and Generic. A group is defined by typing its name, and placing beneath it four hyphens in a row: ----. Groups appear in the right-click menu on a token, and are basically a way for you, as GM, to organize the different light sources in your game.
Light Source Syntax
Beneath each group header are a list of light sources. The syntax for these is very similar to the syntax for Sight Types, with a couple exceptions. Let's look at the entry for Sunrod:
Sunrod - 30: 30 60#000000
There are three elements shown here:
- Sunrod - 30: the name of the light source; this is what appears in the right-click menu on a token, under the appropriate Light Source group
- 30: this is a light source radius of 30 units; the "first" radius of the light
- 60#000000: this is a second radius to the light, and a hexadecimal color code.
- Light Source Radii: A light source can have one or more radii, each of which can be set to a different color. In the sunrod example, the first radius has no color (or rather, it has the default color of white, which means that the area it covers is completely illuminated). The second radius (60) has the color #000000, which, when rendered by MapTool, makes a "dim light" area (translucent gray) from 30 units to 60 units. The overall effect is that from the center of the light source out to 30 units, the light is "bright," and everything is fully illuminated. From 30 units to 60 units, the light is a big darker, and items in that area are less brightly lit.
One element is left out here, which is the light source shape. Like Sight Types, light sources can have shapes. The default shape is circular, and so if you do not specify a shape, the light source will default to circle-shaped. The other shapes are:
- Cone: create a conic area with a user-defined arc. This projects the light along the current facing of the token.
- Square: this creates a square light area
- Aura: this is a special light source, because while it is blocked by VBL and can cast colored light, it does not actually illuminate anything (therefore, an aura will not reveal hidden areas to a player, but it does act as a way to see how far from a token its aura extends).
Giving Tokens and Objects Sight and Light
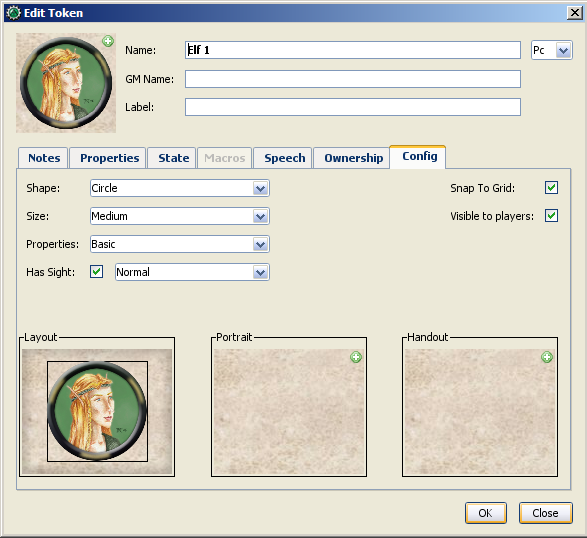
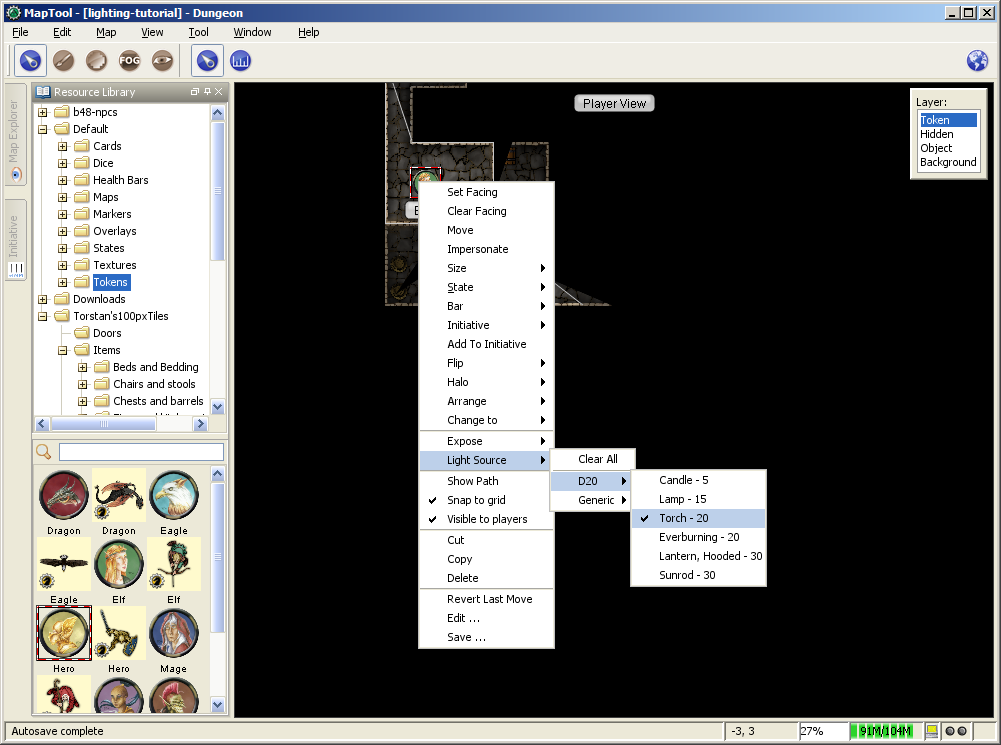
To give a token Sight and Light, do the following:
- Double-click on the token and go to the Config tab. There, check the Has Sight box, and select the appropriate sight type. Remember that a token can only have one type of sight active at a time.
- Click OK to save the sight settings.
- Right-click on the token, and go to Light Source. Navigate through the submenus until you can select a specific light source. The token now has a light source.
Vision Modes
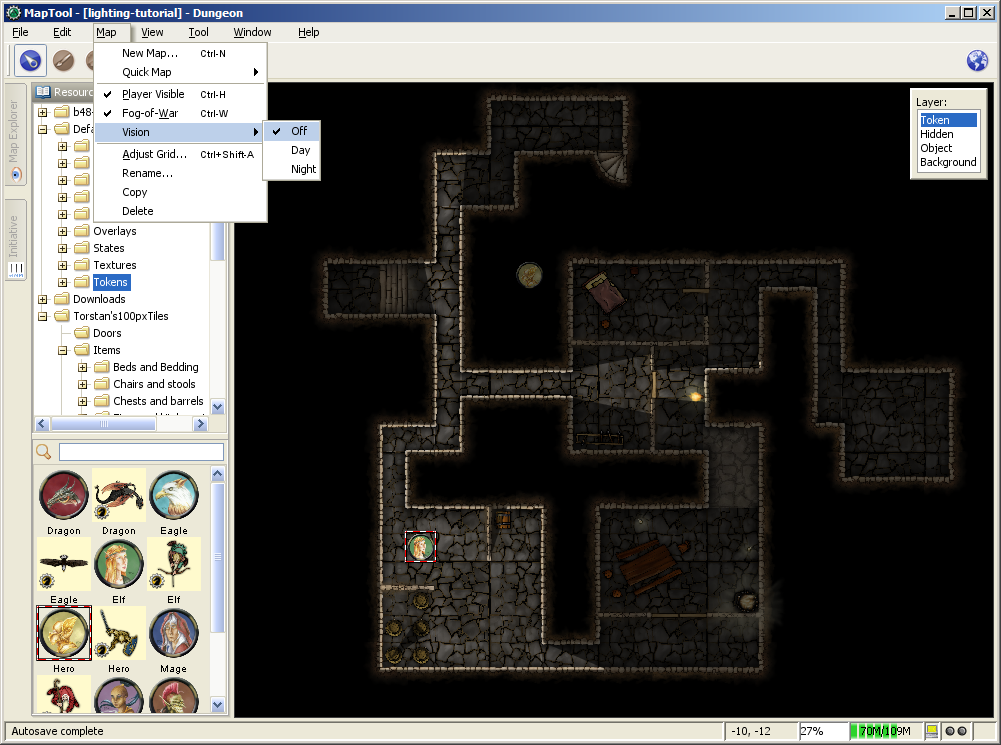
Recent builds of MapTool introduced the concept of Vision Modes, which let the GM dictate how vision and light will affect a given map. There are three Vision Modes: Off, Day, and Night, each of which alters the way in which light and vision interact for a token.
In the following discussion of vision modes, what is visible to the player as they move their token is based on what is visible to the token itself. Thus, if, under the proper settings, an enemy token is visible to the player's token, the player will see it on the Map. However, if that enemy token is not visible to the player's token, it will not appear on the player's instance of MapTool.
Off
When Map Vision is set to "Off," Token vision settings are not taken into account when displaying information to players: all things are visible at all times, unless hidden beneath Fog of War.
Day
In Day mode, light sources are not considered when evaluating token vision and what lies inside the tokens visual range. Furthermore, no part of the map is hidden from the players (that is, they will see the entire map - not necessarily all the tokens on a map, but they will see the layout of the entire dungeon, building, or area). Effectively, the Day mode assumes that a bright sun is shining down on everything, illuminating it all, and everything is visible unless blocked by VBL or covered by Fog of War.
Night
This mode incorporates Light Sources into the calculations, effectively assuming that it is "night" in the game, and that without a light source, the tokens are in a pitch-black environment and can see nothing. If Fog of War is used with Night Mode, light sources will reveal areas covered by Fog of War, assuming a token can see the light source and the area is not blocked by VBL.
Vision Modes and Fog of War
You can use Fog of War with any of the Vision modes: Off, Day, or Night.
- When Map Vision is Off, Fog is removed to the extent of the token's sight (set using the Token Properties dialog). Soft Fog does not appear when using Off Mode, as tokens do not actually "see" anything in this mode. VBL works normally.
- In Day Mode, the Fog will be removed out to the limit of the token's visual range (which, if you note when you create a map, defaults to 1,000 units), and token vision is blocked by VBL. In this mode, Fog of War has both Hard and Soft Fog, as token vision is active.
- In Night Mode, Fog of War (when removed) is cleared to the maximum radius of a token's light source (remember, though - the token must a) have sight, and b) have a light source - without a light source, the token can't see at all!). Thus, when using Fog of War and Night mode for vision, the fog will be removed only where the light source illuminates it. Soft Fog works in this mode just as it works in Day mode.
Using Sight and Light in a Game
Sight, Light, and Fog interact in a number of ways in-play. To start, let's look at using Sight without Light or Fog of War. The examples below will use the sample dungeon shown to the right. Note that the sample dungeon uses Vision Blocking, a feature of MapTool that blocks the line of sight of a token (meaning you can use it to indicate the placement of walls, pillars, and similar objects that would obstruct a character's vision).
Vision Range
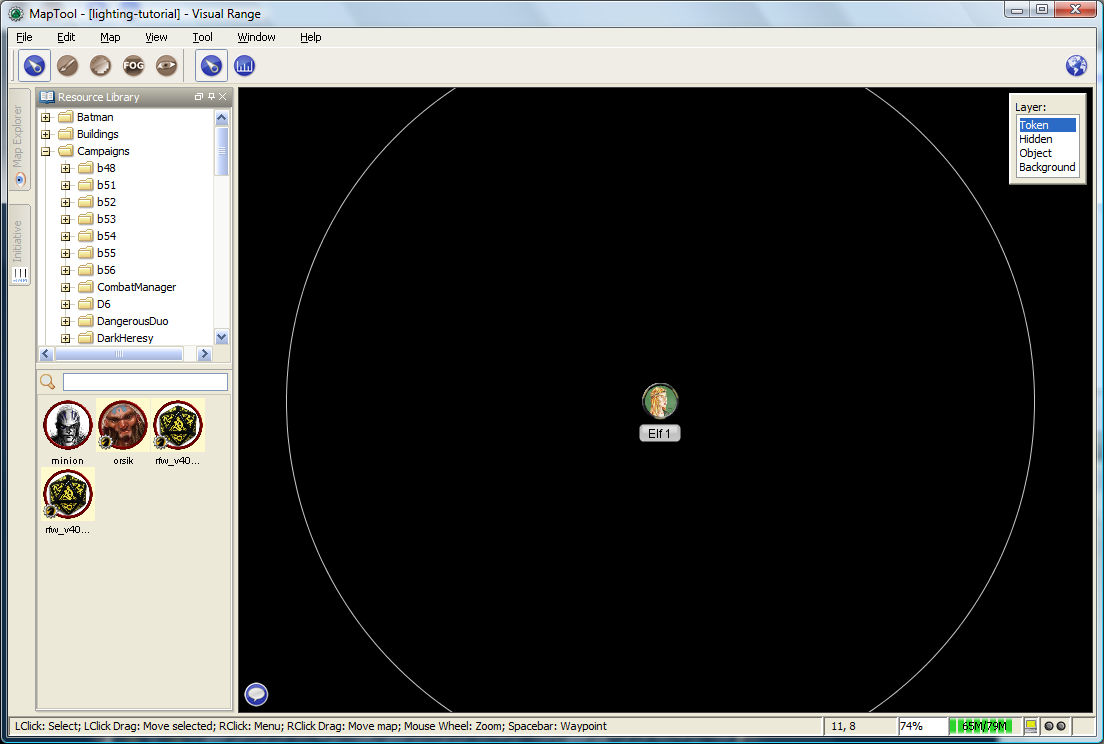
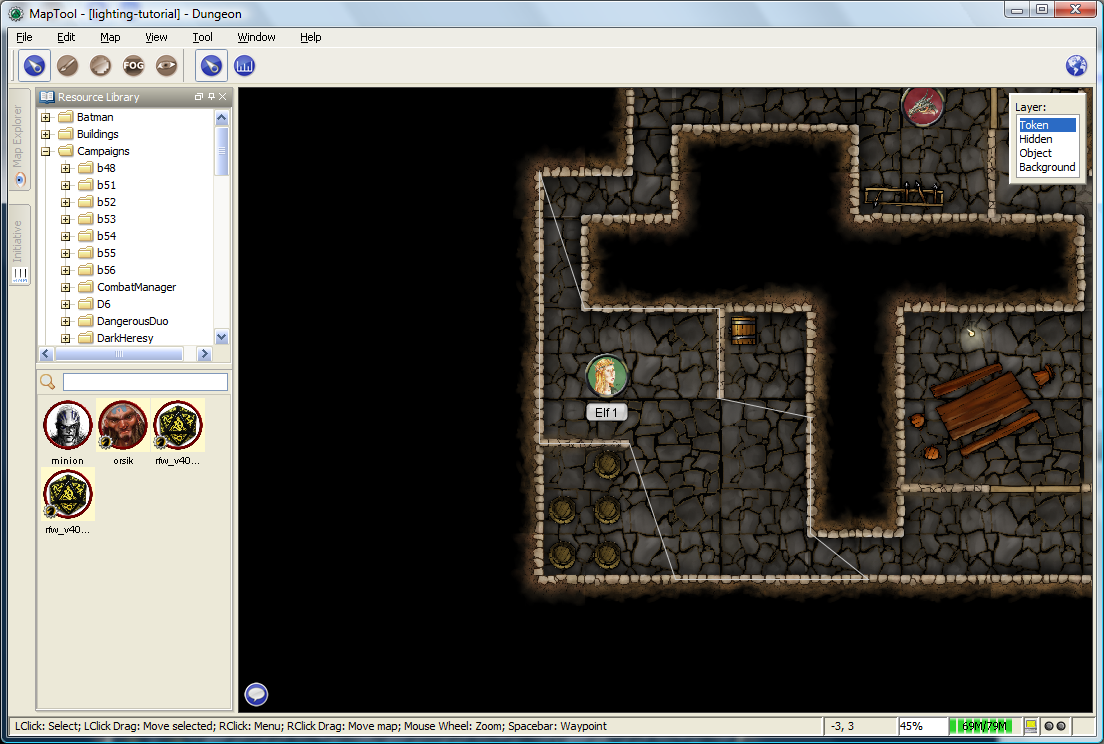
When you configure a token to have sight, when you hover your mouse token over the token, MapTool will illustrate the limit of the token's visual range with a white border (a circle if the sight type is circular, or square if square, or a cone if it's cone shaped, etc.). The screenshot to the right shows a PC token with the sight type "Normal - Short Range" configured. Note the white circle indicating the boundary of the token's vision.
In the first screenshot to the right, there is no VBL on the map, so the token's visual range is unaffected. For a more practical illustration of the "line of sight" boundary, consider the second screenshot, taken using the same token, but on the dungeon map, which employs VBL along the the walls of the dungeon. If you look closely, you'll see the white boundary - however, instead of being circular, it is blocked in certain areas by the VBL of the map, and thus has an irregular shape.
Vision Modes and Sight
As mentioned above, there are three vision modes - Off, Day, and Night. Each setting affects how token vision is evaluated by MapTool.
Sight when Vision is "Off"
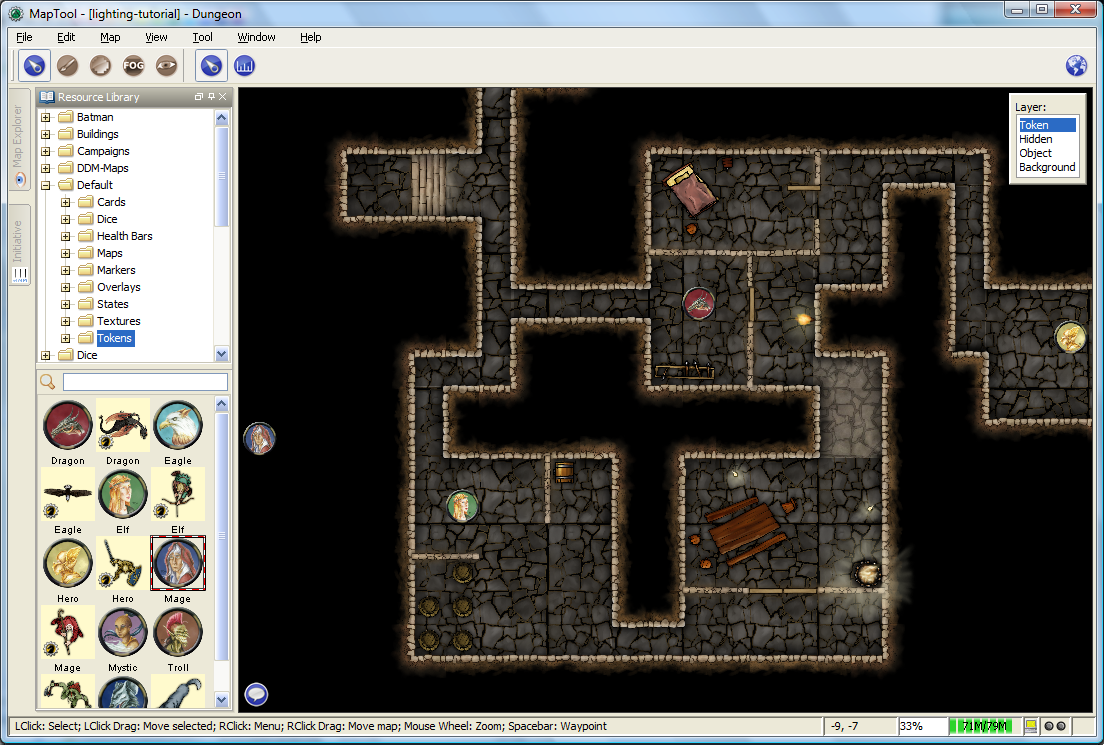
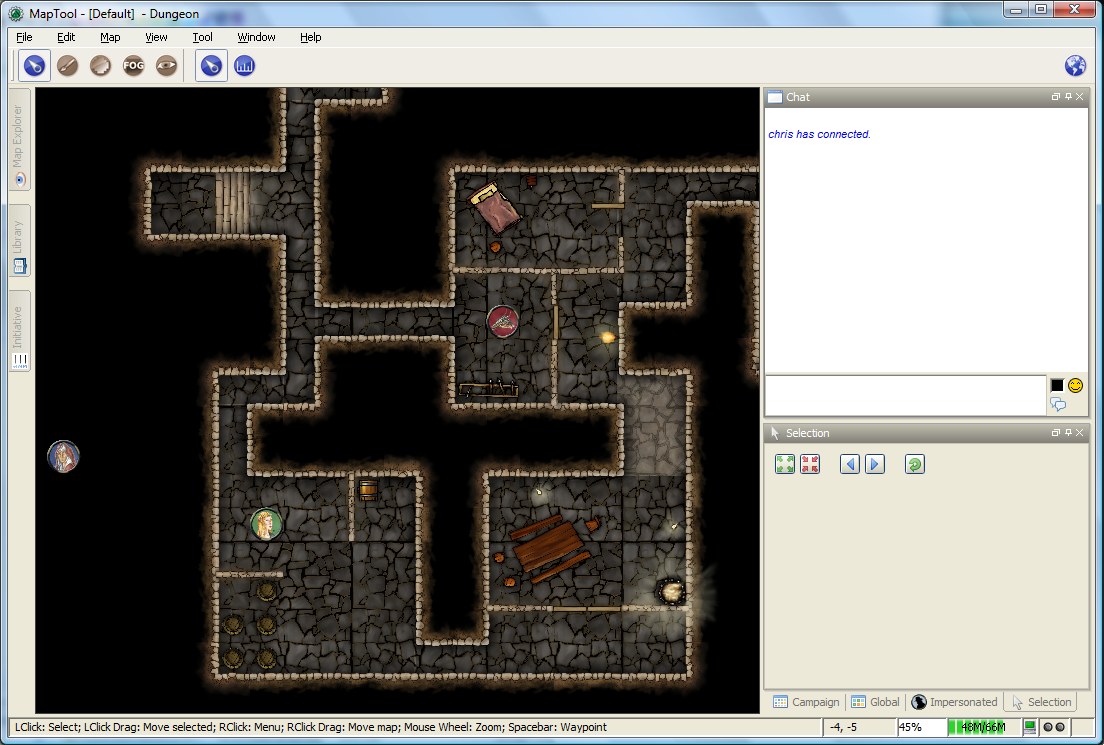
When Vision is set to Off, the token's sight settings are not taken into account when deciding what to display to the player. Instead, the player can look at all of the items and backgrounds on the map. VBL will still block the "visual boundary", but it won't actually block vision in any way - something on the far side of VBL from a token is still visible on the player's screen.
The two screenshots to the right illustrate this: the top screenshot is the GM's view of the screen, while the shot on the bottom is the Player's view of the same map - note that they both see the same items. The only items a player will not see are those items on the Hidden layer, or those items that the GM has explicitly flagged as invisible to players.
Sight when Vision is "Day"
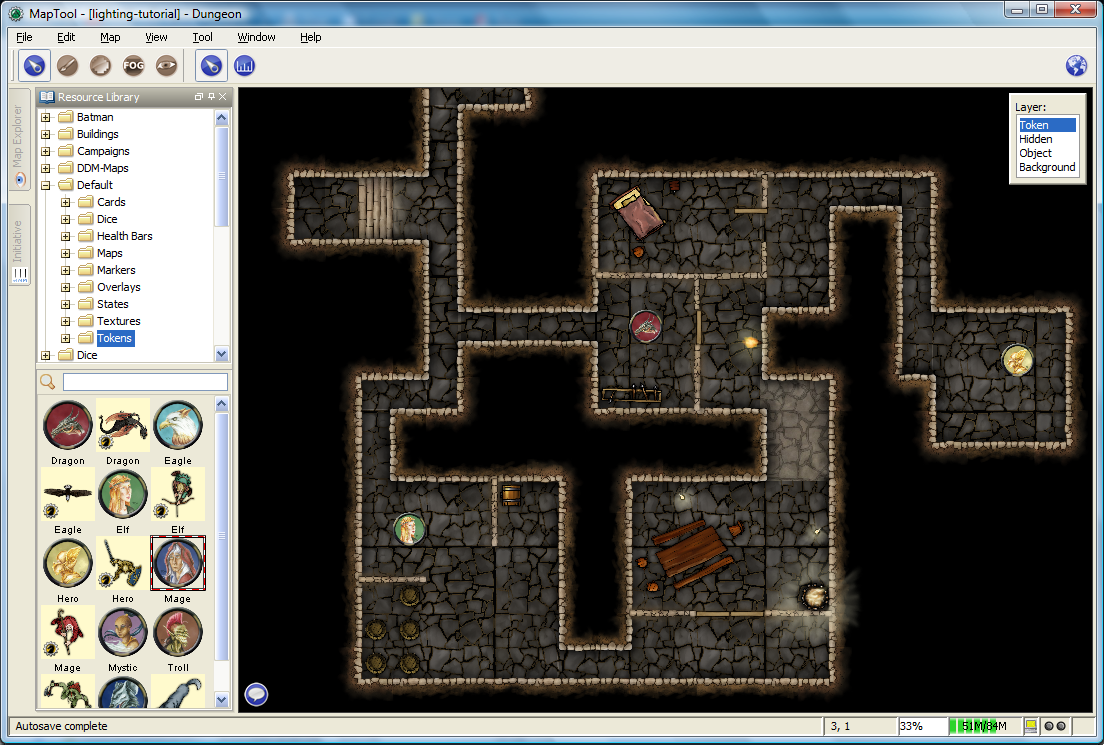
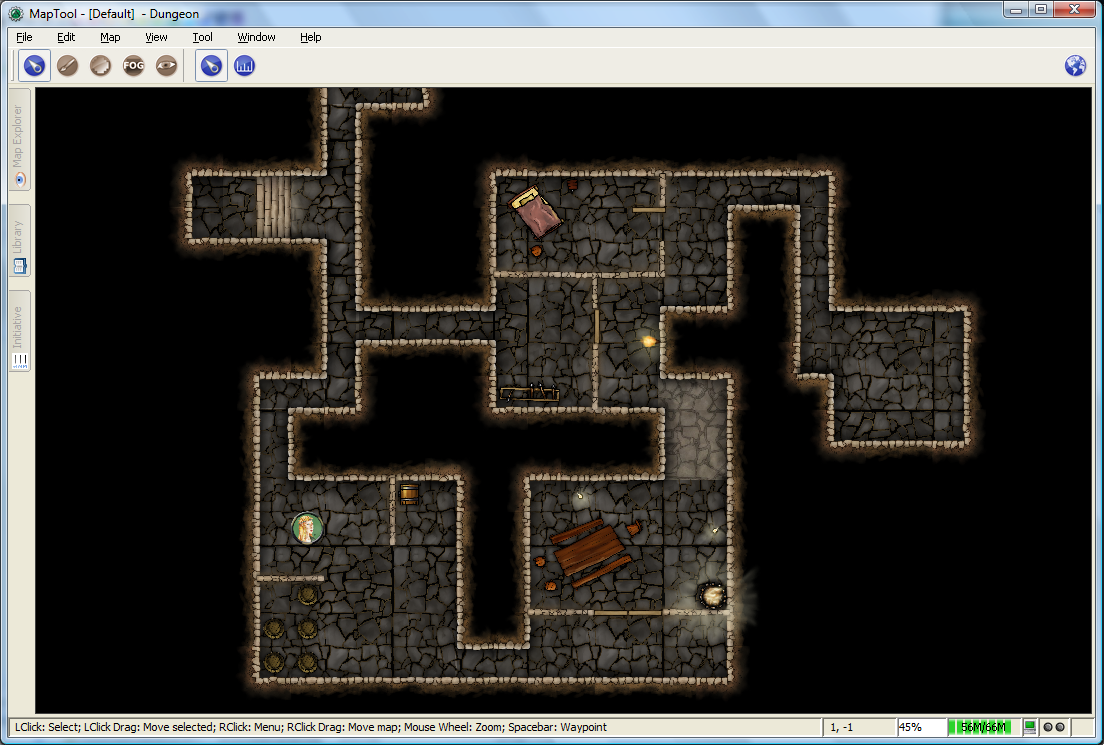
When Vision is set to Day, the token's sight settings are take into account when determining what objects and other tokens are visible to the player. Light source settings are not taken into account. If an object or token lies outside the player's token's vision, it will not be visible to the player. Likewise, if an object or token lies beyond VBL from the player token, it will not be visible.
The screenshots to the right show this (again, the top is the GM's view, and the bottom is the Player view). Note that in the player view, the Dragon and Hero token are not visible to the Elf token (the player token), because they are hidden by VBL.
Sight when Vision is "Night"
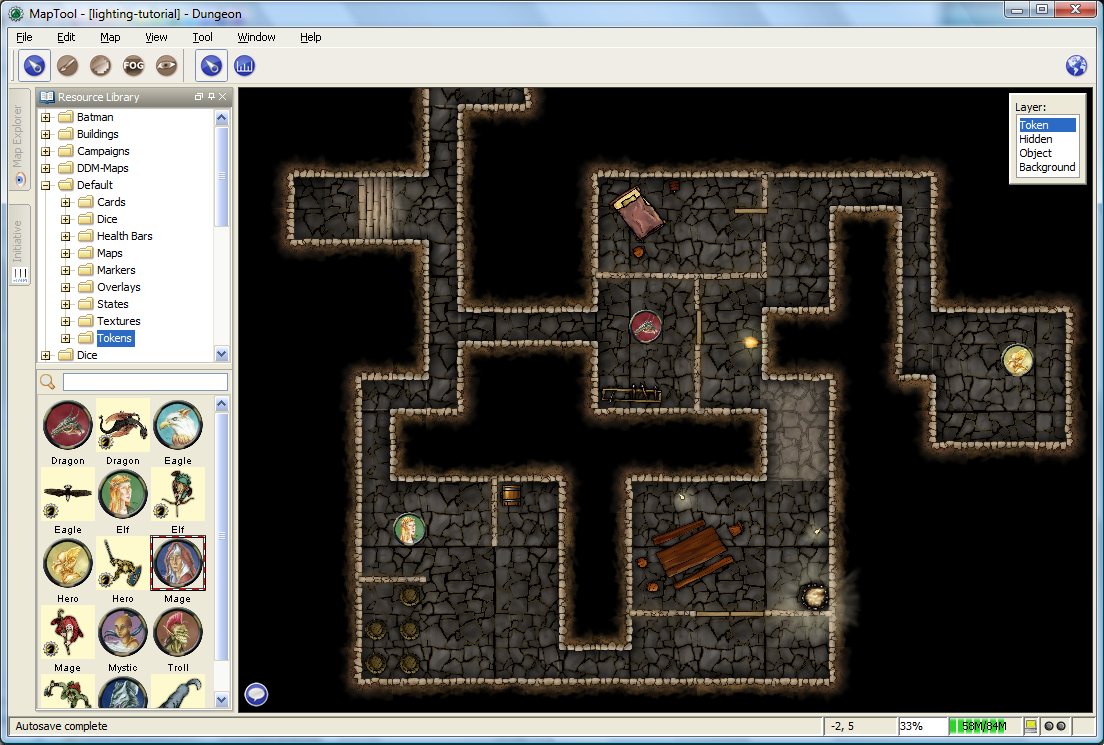
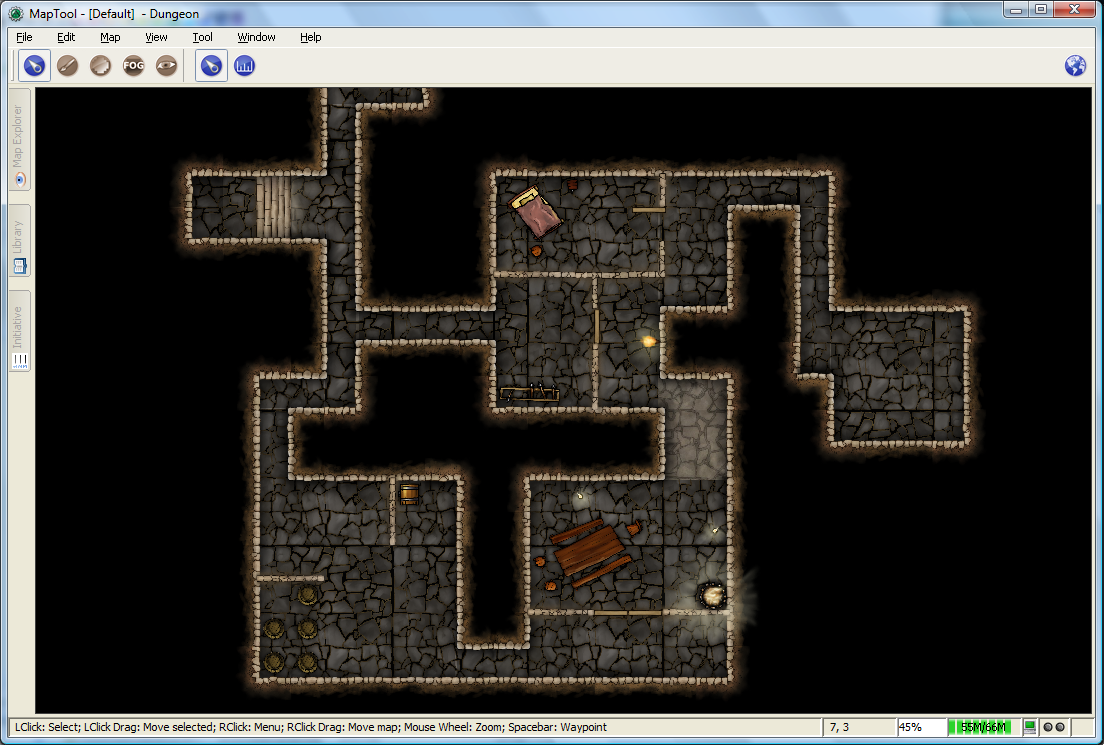
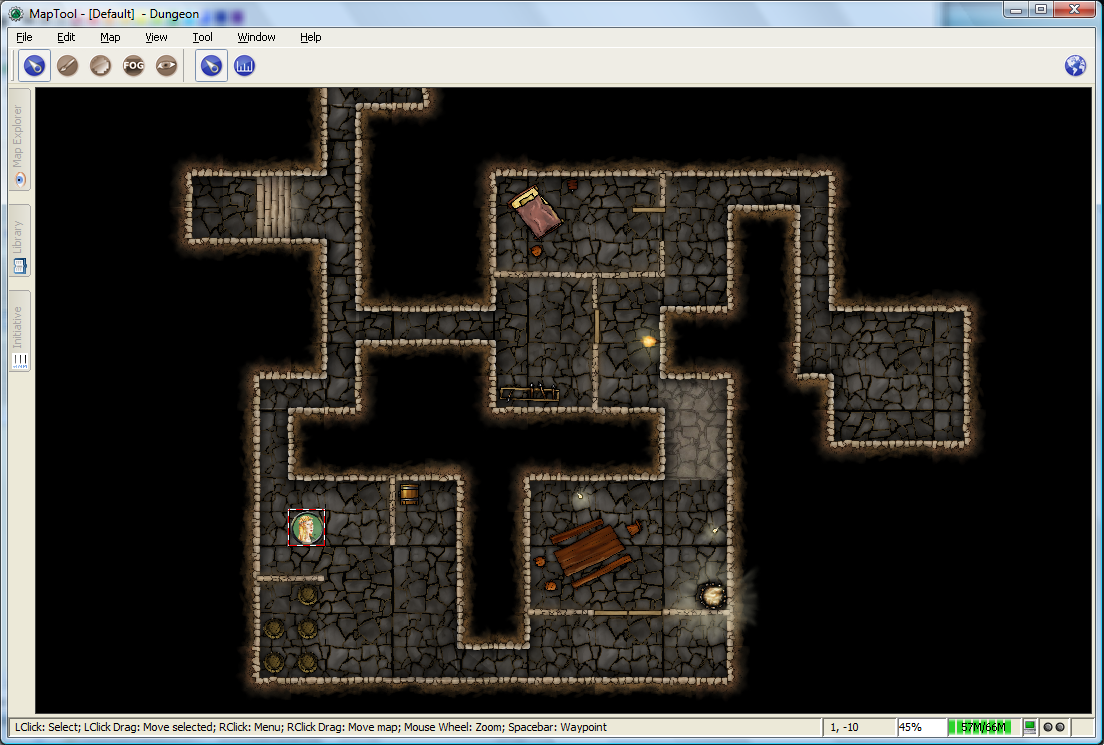
When vision is set to Night, both the token's sight settings and the token's light source setting is taken into account when determining what the token is able to see. If a token lacks a light source, it will be unable to see anything unless it has a sight type that indicates personal light (in other words, a sight type like the "Darkvision" type discussed previously) - in fact, the token itself will not be visible to the player!
The screenshots to the right show Night-mode vision in effect. The top screenshot is the GM view; the second two show the Player view without a light source on the player's Elf token, and then with the "Candle - 5" light source selected. There are several things to note about this:
- "Night" mode vision does not add "darkness" to the map in any visual way - it simply means that without a light source, tokens cannot see other tokens, objects, or themselves.
- In the first Player screenshot, the player's Elf token is not visible in the lower left room of the dungeon - that's because the player's token doesn't have a light source, so it can't see - and therefore, the player can't see anything but the map background.
- In the second Player screenshot, the Elf is now visible because it has a light source active. This light source means that the player can see out to the limit of its light source's area.
{{#customtitle:Introduction aux lumières et à la vision|Introduction aux lumières et à la vision}}