Introduction to Mapping/es: Difference between revisions
Lachnaddar (talk | contribs) mNo edit summary |
Lachnaddar (talk | contribs) mNo edit summary |
||
| Line 13: | Line 13: | ||
En la discusion sobre macros, propiedades, tablas y creacion de scripts que se desarrollara en esta y otras guias, no pierdas de vista la razon por la que revisas MapTool: es una manera de jugar y compartir con tus amigos. | En la discusion sobre macros, propiedades, tablas y creacion de scripts que se desarrollara en esta y otras guias, no pierdas de vista la razon por la que revisas MapTool: es una manera de jugar y compartir con tus amigos. | ||
=== | ===Acerca de esta guía=== | ||
El propósito de esta guía es no profundizar mucho en las entrañas del sistema de script de MapTool, iluminación, propiedades, o cualquier cosa compleja. El lugar de eso, esta guía debe iniciarte en el uso de MapTool como un ''Programa de Creación de Mapas'' para juegos de rol. Otras guías abordan temas como [[Introduction_to_Game_Hosting|hosting an online game]], [[Introduction_to_Tokens|working with tokens]], [[Introduction to Lights and Sights|setting up vision and light]], e [[Introduction_to_Macro_Writing|writing macros]]. | |||
Las siguientes instrucciones deben ponerte al día con el uso de MapTool como una herramienta para crear mapas de batalla y mapas generales. Esto asume algunas cosas: | |||
# | # Usted sabe como crear u obtener algunas imágenes de mapas. Existen terabytes (exabytes! yottabytes!) de imágenes de mapas en la Web. Revise [http://gallery.rptools.net RPTools Gallery] o [http://www.rpgmapshare.com RPGMapShare] y encontrara montones de excelentes imágenes. | ||
# | # Usted puede ejecutar MapTool en su ordenador. MapTool requiere Java 1.5 para poder ser instalado en su pc; queda de su parte encargarse de ello. | ||
Así que aquí vamos. Para comenzar lo menos complicado: | |||
# | # Obtenga MapTool de http://rptools.net. La ultima versión compilada de MapTool puede obtenerse siempre al principio de [http://www.rptools.net/index.php?page=downloads#MapTool this list].Actualmente la última compilación es 1.3.b56. '''NOTA''': Usted también puede ejecutar el [http://www.rptools.net/index.php?page=launch Java WebStart] para ejecutar MapTool sin necesidad de descargar y descomprimir el archivo. | ||
# | # Si usted descarga el archivo comprimido de MapTool, descomprímalo en algún lugar de su ordenador y asegúrese de que puede ser ejecutado. Los archivos .bat incluidos asignan algunos parámetros cuando los ejecuta, como locación de memoria y cosas similares. El programa se ejecutara si hace dobleclick sobre el archivo .jar, pero le dará algunas advertencias. Si utiliza Windows™, puede utilizar el Lanzador de Windows™, el cual permite alterar las configuraciones de manera muy conveniente. | ||
Ahora, creemos algún mapa útil. | |||
==Getting Images into your MapTool Resource Library== | ==Getting Images into your MapTool Resource Library== | ||
Revision as of 21:46, 26 November 2009
BEGINNER
THIS IS A BEGINNER ARTICLE
Introducion
Primero lo Primero: Que es MapTool?
A pesar de que probablemente tengas una idea de que es y que hace MapTool, quiero tomarme un momento para reforzar el objetivo principal de MapTool:
MapTool es un programa que te ayuda a compartir una "Mesa Virtual" con tus amigos, permitiendoles jugar sobre ella.
Esto es lo que MapTool hace, y sus caracteristicas estan orientadas a proveer gran cantidad de opciones, de lo simple a lo complejo, para alcanzar ese objetivo.
En la discusion sobre macros, propiedades, tablas y creacion de scripts que se desarrollara en esta y otras guias, no pierdas de vista la razon por la que revisas MapTool: es una manera de jugar y compartir con tus amigos.
Acerca de esta guía
El propósito de esta guía es no profundizar mucho en las entrañas del sistema de script de MapTool, iluminación, propiedades, o cualquier cosa compleja. El lugar de eso, esta guía debe iniciarte en el uso de MapTool como un Programa de Creación de Mapas para juegos de rol. Otras guías abordan temas como hosting an online game, working with tokens, setting up vision and light, e writing macros.
Las siguientes instrucciones deben ponerte al día con el uso de MapTool como una herramienta para crear mapas de batalla y mapas generales. Esto asume algunas cosas:
- Usted sabe como crear u obtener algunas imágenes de mapas. Existen terabytes (exabytes! yottabytes!) de imágenes de mapas en la Web. Revise RPTools Gallery o RPGMapShare y encontrara montones de excelentes imágenes.
- Usted puede ejecutar MapTool en su ordenador. MapTool requiere Java 1.5 para poder ser instalado en su pc; queda de su parte encargarse de ello.
Así que aquí vamos. Para comenzar lo menos complicado:
- Obtenga MapTool de http://rptools.net. La ultima versión compilada de MapTool puede obtenerse siempre al principio de this list.Actualmente la última compilación es 1.3.b56. NOTA: Usted también puede ejecutar el Java WebStart para ejecutar MapTool sin necesidad de descargar y descomprimir el archivo.
- Si usted descarga el archivo comprimido de MapTool, descomprímalo en algún lugar de su ordenador y asegúrese de que puede ser ejecutado. Los archivos .bat incluidos asignan algunos parámetros cuando los ejecuta, como locación de memoria y cosas similares. El programa se ejecutara si hace dobleclick sobre el archivo .jar, pero le dará algunas advertencias. Si utiliza Windows™, puede utilizar el Lanzador de Windows™, el cual permite alterar las configuraciones de manera muy conveniente.
Ahora, creemos algún mapa útil.
Getting Images into your MapTool Resource Library
MapTool's Resource Library is actually a collection of "pointers" or "links" to folders on your computer containing images you want to use with MapTool. MapTool comes with a default set of images, but you can add any images you wish - you are in control of what images are available to MapTool.
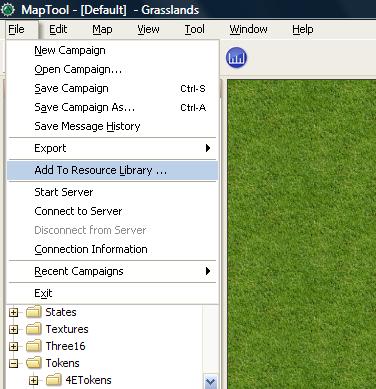
1. Obtain some images (maps, for instance) from somewhere: these can be downloaded off the web, or created by you. Put them in a directory where you'll remember them - this directory is important for step 3.
2. Open MapTool.
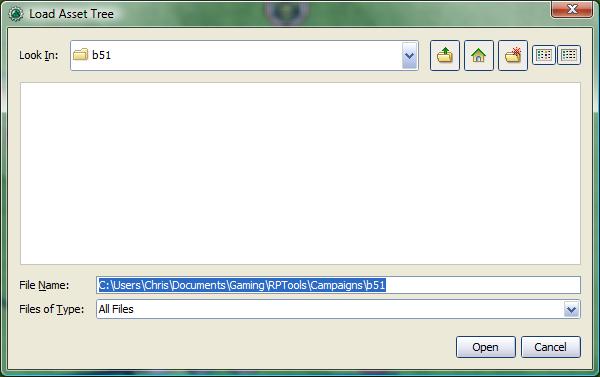
3. Select File -> Add to Resource Library (shown below, left). This will open a dialog called Load Asset Tree (click on the thumbnails to see the full images to the right).
4. In the dialog, go to the folder where you stored the map images you want to add, and click Open. MapTool will process the images in the directory, and add a new folder in the Resource Library tree.
NOTE: The name of the directory in MapTool's Resource Library will be the same as the name of the directory you picked in step 3.
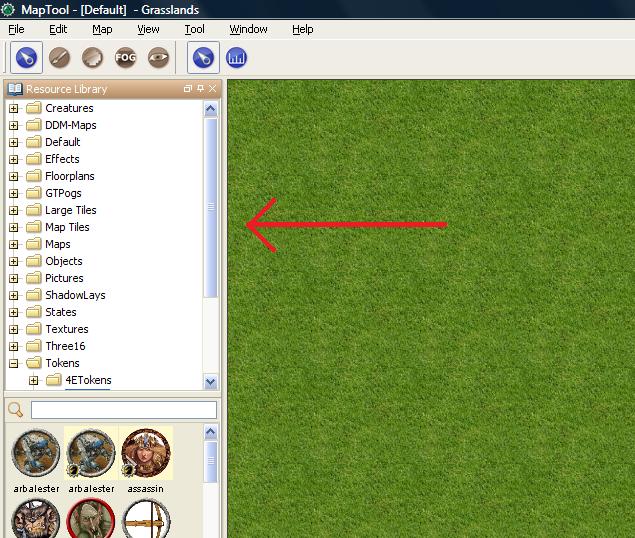
5. Afterwards, if you select one of the folders in your resource library (as seen in the image below), you'll see thumbnails of the images inside that folder. NOTE: if your folder has subfolders, hit the + to expand that folder tree. Also, you won't need to add that directory again - MapTool remembers what you picked.
NOTE: Because the folders that appear in the Resource Library are in reality pointers to folders on your hard drive, you don't need to worry that MapTool is duplicating every file -- the Resource Library is just a way for MapTool to know where the images are.
Creating a Map
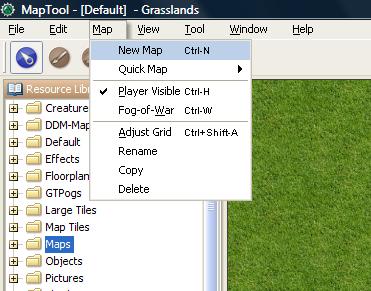
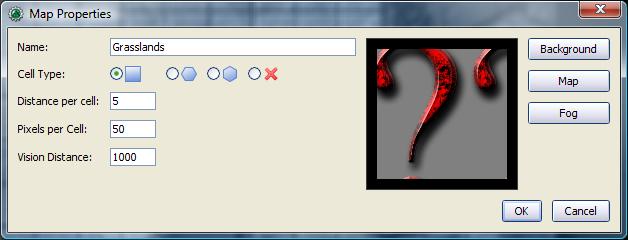
1. Go to Map -> New Map. This will bring up the Map Properties dialog.
2. On the left hand side of the Map Properties dialog, you’ll see several options and text fields.
- Name: this is the map’s title. Note that if you select a map image, the title resets itself to the filename of the image. Best bet is to title the map last, so you can call it something you like, instead of xqmap2.jpg or whatever it was originally called.
- Cell Type: hex or square map, or no grid at all.
- Distance Per Cell: this is how many arbitrary units each cell covers (e.g., for Dungeons & Dragons 4th Edition, since everything is counted in squares, you can just set this to 1)
- Pixels per cell: this is how many pixels each cell should cover – the default is 50. This is most important for scaling to map images you downloaded.
- Vision Distance: MapTool has vision, fog-of-war, and other functions, so this indicates how far, by default, a character can see on the map.
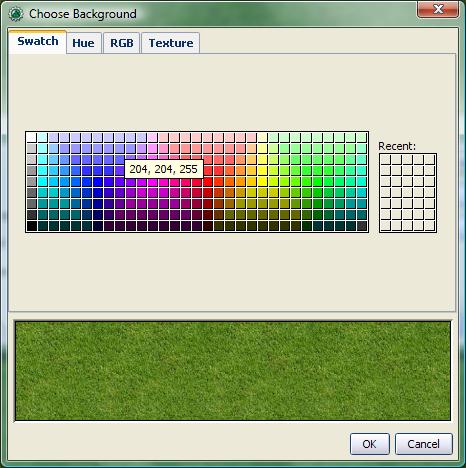
3. Click the Background button. You’ll get a pop-up dialog offering several options. The background texture and/or color are infinitely tiled in all directions.
- Swatch: lets you use a uniform color as the map background.
- Warning: As recently as version 1.3.b53, if you select the top-leftmost swatch (the "white" swatch), MapTool will generate an error. The error will not cause MapTool to crash or anything, but it will not set the background to white. As a workaround, you can set the background to white via the Hue or RGB tabs.
- Hue/RGB: lets you specify colors instead of selecting a color swatch
- Texture (what I use most often): gives you access to your resource library, where you can select a texture to serve as the background.
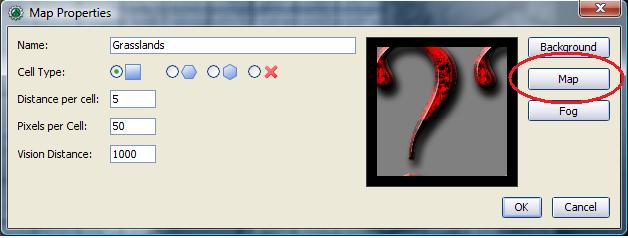
4. If you have a map image in mind (like a downloaded one, or one you created in Photoshop or something like that), click the Map button. You’ll be taken to a dialog that shows your Resource Library. Select the image you want to use. This image will be layered above the background you already selected.
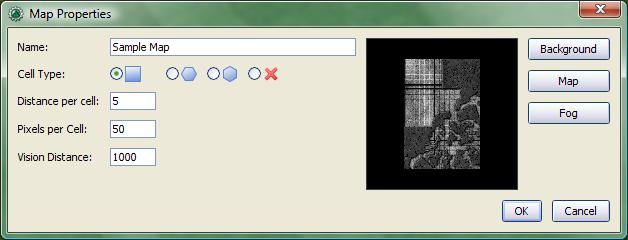
5. When you’re satisfied with the background and map – you’ll be given a preview thumbnail to double check, as shown below - give it a title, and click OK. The map will now be loaded into the main window of MapTool.
Creating Multiple Maps in One Campaign
MapTool lets you create multiple maps, all of which will be in one campaign. The process is very simple: you simply repeat the Creating a Map steps for each new map, selecting a new image, background color/texture, and title for each new map.
Each new map you create will automatically be created within the campaign you are currently working on (creating a new map does not automatically save your campaign, so make sure to save your work when you're finished).
You can also add new maps to a campaign you've already saved - just open the campaign file (by going to File > Open Campaign) and follow the steps to create a new map.
MapTool Main Window
MapTool Layers

Once you have a map loaded, you’ll see a small box in the map window titled Layer. MapTool maps have four layers:
- Background: this is the layer for images, background maps, and anything that isn’t going to move.
- Hidden: for online games, this is a layer only the GM can see.
- Object: this is a layer for token-like objects, things that might move, or that players might be able to move (lamps, tables, etc.).
- Token: this layer is the layer that tokens go on (tokens are small images that represent characters or NPCs). Make sure you have the Token layer selected when you’re adding characters and enemies to the map.
Think of the MapTool Layers as four different sheets of acetate or tracing paper, one on top of the other. The bottom one - the Background - is where you draw the basic parts of the map: walls, floors, trees, etc. On the next sheet of tracing paper, the one called Objects you draw the things that your characters might use, mess with, or break: doors, chests, tables, chairs, and so forth. On the next one up - the Hidden layer - you put things only the GM can see (which might be objects or hidden characters!). Finally, on the very top layer - the Token layer, you put your miniatures - the monsters, characters, and NPCs of the game world.
Tokens can be put on any of the 4 layers in MapTool. To do so, just right-click on the token image, and select Change To >. In the menu, select the layer you want to change the token to, and it will be moved.
Selecting Maps
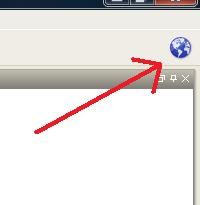
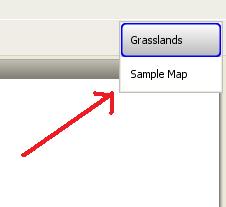
If you create only one map in your campaign, it will be loaded by default and will be the only map you can see.
If you create multiple maps or have a campaign with multiple maps, you can choose between them by clicking the blue globe icon in the upper right hand side of the MapTool window – this will present a list of possible maps. Note that if you have only one map, clicking on the blue globe will show that map's name.
Zooming and Moving
To zoom the map, you can use the mouse scroll wheel (if you have one), or you can use the equals sign to zoom in, and the hyphen to zoom out.
Hitting the plus sign will zoom to 1:1.
To move the map, right click on it and move the mouse. This will pan the map in any direction.
Token Basics
MapTool Tokens (or just "Tokens") are small images that act as visual representations of many things in a MapTool map. The most common use for tokens is to represent player and non-player characters - in other words, tokens take the place of miniatures on the virtual map.
Tokens, like everything else, start as image files that are stored in your Resource Library. MapTool comes with some default tokens (and they have a great, separate program called TokenTool that lets you make tokens), or you can supply your own from wherever you find them.
This section of the Introduction to Mapping guide deals with only a few of the most basic, common things you might want to do with MapTool Tokens. There are many features, tricks, and cool functions available when working with tokens - so many that they deserve a guide all to themselves.
Placing Tokens on the Map
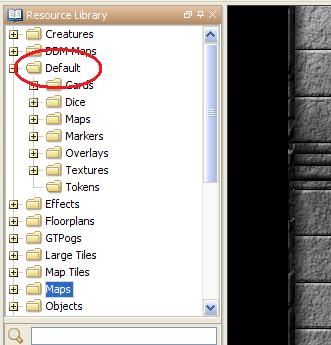
1. To see the default tokens mentioned above, go to the Default folder in your Resource Library, and click the + to expand it.
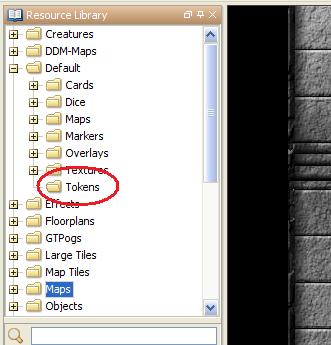
2. Select the Tokens folder.
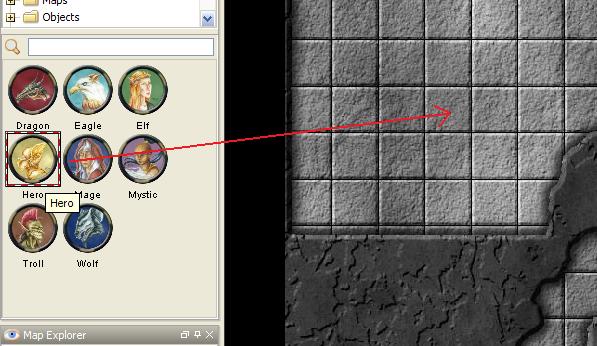
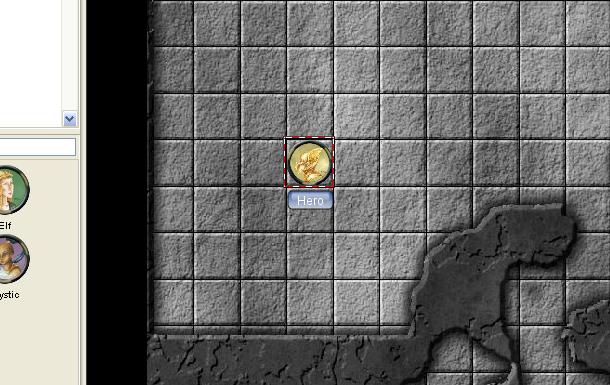
3. In the window below (where the thumbnails appear), use the mouse to drag a token onto the map. The cursor will change to a hand, and you just need to hold the token over the map somewhere and release the button.
When you release the mouse button, the token will appear on the map, as shown in the thumbnail.
Moving Tokens
Once a token is on the map, it can be dragged around using the mouse, or moved by selecting the token (clicking on it) and using the arrow keys to move the token, and pressing the D key to complete the move.
If you want to create a complex path, you can hit the space bar to make a waypoint in your path.
Changing a Token's Name, GM Name, and Label
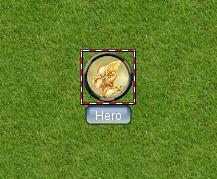
Tokens have three possible "names" you can assign to them. When a token is first dragged onto the map, it is given a default name (typically, the same as the token's filename on your computer, with the extension trimmed off). For example, the token shown in the image below was dragged from MapTool's default token set, and its default name is "Hero."
The three possible names a token can have are:
- Token Name: The name of the token that will appear to all users. This is not optional.
- NOTE: Make sure each token has a unique name! Otherwise, MapTool macros may behave unpredictably.
- GM Name: This name appears only to the person(s) currently connected to MapTool in the role of "GM."
- Label: This text appears below the Token Name, and is visible to all connected individuals.
To change a token's name, GM name, and/or label:
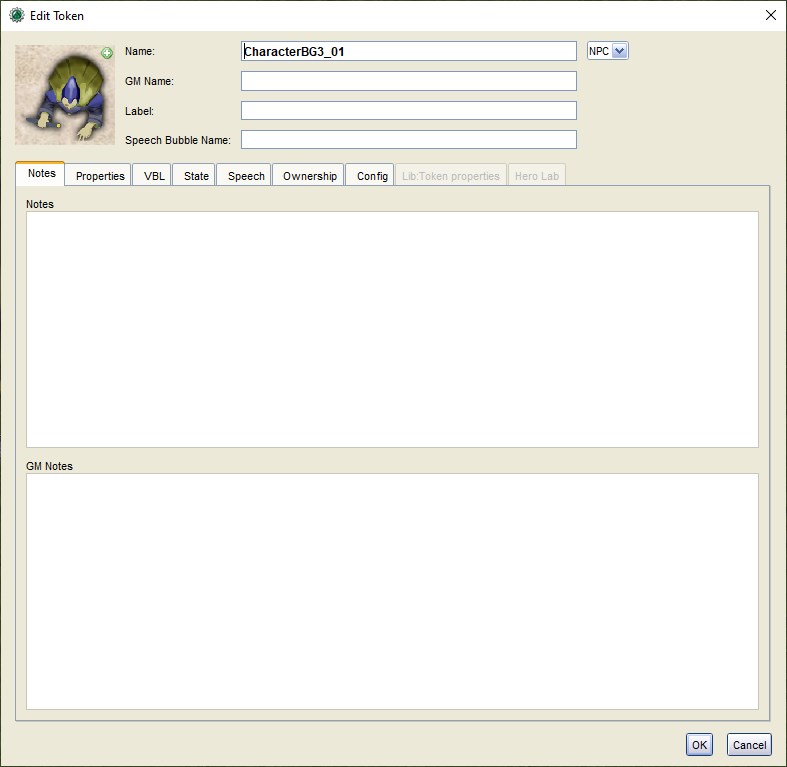
1. Double-click on the token image on the map. This will open the Edit Token dialog, as shown below.

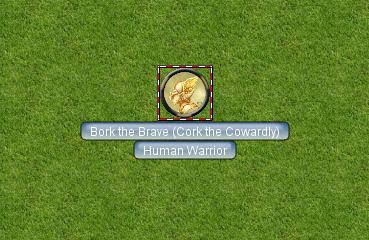
2. In the Name field, enter the name you'd like. For this example, I've entered "Bork the Brave"
3. In the GM Name field, enter a name. For this example, I've entered "Cork the Cowardly"
4. In the Label field, enter a Label. For this example, I've entered "Human Warrior".
5. Click OK to save your changes.
Once you've clicked okay, you'll see that the token has changed:
You can do this name changing process with any token you drop on the map.
Changing a Token's Image
Sometimes, when you create a new token, you will want to change the image on the token's face. Say, for instance, you find a cool new picture that you just have to use for your evil overlord, but you already have a token made up for him - you don't want to delete the whole token just to change the image, right? That's overkill. Instead, just change the token image using the following steps:

1. Make sure you have a new token image in PNG or JPG format, already available in your MapTool Resource Library. If you look at Getting Images Into your MapTool Resource Library section, above, it talks about how to get map images into your Resource Library: well, token images (in fact, any image) can be added to your resource library in exactly the same way.
2. Double-click on the token to open the Edit Token dialog.

3. In the upper-left of that dialog, click the small green plus sign.
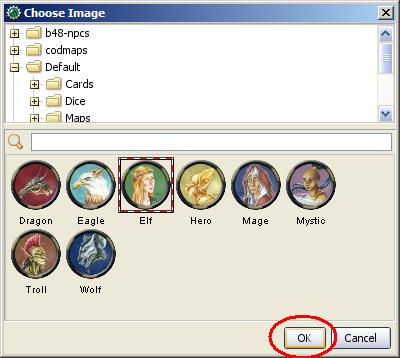
4. In the Choose Image dialog, select the Resource Library folder that has the new token image in it (a red-and-white border will indicate the image you've selected), and click OK.

5. Once you hit OK, you are taken back to the Edit Token dialog, and you will see that the token image has been changed to the one you selected.
Changing Token Size
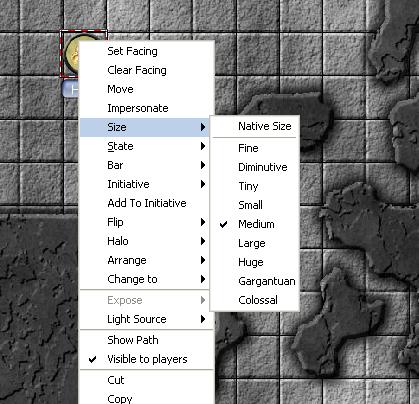
Tokens will default to the size of one grid square (note that by default, MapTool’s grid is 50x50 pixels). If you right-click on a token, the menu has a lot of options – one of which is Size. You can then set it using the size values there, so you can make large or huge or gargantuan creatures, and so forth. The image below illustrates the right-click menu for a token.
NOTE: these size values (large, huge, gargantuan, etc.) only apply to maps that have a grid (remember, when you create a map, you have the option to make a map with no grid). If you use a gridless map, the size values are more fine-grained.
Saving Your Work
MapTool's default "save" format is called a Campaign File. The Campaign File (which has the extension .cmpgn) contains the maps and tokens that you've set up. If you're interested in this sort of thing, the campaign file is actually a zipped XML file.
To save your work so far, choose File -> Save Campaign, give your campaign a name, and that’s all there is to it.
When you save a campaign, MapTool saves the locations of the tokens on all of the maps, so you can pick up right where you left off!
Exporting Map Images
MapTool can export your map images to an image file (PNG format). To export an image to a location of your choice:
1. Go to File->Export and select Screenshot As.
2. In the dialog that comes up, select a "View" (either GM view, where you can see everything, or Player View, where the only things visible are what players can see...I told you MapTool had some cool vision capabilities!)
3. Select the destination for your file using the Browse button (or, alternatively, send it to an FTP server)
4. Click Export.
Next Steps
Now that you can create a basic map and put some tokens on it, the next step is connecting up with some friends over the Internet (or face to face) and using it for a game session! This topic is covered in the Introduction to Game Hosting.