Introduction to Dialogs and Frames: Difference between revisions
Verisimilar (talk | contribs) No edit summary |
m (add [r:] as best practice in example) |
||
| (24 intermediate revisions by 8 users not shown) | |||
| Line 1: | Line 1: | ||
=An Introduction to MapTool Macro Dialogs and Frames= | [[Category:Tutorial]] | ||
{{stub|A page similar to this one that demonstrates using Add-ons instead of a Lib:Token.}}{{Advanced}} | |||
==An Introduction to MapTool Macro Dialogs and Frames== | |||
Please note I will be using CSS and HTML in this tutorial but I will not really be explaining them, if you need a refresher on either a search on [http://www.google.com.au/search?q=HTML+and+CSS+Tutorials google] will point you to many resources that do a better job than I could. | Please note I will be using CSS and HTML in this tutorial but I will not really be explaining them, if you need a refresher on either a search on [http://www.google.com.au/search?q=HTML+and+CSS+Tutorials google] will point you to many resources that do a better job than I could. | ||
The | The {{roll|dialog}} and {{roll|frame}} [[Macros:Roll:types|roll types]] create a new dialog or frame where all the output from the commands within the | ||
{} will be displayed. dialog create a dialog box that hovers over other windows. frame creates a frame that can be docked like the other maptool windows. The dialog and frame windows can be used to display HTML and rolls the same as the chat output window. | {} will be displayed. dialog create a dialog box that hovers over other windows. frame creates a frame that can be docked like the other maptool windows. The dialog and frame windows can be used to display HTML and rolls the same as the chat output window. | ||
This tutorial starts with the standard blank campaign you get when you start MapTool, anything else we need we will add along the way. | This tutorial starts with the standard blank campaign you get when you start MapTool, anything else we need we will add along the way. | ||
==First Steps== | ===First Steps=== | ||
So lets jump in and create your first dialog, you can use the code below to create a dialog. | So lets jump in and create your first dialog, you can use the code below to create a dialog. | ||
< | <syntaxhighlight lang="mtmacro" line> | ||
[dialog("Test"): { | [dialog("Test"): { | ||
Your first dialog! | Your first dialog! | ||
}] | }] | ||
</ | </syntaxhighlight> | ||
[[Image:FirstDialog.png]] | [[Image:FirstDialog.png|frame|center|Example Dialog]] | ||
I know its pretty boring but before we start adding more to it lets create a frame so that you can see the difference | I know its pretty boring but before we start adding more to it lets create a frame so that you can see the difference | ||
< | <syntaxhighlight lang="mtmacro" line> | ||
[frame("Test"): { | [frame("Test"): { | ||
Your first frame! | Your first frame! | ||
}] | }] | ||
</ | </syntaxhighlight> | ||
[[Image:FirstFrame.png]] | [[Image:FirstFrame.png|frame|center|Example Frame]] | ||
| Line 29: | Line 31: | ||
[[Image:FirstFrame-Docked.png]] | [[Image:FirstFrame-Docked.png|frame|center|Example Docked Frame]] | ||
Back to the dialog you can spice it up a little with some [[Macros:Roll:types|dice rolls]] and HTML formatting. | Back to the dialog you can spice it up a little with some [[Macros:Roll:types|dice rolls]] and HTML formatting. | ||
< | <syntaxhighlight lang="mtmacro" line> | ||
[dialog("Test"): { | [dialog("Test"): { | ||
<b>1d4</b> -> [1d4]<br> | <b>1d4</b> -> [1d4]<br> | ||
| Line 44: | Line 46: | ||
<b>1d100</b> -> [1d100]<br> | <b>1d100</b> -> [1d100]<br> | ||
}] | }] | ||
</ | </syntaxhighlight> | ||
==Adding Some HTML== | ===Adding Some HTML=== | ||
This will create a dialog box with some HTML formatting and [[ | This will create a dialog box with some HTML formatting and [[Macros:Roll:types|dice rolls]]. The [[Macros:Roll:types|dice rolls]] will have all the tooltips that you would normally get in the chat output. | ||
Still the title is boring (it defaults to the name of the dialog). You can use the HTML <title> tag to change the title. Run the | Still the title is boring (it defaults to the name of the dialog). You can use the HTML <title> tag to change the title. Run the | ||
| Line 54: | Line 56: | ||
< | <syntaxhighlight lang="mtmacro" line> | ||
[dialog("Test"): { | [dialog("Test"): { | ||
<html> | <html> | ||
| Line 71: | Line 73: | ||
</html> | </html> | ||
}] | }] | ||
</ | </syntaxhighlight> | ||
[[Image:DialogTitle.png]] | [[Image:DialogTitle.png|frame|center|Example Dice Roll Dialog]] | ||
Notice that the dialog command did not open a new dialog window, instead it replaced the contents of the dialog you had open. When | Notice that the dialog command did not open a new dialog window, instead it replaced the contents of the dialog you had open. When you use {{code|[dialog()]}} with the name of a dialog that already exists, the contents of that dialog are replaced, ([[frame_(roll_option)|[frame()]]] works the same way). You can use this behavior to update your dialogs. Create a token called [[Library_Token|Lib:Test]]. Create a macro (on that same token) called Test. | ||
you use [dialog()] with the name of a dialog that already exists the contents of that dialog are replaced, ([[ | |||
Copy the following code into the Test macro. | Copy the following code into the Test macro. | ||
< | <syntaxhighlight> | ||
[dialog("Test"): { | [dialog("Test"): { | ||
<html> | <html> | ||
| Line 94: | Line 95: | ||
<b>1d100</b> -> [1d100]<br> | <b>1d100</b> -> [1d100]<br> | ||
<br> | <br> | ||
[macroLink("Refresh", "Test@Lib:Test")] | [r: macroLink("Refresh", "Test@Lib:Test")] | ||
</body> | </body> | ||
</html> | </html> | ||
}] | }] | ||
</ | </syntaxhighlight> | ||
[[Image:DialogRefresh.png]] | [[Image:DialogRefresh.png|frame|center|Example Dice Roll Dialog with Refresh macroLink]] | ||
The above macro uses the | The above macro uses the {{func|macroLink}} function to create a link that will call Test on [[Library_Token|Lib:Test]] when ever it is clicked (which will update the dialog with new rolls). | ||
The above would be really useful if you needed a window that provided you with a bunch of dice rolls all the time. But I assume that is not | The above would be really useful if you needed a window that provided you with a bunch of dice rolls all the time. But I assume that is not | ||
what most people will want to do with the dialogs. | what most people will want to do with the dialogs. | ||
Drag another [[Token | Drag another [[Token|token]] out on to the map, and fill in the [[Token:token_property|token properties]]. We can create a simple character sheet with a dialog. On the [[Library_Token|Lib:Test]] token create a macro called CharSheet and paste the following code into it. | ||
< | <syntaxhighlight lang="mtmacro" line> | ||
[h: propNames = "Strength, Dexterity, Constitution, Intelligence, Wisdom, Charisma"] | [h: propNames = "Strength, Dexterity, Constitution, Intelligence, Wisdom, Charisma"] | ||
[dialog("CharSheetTest"): { | [dialog("CharSheetTest"): { | ||
| Line 129: | Line 130: | ||
</html> | </html> | ||
}] | }] | ||
</ | </syntaxhighlight> | ||
On the new [[ | On the new [[Token]] that you placed on the map, create a [[Macro_Button|macro button]] called CharSheet and paste the following into it. | ||
< | <syntaxhighlight lang="mtmacro" line> | ||
[macro("CharSheet@Lib:Test"): ""] | [macro("CharSheet@Lib:Test"): ""] | ||
[abort(0)] | [abort(0)] | ||
</ | </syntaxhighlight> | ||
Click on the new [[ | Click on the new [[Macro_Button|macro button]]. | ||
===Now for a dash of CSS=== | |||
Again, we are not going to set the world on fire with this character sheet dialog. Let's spice it up a little — I will show you how to use some CSS for formatting. | |||
To use CSS, you insert a link like the following into the HTML to be displayed: | |||
<syntaxhighlight lang="mtmacro" line> | |||
< | |||
[dialog("Test"): { | [dialog("Test"): { | ||
<link rel='stylesheet' type='text/css' href='myCSS@Lib:Test'></link> | <link rel='stylesheet' type='text/css' href='myCSS@Lib:Test'></link> | ||
}] | }] | ||
</ | </syntaxhighlight> | ||
Although you can (and probably should) use the | Although you can (and probably should) use the {{func|getMacroLocation}} function to make sure it comes from the same [[Library_Token|Lib:Token]] as the macro. So, | ||
< | <syntaxhighlight lang="mtmacro" line> | ||
[dialog("Test"): { | [dialog("Test"): { | ||
<link rel='stylesheet' type='text/css' href='myCSS@[r: getMacroLocation()]'></link> | <link rel='stylesheet' type='text/css' href='myCSS@[r: getMacroLocation()]'></link> | ||
}] | }] | ||
</ | </syntaxhighlight> | ||
Edit the CharSheet macro on the [[ | Edit the CharSheet macro on the [[Library_Token|Lib:Test]] [[Token|Token]] and paste in the following. | ||
< | <syntaxhighlight lang="mtmacro" line> | ||
[h: propNames = "Strength, Dexterity, Constitution, Intelligence, Wisdom, Charisma"] | [h: propNames = "Strength, Dexterity, Constitution, Intelligence, Wisdom, Charisma"] | ||
[dialog("CharSheetTest"): { | [dialog("CharSheetTest"): { | ||
| Line 188: | Line 188: | ||
</html> | </html> | ||
}] | }] | ||
</ | </syntaxhighlight> | ||
Also create a new [[ | Also create a new [[Macro_Button|macro button]] on [[Library_Token|Lib:Test]] called CharSheet_css and paste the following CSS code into it. | ||
< | <syntaxhighlight lang="mtmacro" line> | ||
.oddRow { background-color: #FFFFFF } | .oddRow { background-color: #FFFFFF } | ||
.evenRow { background-color: #EEEEAA } | .evenRow { background-color: #EEEEAA } | ||
#stats th { background-color: #113311; color: #FFFFFF } | #stats th { background-color: #113311; color: #FFFFFF } | ||
</ | </syntaxhighlight> | ||
Click on the CharSheet [[ | Click on the CharSheet [[Macro_Button|macro button]] on your [[Token|Token]]. | ||
[[Image:CharSheetDialog2.png]] | [[Image:CharSheetDialog2.png|frame|center|Simple Character Sheet with a Style Sheet]] | ||
Looks much better already! | Looks much better already! | ||
Getting better... Let's make some more changes. | |||
Change the CharSheet macro on [[Library_Token|Lib:Test]] to: | |||
<syntaxhighlight lang="mtmacro" line> | |||
< | |||
[h: propNames = "Strength, Dexterity, Constitution, Intelligence, Wisdom, Charisma"] | [h: propNames = "Strength, Dexterity, Constitution, Intelligence, Wisdom, Charisma"] | ||
[dialog("CharSheetTest"): { | [dialog("CharSheetTest"): { | ||
| Line 255: | Line 245: | ||
<td>[r: HP]</td> | <td>[r: HP]</td> | ||
<th>Armor Class:</th> | <th>Armor Class:</th> | ||
< | <td>[r: AC]</td> | ||
</tr> | </tr> | ||
<table> | </table> | ||
</body> | </body> | ||
</html> | </html> | ||
}] | }] | ||
</ | </syntaxhighlight> | ||
[[Image:CharSheetDialog3.png|frame|center|Simple Character Sheet with Token Image]] | |||
Looking good...! | |||
===And a Touch more formatting=== | |||
Go to Edit->Campaign Properties, Token Properties Tab, Basic Token type, add the following properties | |||
* {{code|*@MaxHP}} | |||
* {{code|*@XP}} | |||
* {{code|*@NextLevelXP}} | |||
Then edit your [[ | Then edit your [[Token]] and set some values in your new [[Token_Property|properties]]. | ||
Time to create a new | Time to create a new [[Macro_Button|macro button]] on the [[Library_Token|Lib:Test]] called TrafficLightBar and paste the following code into it. | ||
< | <syntaxhighlight lang="mtmacro" line> | ||
<!-- ====================================================================== | <!-- ====================================================================== | ||
==== | ==== | ||
| Line 319: | Line 307: | ||
</tr> | </tr> | ||
</table> | </table> | ||
</ | </syntaxhighlight> | ||
Create another [[ | Create another [[Macro_Button|macro button]] on [[Library_Token|Lib:Test]] called StatusBar and copy the following code into it. | ||
< | <syntaxhighlight lang="mtmacro" line> | ||
<!-- ====================================================================== | <!-- ====================================================================== | ||
==== | ==== | ||
| Line 363: | Line 351: | ||
</tr> | </tr> | ||
</table> | </table> | ||
</ | </syntaxhighlight> | ||
I am really going to gloss over the previous two functions a bit as they are not important to understanding how to use dialogs or frames, but so you know what they do TrafficLightBar creates a red/yellow/green bar where the color is based on how full the bar is. StatusBar just creates a bar that is one color. | I am really going to gloss over the previous two functions a bit as they are not important to understanding how to use dialogs or frames, but so you know what they do TrafficLightBar creates a red/yellow/green bar where the color is based on how full the bar is. StatusBar just creates a bar that is one color. | ||
Just a quick point for those who may not know this already, but when you call a macro with [[ | (Just a quick point for those who may not know this already, but when you call a macro with [[macro_(roll_option)|[macro("name"): arguments]]] the arguments are available in the macro in the variable [[macro.args]]. A macro returns a value to the caller by storing it into the [[macro.return]] special variable. The caller can then retrieve that value by querying the contents of the same [[macro.return] variable.) | ||
Then we change the CharSheet macro on [[ | Then, we change the CharSheet macro on [[Library_Token|Lib:Test]] to | ||
< | <syntaxhighlight lang="mtmacro" line> | ||
[h: propNames = "Strength, Dexterity, Constitution, Intelligence, Wisdom, Charisma"] | [h: propNames = "Strength, Dexterity, Constitution, Intelligence, Wisdom, Charisma"] | ||
[dialog("CharSheetTest"): { | [dialog("CharSheetTest"): { | ||
| Line 416: | Line 404: | ||
</td> | </td> | ||
</tr> | </tr> | ||
<table> | </table> | ||
</body> | </body> | ||
</html> | </html> | ||
}] | }] | ||
</ | </syntaxhighlight> | ||
Click on the CharSheet [[ | Click on the CharSheet [[Macro_Button|macro button]] on your [[Token]] again and you will have a new character sheet. | ||
[[Image:CharSheetDialog4.png]] | [[Image:CharSheetDialog4.png|frame|center|Simple Character Sheet with Progress Bars]] | ||
The above example uses | The above example uses {{func|strformat}} which allows you to insert variables in a string using the %{''var''} syntax. It also has other flags that can be used to format variable output. | ||
===Creating Support Functions=== | |||
==Creating Support Functions== | |||
Lets leave the character sheet at this for the moment and move on to a new example. | Lets leave the character sheet at this for the moment and move on to a new example. | ||
| Line 440: | Line 427: | ||
We are going to store our weapons in a [[ | We are going to store our weapons in a [[string property list]] with the following keys. | ||
* NumWeapons - The number of weapons in our property list. | * NumWeapons - The number of weapons in our property list. | ||
* UsingWeapon - The weapon we are currently using. | * UsingWeapon - The weapon we are currently using. | ||
| Line 447: | Line 434: | ||
* WeaponXBonus - The bonus of weapon number X | * WeaponXBonus - The bonus of weapon number X | ||
We could add a lot more, but | We could add a lot more, but we'll keep it semi-simple for this post. | ||
The first thing we need is a way to enter weapons | The first thing we need is a way to enter weapons. We could use the {{func|input}} function but since this is a tutorial on frames and dialogs, I should probably show you how to do it in a dialog. | ||
But first we need to do some set up | But first we need to do some set up. When the player creates a new weapon, we will need to get NumWeapons, add 1 to it, save it back to the property, and use that number (let's not worry about what happens if a player cancels the entry of the weapon as we are not really that worried if we have gaps in our numbering scheme). One problem is, though, what do we do the first time around since the [[string property list]] would be empty? Trying to use the [[Token_Property|token property]] Weapons in strProp*() functions would result in the user being prompted for a value! We could add a default value in the campaign for the token, but there are also other methods. One thing we can do is use the {{func|isPropertyEmpty}} function to check if the [[Token_Property|property]] is empty, and if so, use a initial value for it; or, we could use the {{func|getProperty}} function that will just return an empty string (""), not | ||
prompt if there is no [[ | prompt if there is no [[Token_Property|property]]. | ||
So | So let's create a macro that returns the number of a new weapon. Create a [[Macro_Button|macro button]] called NextWeaponNumber and then paste the following code into it. | ||
< | <syntaxhighlight lang="mtmacro" line> | ||
<!-- | <!-- | ||
Returns the number for the next weapon as well as updating the | Returns the number for the next weapon as well as updating the | ||
| Line 472: | Line 459: | ||
<!-- Finally set out return value --> | <!-- Finally set out return value --> | ||
[h: macro.return = numWeapons] | [h: macro.return = numWeapons] | ||
</ | </syntaxhighlight> | ||
You can test it by | You can test it by running the following code from chat a few times | ||
< | <syntaxhighlight lang="mtmacro" line> | ||
[macro("NextWeaponNumber@Lib:Test"): ""] [macro.return] | [macro("NextWeaponNumber@Lib:Test"): ""] [macro.return] | ||
</ | </syntaxhighlight> | ||
When you are done you can reset the weapon count simply by editing the [[ | When you are done you can reset the weapon count simply by editing the [[Token_Property|token properties]] and clearing out the text for weapons. | ||
Let's also make a [[Macro_Button|macro button]] called AddWeapon which takes a [[string property list]] with the following keys: | |||
* Name | * Name | ||
* Damage | * Damage | ||
| Line 489: | Line 476: | ||
* Number | * Number | ||
It should add or update the weapon in the [[string property list]]. | |||
< | <syntaxhighlight lang="mtmacro" line> | ||
<!-- | <!-- | ||
Adds a weapon to the Weapons property list | Adds a weapon to the Weapons property list | ||
| Line 508: | Line 495: | ||
[h: Weapons = setStrProp(Weapons, strformat("Weapon%{num}Damage"), damage)] | [h: Weapons = setStrProp(Weapons, strformat("Weapon%{num}Damage"), damage)] | ||
[h: Weapons = setStrProp(Weapons, strformat("Weapon%{num}Bonus"), bonus)] | [h: Weapons = setStrProp(Weapons, strformat("Weapon%{num}Bonus"), bonus)] | ||
</ | </syntaxhighlight> | ||
You can test this macro too by a little typing at the command line. | You can test this macro too by a little typing at the command line. | ||
< | <syntaxhighlight lang="mtmacro" line> | ||
[macro("AddWeapon@Lib:Test"): "Number=1; Damage=1d8; Name=LongSword; Bonus=0"] | [macro("AddWeapon@Lib:Test"): "Number=1; Damage=1d8; Name=LongSword; Bonus=0"] | ||
</ | </syntaxhighlight> | ||
Look at the Weapons [ | Look at the Weapons [Token_Property|property]] and see how its built up our [[string property list]] for us. It wont have modified NumWeapons but that is ok we are going to assume that NextWeaponNumber is always used before adding a new weapon. Before clearing out the Weapons [[Token_Property|property]] to reset it lets write a function to retrieve a weapon. | ||
Create a [[ | Create a [[Macro_Button|macro button]] called GetWeapon on your [[Library_Token|Lib:Test]] [[Token]] and paste the following into it. | ||
< | <syntaxhighlight lang="mtmacro" line> | ||
<!-- | <!-- | ||
Retrieves a weapon from the Weapons Property list. | Retrieves a weapon from the Weapons Property list. | ||
| Line 543: | Line 530: | ||
macro.return = strformat("Number=%{num}; Damage=%{damage}; Bonus=%{bonus}; Name=%{name}") | macro.return = strformat("Number=%{num}; Damage=%{damage}; Bonus=%{bonus}; Name=%{name}") | ||
] | ] | ||
</ | </syntaxhighlight> | ||
Test it with | Test it with | ||
< | <syntaxhighlight lang="mtmacro" line> | ||
[h, macro("GetWeapon@Lib:Test"): 1] [macro.return] | [h, macro("GetWeapon@Lib:Test"): 1] [macro.return] | ||
</ | </syntaxhighlight> | ||
Lets add a way to delete items. Create a [[ | Lets add a way to delete items. Create a [[Macro_Button|macro button]] called DeleteWeapon and paste the following code. | ||
< | <syntaxhighlight lang="mtmacro" line> | ||
<!-- ============================================================ --> | <!-- ============================================================ --> | ||
<!-- ============================================================ --> | <!-- ============================================================ --> | ||
| Line 566: | Line 553: | ||
[h: Weapons = deleteStrProp(Weapons, strformat("Weapon%{num}Name"))] | [h: Weapons = deleteStrProp(Weapons, strformat("Weapon%{num}Name"))] | ||
[h: Weapons = deleteStrProp(Weapons, strformat("Weapon%{num}Bonus"))] | [h: Weapons = deleteStrProp(Weapons, strformat("Weapon%{num}Bonus"))] | ||
</ | </syntaxhighlight> | ||
One more "setup" function then we should be good to go. | One more "setup" function, then we should be good to go. Let's create a function that returns a [[string list]] of all the item numbers (remember we can have gaps because a user could cancel the addition of the item after calling NextWeaponNumber, or they could delete a weapon). | ||
(remember we can have gaps because a user could cancel the addition of the item after calling NextWeaponNumber or they could delete a weapon). | Create a [[Macro_Button|macro button]] on [[Library_Token|Lib:Test]] called GetWeaponNumbers: | ||
Create a [[ | |||
< | <syntaxhighlight lang="mtmacro" line> | ||
<!-- | <!-- | ||
Gets a string list of the valid weapon numbers | Gets a string list of the valid weapon numbers | ||
| Line 589: | Line 575: | ||
}] | }] | ||
[h: macro.return = wnumList] | [h: macro.return = wnumList] | ||
</ | </syntaxhighlight> | ||
The [[ | The [[string (function)|string()]] around the arguments in {{func|listAppend}} is to convert the | ||
arguments to strings | arguments to strings (as of 1.3.b48, {{func|listAppend}} seems to have problems with arguments that could be interpreted as numbers). | ||
===Input Dialogs=== | |||
So, now we can get back to the dialogs. Let's create a dialog to edit weapons. Create a [[Macro_Button|macro button]] on your [[Library_Token|Lib:Test]] called EditWeaponDialog and paste the following into it. | |||
<syntaxhighlight lang="mtmacro" line> | |||
< | |||
[dialog("weaponInput"): { | [dialog("weaponInput"): { | ||
[h: weaponNum = getStrProp(macro.args, "Number")] | [h: weaponNum = getStrProp(macro.args, "Number")] | ||
| Line 644: | Line 628: | ||
</td> | </td> | ||
</tr> | </tr> | ||
< | </table> | ||
<!-- hidden input with the weapon number --> | <!-- hidden input with the weapon number --> | ||
<input type="hidden" name="Number" value="[r: weaponNum]"></input> | <input type="hidden" name="Number" value="[r: weaponNum]"></input> | ||
| Line 653: | Line 637: | ||
</html> | </html> | ||
}] | }] | ||
</ | </syntaxhighlight> | ||
[[image:EditWeaponDialog1.png|frame|center|Edit Weapon Dialog]] | |||
One thing to note is @this will not work in a macro link, so we build | One thing to note is {{code|@this}} will not work in a macro link (the link has no token to associate as context at the time the link is clicked), so we build that portion of the macro name when the dialog is created. | ||
The action=... portion of the form tag specifies which macro to call when any submit button is pushed for the form. If the dialog is specified as | The {{code|action=...}} portion of the form tag specifies which macro to call when any submit button is pushed for the form. If the dialog is specified as an input dialog, the close button down at the bottom is not displayed, and when any form on the dialog is submitted, it is closed. | ||
The arguments to the macro that is called when the form is submitted is a string property list with the names of the input fields as the keys and the entered | The arguments to the macro that is called when the form is submitted is a string property list with the names of the input fields as the keys and the entered values as the values. Since I named all of my inputs the same as the keys in the parameter for the {{code|AddWeaponMacro}}, I can call that straight from the submit action on the form (sometimes is seems like I almost know what I am doing). | ||
The only problem is our edit weapon is kinda plain compared to our character sheet so time to add a little bling. | The only problem is our edit weapon is kinda plain compared to our character sheet so time to add a little bling. | ||
Change your EditWeaponDialog [[ | Change your EditWeaponDialog [[Macro_Button|macro button]] on [[Library_Token|Lib:Test]] to | ||
< | <syntaxhighlight lang="mtmacro" line> | ||
[dialog("weaponInput"): { | [dialog("weaponInput"): { | ||
[h: weaponNum = getStrProp(macro.args, "Number")] | [h: weaponNum = getStrProp(macro.args, "Number")] | ||
| Line 733: | Line 716: | ||
</html> | </html> | ||
}] | }] | ||
</ | </syntaxhighlight> | ||
Also, add [[Macro_Button|macro button]] EditWeapon_css to [[Library_Token|Lib:Test]] that contains: | |||
< | <syntaxhighlight lang="mtmacro" line> | ||
body { | body { | ||
background-color: #CCBBBB | background-color: #CCBBBB | ||
} | } | ||
</ | </syntaxhighlight> | ||
And you might as well add a AddWeapon [[ | And you might as well add a AddWeapon [[Macro_Button|macro button]] to your [[Token]] that contains | ||
< | <syntaxhighlight lang="mtmacro" line> | ||
[macro("EditWeaponDialog@Lib:Test"): "" ] | [macro("EditWeaponDialog@Lib:Test"): "" ] | ||
[abort(0)] | [abort(0)] | ||
</ | </syntaxhighlight> | ||
Now our dialog looks like | Now our dialog looks like | ||
[[Image:EditWeaponDialog2.png]] | [[Image:EditWeaponDialog2.png|frame|center|Edit Weapon Dialog with a Style Sheet]] | ||
Now, let's make a quick dialog to display our weapons. Create a new [[Macro_Button|macro button]] on your [[Library_Token|Lib:Test]] called ViewWeapons and paste in the following: | |||
< | <syntaxhighlight lang="mtmacro" line> | ||
[dialog("Weapons"): { | [dialog("Weapons"): { | ||
<html> | <html> | ||
| Line 782: | Line 765: | ||
</html> | </html> | ||
}] | }] | ||
</ | </syntaxhighlight> | ||
For good measure create a [[ | For good measure, create a [[Macro_Button|macro button]] called ViewWeapon_css on [[Library_Token|Lib:Test]] paste in the following. | ||
< | <syntaxhighlight lang="mtmacro" line> | ||
.WeaponName { | .WeaponName { | ||
background-color: #55AA55; | background-color: #55AA55; | ||
| Line 791: | Line 774: | ||
text-align: center; | text-align: center; | ||
} | } | ||
</ | </syntaxhighlight> | ||
Add a [[ | Add a [[Macro_Button|macro button]] to your [[Token]] called ViewWeapons which contains: | ||
< | <syntaxhighlight lang="mtmacro" line> | ||
[macro("ViewWeapons@Lib:Test"): ""] | [macro("ViewWeapons@Lib:Test"): ""] | ||
[abort(0)] | [abort(0)] | ||
</ | </syntaxhighlight> | ||
And this is what it looks like. | And this is what it looks like. | ||
[[Image:ViewWeapons.png]] | [[Image:ViewWeapons.png|frame|center|Weapon List Dialog]] | ||
===Creating a Simple Character Sheet Frame=== | |||
Up until now I haven't talked at all about frames, but don't worry, change {{roll|dialog}} to {{roll|frame}} above and it will work (except you can't have a frame that closes when you submit a form — what would be the point?). | |||
Let's make some final changes to show some frames... I am going to make all of these in one go, as everything in them has been discussed previously in this article. | |||
First, we are going to completely change the CharSheet [[Macro_Button|macro button]] on [[Library_Token|Lib:Test]] to: | |||
<syntaxhighlight lang="mtmacro" line> | |||
< | |||
[frame("CharSheet"): { | [frame("CharSheet"): { | ||
[h: page = getStrProp(macro.args, "Page")] | [h: page = getStrProp(macro.args, "Page")] | ||
| Line 827: | Line 809: | ||
</html> | </html> | ||
}] | }] | ||
</ | </syntaxhighlight> | ||
Create a CharSheetHeader [[Macro_Button|macro button]] on [[Library_Token|Lib:Test]] and paste the following into it: | |||
<syntaxhighlight lang="mtmacro" line> | |||
[h: currentPage = macro.args] | |||
[h: pages = "Main,Weapons"] | |||
<table> | |||
<tr> | |||
[foreach(page, pages,""), code: { | |||
[h,if (page == currentPage): class="currentPage" ; class="page"] | |||
[h: callback = "CharSheet@"+getMacroLocation()] | |||
<td class="[r: class]"> | |||
[r: macroLink(page, callback, "none", "Page="+page)] | |||
</td> | |||
}] | |||
</tr> | |||
</table> | |||
</syntaxhighlight> | |||
Create a CharSheetMain [[ | Create a CharSheetMain [[Macro_Button|macro button]] on [[Library_Token|Lib:Test]] and paste the following into it: | ||
<syntaxhighlight lang="mtmacro" line> | |||
< | |||
[h: propNames = "Strength, Dexterity, Constitution, Intelligence, Wisdom, Charisma"] | [h: propNames = "Strength, Dexterity, Constitution, Intelligence, Wisdom, Charisma"] | ||
<table> | <table> | ||
| Line 871: | Line 868: | ||
</td> | </td> | ||
</tr> | </tr> | ||
<table> | </table> | ||
</ | </syntaxhighlight> | ||
Create a CharSheetWeapons [[ | Create a CharSheetWeapons [[Macro_Button|macro button]] on [[Library_Token|Lib:Test]] and paste the following into it: | ||
< | <syntaxhighlight lang="mtmacro" line> | ||
[h,macro("GetWeaponNumbers@this"): ""] | [h,macro("GetWeaponNumbers@this"): ""] | ||
[h: wpList = macro.return] | [h: wpList = macro.return] | ||
| Line 900: | Line 897: | ||
}] | }] | ||
</table> | </table> | ||
</ | </syntaxhighlight> | ||
And the last change to make is the CharSheet_css [[ | And the last change to make is the CharSheet_css [[Macro_Button|macro button]] on [[Library_Token|Lib:Test]] an paste the following into it: | ||
< | <syntaxhighlight lang="mtmacro" line> | ||
.oddRow { background-color: #FFFFFF } | .oddRow { background-color: #FFFFFF } | ||
.evenRow { background-color: #EEEEAA } | .evenRow { background-color: #EEEEAA } | ||
| Line 920: | Line 917: | ||
color: white; | color: white; | ||
} | } | ||
</ | </syntaxhighlight> | ||
So what does this give us? A shiny new frame. Unlike Dialogs, Frames act like any of the other | So what does this give us? A shiny new frame. Unlike Dialogs, Frames act like any of the other MapTool panels and can be docked on the sides, or with other windows (forming a tab group). | ||
[[Image:CharSheetFrame1.png]] | [[Image:CharSheetFrame1.png|frame|center|Simple Character Sheet in a Frame]] | ||
Where it says Main and Weapons on the top, they are links | Where it says Main and Weapons on the top, they are links; if you click on Weapons, it will change the CharacterSheet frame to | ||
[[Image:CharSheetFrame2.png]] | [[Image:CharSheetFrame2.png|frame|center|Weapon List in a Frame]] | ||
And as an added bonus, the weapon names are links | And as an added bonus, the weapon names are links. If you click on them, it will open up the edit dialog where you can edit them. (Note that this will not update the character sheet at this time, but that is left as an exercise for the reader). | ||
This has just been a short example of what can be done | This has just been a short example of what can be done. I am sure people will come up with some great ideas of how to use this. | ||
The campaign file with the dialogs we have created can be found at [http://lmwcs.com/maptool/campaigns/B48MiniTuts.cmpgn campaign] | The campaign file with the dialogs we have created can be found at [http://lmwcs.com/maptool/campaigns/B48MiniTuts.cmpgn campaign] | ||
==Related Pages== | ===Related Pages=== | ||
* [[Supported CSS Styles]] | * [[Supported CSS Styles]] | ||
* [[Forms tutorial]] | |||
Latest revision as of 23:59, 24 March 2024
This article is a stub, you can help the RPTools Wiki project by contributing content to expand this article.
This article needs: A page similar to this one that demonstrates using Add-ons instead of a Lib:Token.
THIS IS AN ADVANCED ARTICLE
An Introduction to MapTool Macro Dialogs and Frames
Please note I will be using CSS and HTML in this tutorial but I will not really be explaining them, if you need a refresher on either a search on google will point you to many resources that do a better job than I could.
The [dialog():] and [frame():] roll types create a new dialog or frame where all the output from the commands within the
{} will be displayed. dialog create a dialog box that hovers over other windows. frame creates a frame that can be docked like the other maptool windows. The dialog and frame windows can be used to display HTML and rolls the same as the chat output window.
This tutorial starts with the standard blank campaign you get when you start MapTool, anything else we need we will add along the way.
First Steps
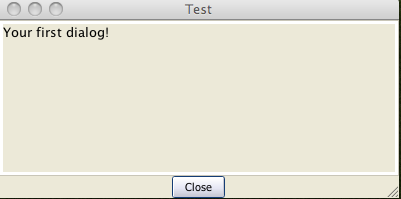
So lets jump in and create your first dialog, you can use the code below to create a dialog.
[dialog("Test"): {
  Your first dialog!
}]
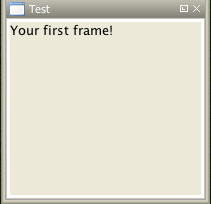
I know its pretty boring but before we start adding more to it lets create a frame so that you can see the difference
[frame("Test"): {
  Your first frame!
}]
And a picture of your first frame docked.
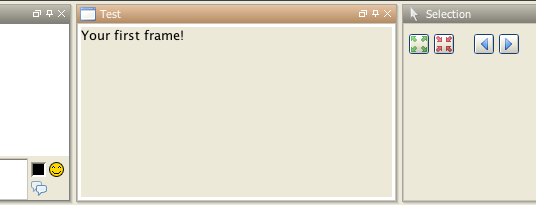
Back to the dialog you can spice it up a little with some dice rolls and HTML formatting.
[dialog("Test"): {
  <b>1d4</b> -> [1d4]<br>
  <b>1d6</b> -> [1d6]<br>
  <b>1d8</b> -> [1d8]<br>
  <b>1d10</b> -> [1d10]<br>
  <b>1d12</b> -> [1d12]<br>
  <b>1d20</b> -> [1d20]<br>
  <b>1d100</b> -> [1d100]<br>
}]
Adding Some HTML
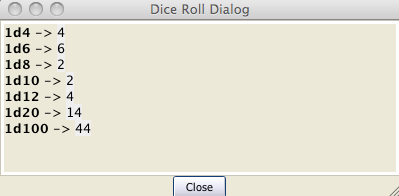
This will create a dialog box with some HTML formatting and dice rolls. The dice rolls will have all the tooltips that you would normally get in the chat output.
Still the title is boring (it defaults to the name of the dialog). You can use the HTML <title> tag to change the title. Run the code below, there is no need to close the dialog from the code above.
[dialog("Test"): {
  <html>
    <head>
      <title>Dice Roll Dialog</title>
    </head>
    <body>
      <b>1d4</b> -> [1d4]<br>
      <b>1d6</b> -> [1d6]<br>
      <b>1d8</b> -> [1d8]<br>
      <b>1d10</b> -> [1d10]<br>
      <b>1d12</b> -> [1d12]<br>
      <b>1d20</b> -> [1d20]<br>
      <b>1d100</b> -> [1d100]<br>
    </body>
  </html>
}]
Notice that the dialog command did not open a new dialog window, instead it replaced the contents of the dialog you had open. When you use [dialog()] with the name of a dialog that already exists, the contents of that dialog are replaced, ([frame()] works the same way). You can use this behavior to update your dialogs. Create a token called Lib:Test. Create a macro (on that same token) called Test.
Copy the following code into the Test macro.
[dialog("Test"): {
  <html>
    <head>
      <title>Dice Roll Dialog</title>
    </head>
    <body>
      <b>1d4</b> -> [1d4]<br>
      <b>1d6</b> -> [1d6]<br>
      <b>1d8</b> -> [1d8]<br>
      <b>1d10</b> -> [1d10]<br>
      <b>1d12</b> -> [1d12]<br>
      <b>1d20</b> -> [1d20]<br>
      <b>1d100</b> -> [1d100]<br>
      <br>
      [r: macroLink("Refresh", "Test@Lib:Test")]
    </body>
  </html>
}]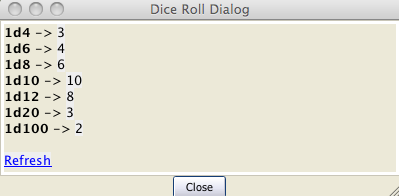
The above macro uses the macroLink() function to create a link that will call Test on Lib:Test when ever it is clicked (which will update the dialog with new rolls).
The above would be really useful if you needed a window that provided you with a bunch of dice rolls all the time. But I assume that is not what most people will want to do with the dialogs.
Drag another token out on to the map, and fill in the token properties. We can create a simple character sheet with a dialog. On the Lib:Test token create a macro called CharSheet and paste the following code into it.
[h: propNames = "Strength, Dexterity, Constitution, Intelligence, Wisdom, Charisma"]
[dialog("CharSheetTest"): {
  <html>
    <head>
      <title>Character Sheet</title>
    </head>
    <body>
      <table>
        [foreach(prop, propNames, ""), code: {
          <tr>
            <td>[r: prop]</td>
            <td>[r: getProperty(prop)]</td>
          </tr>
        }]
      </table>
    </body>
  </html>
}]
On the new Token that you placed on the map, create a macro button called CharSheet and paste the following into it.
[macro("CharSheet@Lib:Test"): ""]
[abort(0)]
Click on the new macro button.
Now for a dash of CSS
Again, we are not going to set the world on fire with this character sheet dialog. Let's spice it up a little — I will show you how to use some CSS for formatting.
To use CSS, you insert a link like the following into the HTML to be displayed:
[dialog("Test"): {
    <link rel='stylesheet' type='text/css' href='myCSS@Lib:Test'></link>
}]
Although you can (and probably should) use the getMacroLocation() function to make sure it comes from the same Lib:Token as the macro. So,
[dialog("Test"): {
    <link rel='stylesheet' type='text/css' href='myCSS@[r: getMacroLocation()]'></link>
}]
Edit the CharSheet macro on the Lib:Test Token and paste in the following.
[h: propNames = "Strength, Dexterity, Constitution, Intelligence, Wisdom, Charisma"]
[dialog("CharSheetTest"): {
  <html>
    <head>
      <link rel="stylesheet" type="text/css" href="CharSheet_css@[r: getMacroLocation()]">
      <title>Character Sheet</title>
    </head>
    <body>
      <table id="stats">
        <tr>
          <th>Name</th>
          <th>Score</th>
        </tr>
        [h: class = "oddRow"]
        [foreach(prop, propNames, ""), code: {
          <tr class="[r:class]">
            <td>[r: prop]</td>
            <td>[r: getProperty(prop)]</td>
          </tr>
          [h: class = if(class=="oddRow", "evenRow", "oddRow")]
        }]
      </table>
    </body>
  </html>
}]
Also create a new macro button on Lib:Test called CharSheet_css and paste the following CSS code into it.
.oddRow { background-color: #FFFFFF }
.evenRow { background-color: #EEEEAA }
#stats th { background-color: #113311; color: #FFFFFF }
Click on the CharSheet macro button on your Token.
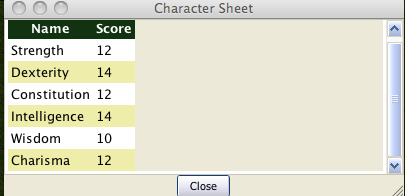
Looks much better already!
Getting better... Let's make some more changes. Change the CharSheet macro on Lib:Test to:
[h: propNames = "Strength, Dexterity, Constitution, Intelligence, Wisdom, Charisma"]
[dialog("CharSheetTest"): {
  <html>
    <head>
      <link rel="stylesheet" type="text/css" href="CharSheet_css@[r: getMacroLocation()]">
      <title>Character Sheet</title>
    </head>
    <body>
      <table>
        <tr>
          <td>
            <img src='[r: getTokenImage(100)]'></img>
          </td>
          <td>
            <table id="stats">
              <tr>
                <th>Name</th>
                <th>Score</th>
              </tr>
              [h: class = "oddRow"]
              [foreach(prop, propNames, ""), code: {
                <tr class="[r:class]">
                  <td>[r: prop]</td>
                  <td>[r: getProperty(prop)]</td>
                </tr>
                [h: class = if(class=="oddRow", "evenRow", "oddRow")]
              }]
            </table>
          </td>
        </tr>
      </table>
      <hr>
      <table>
        <tr>
          <th>Hit Points:</th>
          <td>[r: HP]</td>
          <th>Armor Class:</th>
          <td>[r: AC]</td>
        </tr>
      </table>
    </body>
  </html>
}]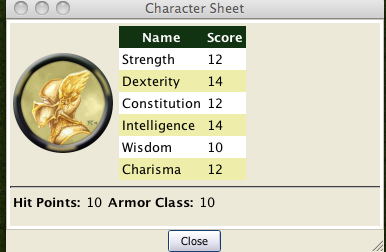
Looking good...!
And a Touch more formatting
Go to Edit->Campaign Properties, Token Properties Tab, Basic Token type, add the following properties
*@MaxHP*@XP*@NextLevelXP
Then edit your Token and set some values in your new properties.
Time to create a new macro button on the Lib:Test called TrafficLightBar and paste the following code into it.
<!-- ======================================================================
====
==== Outputs a red/yellow/green bar
====
==== Parameters (accepts a string property list with following keys)
====
==== MaxLen - Maximum length of status bar.
==== MaxValue - The "Full" value for the bar.
==== Value - The current value for the bar.
==== Label - The label for the bar.
====
====================================================================== -->
<!-- Set up the colors for our "Traffic Lights" -->
[h: r0=200] [h: g0=200] [h: b0=200]
[h: r1=200] [h: g1=0] [h: b1=0]
[h: r2=255] [h: g2=140] [h: b2=0]
[h: r3=0] [h: g3=200] [h: b3=0]
[h: MaxLen=getStrProp(macro.args, "MaxLen")]
[h: MaxValue=getStrProp(macro.args, "MaxValue")]
[h: Value=getStrProp(macro.args, "Value")]
[h: Label=getStrProp(macro.args, "Label")]
[h: Len=max(min(round(Value*MaxLen/MaxValue+0.4999),MaxLen),0)]
[h: Len=if(Value>=MaxValue,MaxLen, Len)]
[h: c=min(round(Value*3/MaxValue+0.4999),3)]
[h: col=min(max(Len,0),1)*c]
[h: r=eval("r"+col)] [h: g=eval("g"+col)] [h: b=eval("b"+col)]
<table>
<tr>
<td><span title="{Value}/{MaxValue}">{Label}</span></td>
<td style="background-color: rgb({r},{g},{b})">
<span title="{Value}/{MaxValue}">[c(Len, ""),r: " "]</span>
</td>
[if(MaxLen-Len>0), code: {
<td style="background-color: rgb({r0},{g0},{b0})">
<span title="{Value}/{MaxValue}">[c(MaxLen-Len,""),r: " "]</span>
</td>
}]
</tr>
</table>Create another macro button on Lib:Test called StatusBar and copy the following code into it.
<!-- ======================================================================
====
==== Outputs a "progress" bar
====
==== Parameters (accepts a string property list with following keys)
====
==== MaxLen - Maximum length of status bar.
==== MaxValue - The "Full" value for the bar.
==== Value - The current value for the bar.
==== Label - The label for the bar.
==== Color - R,G,B color
====
====================================================================== -->
[h: r0=200] [h: g0=200] [h: b0=200]
[h: MaxLen=getStrProp(macro.args, "MaxLen")]
[h: MaxValue=getStrProp(macro.args, "MaxValue")]
[h: Value=getStrProp(macro.args, "Value")]
[h: Color=getStrProp(macro.args, "Color")]
[h: Label=getStrProp(macro.args, "Label")]
[h: r1=listGet(Color,0)]
[h: g1=listGet(Color,1)]
[h: b1=listGet(Color,2)]
[h: Len=max(min(round(Value*MaxLen/MaxValue+0.4999),MaxLen),0)]
[h: c=min(round(Value/MaxValue+0.4999),1)]
[h: col=min(max(Len,0),1)*c]
[h: r=eval("r"+col)] [h: g=eval("g"+col)] [h: b=eval("b"+col)]
[h: r=eval("r"+col)] [h: g=eval("g"+col)] [h: b=eval("b"+col)]
<table>
<tr>
<td><span title="{Value}/{MaxValue}">{Label}</span></td>
<td style="background-color: rgb({r},{g},{b})">
<span title="{Value}/{MaxValue}">[c(Len, ""),r: " "]</span>
</td>
[if(MaxLen-Len>0), code: {
<td style="background-color: rgb({r0},{g0},{b0})">
<span title="{Value}/{MaxValue}">[c(MaxLen-Len,""),r: " "]</span>
</td>
}]
</tr>
</table>I am really going to gloss over the previous two functions a bit as they are not important to understanding how to use dialogs or frames, but so you know what they do TrafficLightBar creates a red/yellow/green bar where the color is based on how full the bar is. StatusBar just creates a bar that is one color.
(Just a quick point for those who may not know this already, but when you call a macro with [macro("name"): arguments] the arguments are available in the macro in the variable macro.args. A macro returns a value to the caller by storing it into the macro.return special variable. The caller can then retrieve that value by querying the contents of the same [[macro.return] variable.)
Then, we change the CharSheet macro on Lib:Test to
[h: propNames = "Strength, Dexterity, Constitution, Intelligence, Wisdom, Charisma"]
[dialog("CharSheetTest"): {
  <html>
    <head>
      <link rel="stylesheet" type="text/css" href="CharSheet_css@[r: getMacroLocation()]">
      <title>Character Sheet</title>
    </head>
    <body>
      <table>
        <tr>
          <td>
            <img src='[r: getTokenImage(100)]'></img>
          </td>
          <td>
            <table id="stats">
              <tr>
                <th>Name</th>
                <th>Score</th>
              </tr>
              [h: class = "oddRow"]
              [foreach(prop, propNames, ""), code: {
                <tr class="[r:class]">
                  <td>[r: prop]</td>
                  <td>[r: getProperty(prop)]</td>
                </tr>
                [h: class = if(class=="oddRow", "evenRow", "oddRow")]
              }]
            </table>
          </td>
        </tr>
      </table>
      <hr>
      <table>
        <tr>
          <td>
            [h: hpBarArgs = strformat("MaxLen=50; Value=%{HP}; MaxValue=%{MaxHP}; Label=HP")]
            [macro("TrafficLightBar@this"): hpBarArgs]
          </td>
        </tr>
        <tr>
          <td>
            [h: hpBarArgs = strformat("MaxLen=50; Value=%{XP}; MaxValue=%{NextLevelXP}; Label=XP; Color=120,120,255")]
            [macro("StatusBar@this"): hpBarArgs]
          </td>
        </tr>
      </table>
    </body>
  </html>
}]
Click on the CharSheet macro button on your Token again and you will have a new character sheet.
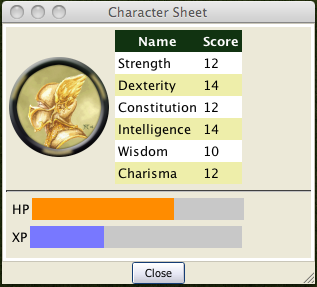
The above example uses strformat() which allows you to insert variables in a string using the %{var} syntax. It also has other flags that can be used to format variable output.
Creating Support Functions
Lets leave the character sheet at this for the moment and move on to a new example.
Edit->Campaign Properties, Token Properties Tab, Basic Token type, add the following properties
- Weapons
- Items
We are going to store our weapons in a string property list with the following keys.
- NumWeapons - The number of weapons in our property list.
- UsingWeapon - The weapon we are currently using.
- WeaponXName - The name of weapon number X
- WeaponXDamage - The damage of weapon number X
- WeaponXBonus - The bonus of weapon number X
We could add a lot more, but we'll keep it semi-simple for this post.
The first thing we need is a way to enter weapons. We could use the input() function but since this is a tutorial on frames and dialogs, I should probably show you how to do it in a dialog.
But first we need to do some set up. When the player creates a new weapon, we will need to get NumWeapons, add 1 to it, save it back to the property, and use that number (let's not worry about what happens if a player cancels the entry of the weapon as we are not really that worried if we have gaps in our numbering scheme). One problem is, though, what do we do the first time around since the string property list would be empty? Trying to use the token property Weapons in strProp*() functions would result in the user being prompted for a value! We could add a default value in the campaign for the token, but there are also other methods. One thing we can do is use the isPropertyEmpty() function to check if the property is empty, and if so, use a initial value for it; or, we could use the getProperty() function that will just return an empty string (""), not prompt if there is no property.
So let's create a macro that returns the number of a new weapon. Create a macro button called NextWeaponNumber and then paste the following code into it.
<!--
  Returns the number for the next weapon as well as updating the
  the counter.
  -->

<!-- If Weapons token property is empty set it to a default value -->
[h,if(isPropertyEmpty("Weapons")): Weapons = "NumWeapons=0;"]

[h: numWeapons = getStrProp(Weapons, "NumWeapons") + 1]

<!-- Now update our property -->
[h: Weapons = setStrProp(Weapons, "NumWeapons", numWeapons)]

<!-- Finally set out return value -->
[h: macro.return = numWeapons]
You can test it by running the following code from chat a few times
[macro("NextWeaponNumber@Lib:Test"): ""] [macro.return]
When you are done you can reset the weapon count simply by editing the token properties and clearing out the text for weapons.
Let's also make a macro button called AddWeapon which takes a string property list with the following keys:
- Name
- Damage
- Bonus
- Number
It should add or update the weapon in the string property list.
<!--
  Adds a weapon to the Weapons property list

  Parameters (in a string property list)

  Name = Name of Weapon
  Damage = Damage Weapon does
  Bonus = Bonus of Weapon
  Number = The index number of the Weapon
-->
[h: num = getStrProp(macro.args, "Number")]
[h: damage = getStrProp(macro.args, "Damage")]
[h: name = getStrProp(macro.args, "Name")]
[h: bonus = getStrProp(macro.args, "Bonus")]
[h: Weapons = setStrProp(Weapons, strformat("Weapon%{num}Name"), name)]
[h: Weapons = setStrProp(Weapons, strformat("Weapon%{num}Damage"), damage)]
[h: Weapons = setStrProp(Weapons, strformat("Weapon%{num}Bonus"), bonus)]
You can test this macro too by a little typing at the command line.
[macro("AddWeapon@Lib:Test"): "Number=1; Damage=1d8; Name=LongSword; Bonus=0"]Look at the Weapons [Token_Property|property]] and see how its built up our string property list for us. It wont have modified NumWeapons but that is ok we are going to assume that NextWeaponNumber is always used before adding a new weapon. Before clearing out the Weapons property to reset it lets write a function to retrieve a weapon.
Create a macro button called GetWeapon on your Lib:Test Token and paste the following into it.
<!--
  Retrieves a weapon from the Weapons Property list.

  Parameters
    Weapon Number

  Returns
    A string property list with following keys
      Name = Name of Weapon
      Damage = Damage Weapon does
      Bonus = Bonus of Weapon
      Number = The index number of the Weapon
    If the weapon is not found then an empty string ("") is returned.
-->
[h: num = macro.args]
[h: damage = getStrProp(Weapons, strformat("Weapon%{num}Damage"))]
[h: name = getStrProp(Weapons, strformat("Weapon%{num}Name"))]
[h: bonus = getStrProp(Weapons, strformat("Weapon%{num}Bonus"))]
[h, if(name == ""):
   macro.return = ""
;
   macro.return = strformat("Number=%{num}; Damage=%{damage}; Bonus=%{bonus}; Name=%{name}")
]
Test it with
[h, macro("GetWeapon@Lib:Test"): 1] [macro.return]Lets add a way to delete items. Create a macro button called DeleteWeapon and paste the following code.
<!-- ============================================================ -->
<!-- ============================================================ -->
<!-- ============================================================ -->
<!--
  Deletes a weapon from the Weapons property List.

  Parameters
    The weapon number
-->
[h: num = macro.args]
[h: Weapons = deleteStrProp(Weapons, strformat("Weapon%{num}Damage"))]
[h: Weapons = deleteStrProp(Weapons, strformat("Weapon%{num}Name"))]
[h: Weapons = deleteStrProp(Weapons, strformat("Weapon%{num}Bonus"))]
One more "setup" function, then we should be good to go. Let's create a function that returns a string list of all the item numbers (remember we can have gaps because a user could cancel the addition of the item after calling NextWeaponNumber, or they could delete a weapon). Create a macro button on Lib:Test called GetWeaponNumbers:
<!--
  Gets a string list of the valid weapon numbers
-->
<!-- If Weapons token property is empty set it to a default value -->
[h,if(isPropertyEmpty("Weapons")): Weapons = "NumWeapons=0;"]

[h: maxNum = getStrProp(Weapons, "NumWeapons")]
[h: wnumList=""]
[h,c(maxNum), code: {
  [h: wnum = roll.count+1]
  [h: name = getStrProp(Weapons, strformat("Weapon%{wnum}Name"))]
  [if(name != ""):
    wnumList = listAppend(string(wnumList), string(wnum))
  ]
}]
[h: macro.return = wnumList]
The string() around the arguments in listAppend() is to convert the
arguments to strings (as of 1.3.b48, listAppend() seems to have problems with arguments that could be interpreted as numbers).
Input Dialogs
So, now we can get back to the dialogs. Let's create a dialog to edit weapons. Create a macro button on your Lib:Test called EditWeaponDialog and paste the following into it.
[dialog("weaponInput"): {
  [h: weaponNum = getStrProp(macro.args, "Number")]
  [h: name = getStrProp(macro.args, "Name")]
  [h: bonus = getStrProp(macro.args, "Bonus")]
  [h: damage = getStrProp(macro.args, "Damage")]
  <!-- If we do not have a weapon number grab the next one -->
  [h, if(weaponNum == ""), code: {
    [h,macro("NextWeaponNumber@this"): ""]
    [h: weaponNum = macro.return]
  }]
  <html>
    <head>
      <title>Edit Weapon Dialog</title>
      <meta name="input" content="true">
    </head>
    <body>
      <form name="weaponInput" action="[r:macroLinkText('AddWeapon@Lib:Test')]">
        <table>
          <tr>
            <th>
              <label for="Name">Weapon Name</label>
            </th>
            <td>
              <input type="text" name="Name" value="[r: name]"></input> <br>
            </td>
          </tr>
          <tr>
            <th>
              <label for="Damage">Weapon Damage</label>
            </th>
            <td>
              <input type="text" name="Damage" value="[r: damage]"></input> <br>
            </td>
          </tr>
          <tr>
            <th>
              <label for="Bonus">Weapon Bonus</label>
            </th>
            <td>
              <input type="text" name="Bonus" value="[r: bonus]"></input>
            </td>
          </tr>
          </table>
        <!-- hidden input with the weapon number -->
        <input type="hidden" name="Number" value="[r: weaponNum]"></input>

        <input type="submit" name="Save" value="Save"> </input>
      </form>
    </body>
  </html>
}]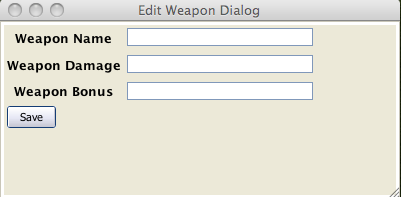
One thing to note is @this will not work in a macro link (the link has no token to associate as context at the time the link is clicked), so we build that portion of the macro name when the dialog is created.
The {{{1}}} portion of the form tag specifies which macro to call when any submit button is pushed for the form. If the dialog is specified as an input dialog, the close button down at the bottom is not displayed, and when any form on the dialog is submitted, it is closed.
The arguments to the macro that is called when the form is submitted is a string property list with the names of the input fields as the keys and the entered values as the values. Since I named all of my inputs the same as the keys in the parameter for the AddWeaponMacro, I can call that straight from the submit action on the form (sometimes is seems like I almost know what I am doing).
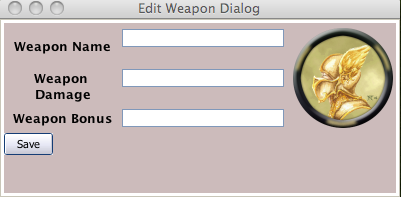
The only problem is our edit weapon is kinda plain compared to our character sheet so time to add a little bling.
Change your EditWeaponDialog macro button on Lib:Test to
[dialog("weaponInput"): {
  [h: weaponNum = getStrProp(macro.args, "Number")]
  [h: name = getStrProp(macro.args, "Name")]
  [h: bonus = getStrProp(macro.args, "Bonus")]
  [h: damage = getStrProp(macro.args, "Damage")]
  <!-- If we do not have a weapon number grab the next one -->
  [h, if(weaponNum == ""), code: {
    [h,macro("NextWeaponNumber@this"): ""]
    [h: weaponNum = macro.return]
  }]
  <html>
    <head>
      <title>Edit Weapon Dialog</title>
      <meta name="input" content="true">
      <link rel="stylesheet" type="text/css" href="EditWeapon_css@[r: getMacroLocation()]">
    </head>
    <body>
      <form name="weaponInput" action="[r:macroLinkText('AddWeapon@Lib:Test')]">
        <table>
          <tr>
            <td>
              <table>
                <tr>
                  <th>
                    <label for="Name">Weapon Name</label>
                  </th>
                  <td>
                    <input type="text" name="Name" value="[r: name]">
                    </input> <br>
                  </td>
                </tr>
                <tr>
                  <th>
                    <label for="Damage">Weapon Damage</label>
                  </th>
                  <td>
                    <input type="text" name="Damage" value="[r: damage]">
                    </input> <br>
                  </td>
                </tr>
                <tr>
                  <th>
                    <label for="Bonus">Weapon Bonus</label>
                  </th>
                  <td>
                    <input type="text" name="Bonus" value="[r: bonus]">
                    </input>
                  </td>
                </tr>
              </table>
            </td>
            <td>
              <img src='[r: getTokenImage(100)]'></img>
            </td>
          </tr>
        </table>
        <!-- hidden input with the weapon number -->
        <input type="hidden" name="Number" value="[r: weaponNum]">
        </input>
        <input id="saveButton" type="submit" name="Save" value="Save">
        </input>
      </form>
    </body>
  </html>
}]
Also, add macro button EditWeapon_css to Lib:Test that contains:
body {
   background-color: #CCBBBB
}
And you might as well add a AddWeapon macro button to your Token that contains
[macro("EditWeaponDialog@Lib:Test"): "" ]
[abort(0)]
Now our dialog looks like
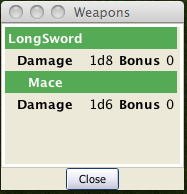
Now, let's make a quick dialog to display our weapons. Create a new macro button on your Lib:Test called ViewWeapons and paste in the following:
[dialog("Weapons"): {
  <html>
    <head>
      <title>Weapons</title>
      <link rel="stylesheet" type="text/css" href="ViewWeapon_css@[r: getMacroLocation()]">
    </head>
    <body>
      [h,macro("GetWeaponNumbers@this"): ""]
      [h: wpList = macro.return]
      <table>
        [foreach(weapon, wpList, ""), code: {
          [h,macro("GetWeapon@this"): weapon]
          [h: wProp = macro.return]
          <tr class="WeaponName">
            <th>
              [r: getStrProp(wProp, "Name")]
            </th>
          </tr>
          <tr>
            <th>Damage</th>
            <td>[r: getStrProp(wProp, "Damage")]</td>
            <th>Bonus</th>
            <td>[r: getStrProp(wProp, "Bonus")]</td>
          </tr>
        }]
      </table>
    </body>
  </html>
}]
For good measure, create a macro button called ViewWeapon_css on Lib:Test paste in the following.
.WeaponName {
    background-color: #55AA55;
    color: white;
    text-align: center;
}
Add a macro button to your Token called ViewWeapons which contains:
[macro("ViewWeapons@Lib:Test"): ""]
[abort(0)]
And this is what it looks like.
Creating a Simple Character Sheet Frame
Up until now I haven't talked at all about frames, but don't worry, change [dialog():] to [frame():] above and it will work (except you can't have a frame that closes when you submit a form — what would be the point?).
Let's make some final changes to show some frames... I am going to make all of these in one go, as everything in them has been discussed previously in this article.
First, we are going to completely change the CharSheet macro button on Lib:Test to:
[frame("CharSheet"): {
  [h: page = getStrProp(macro.args, "Page")]
  [h,if(page==""): page="Main"]
  <html>
    <head>
      <title>Character Sheet</title>
      <link rel="stylesheet" type="text/css" href="CharSheet_css@[r: getMacroLocation()]">
    </head>
    <body>
      [macro("CharSheetHeader@this"): page]
      <br>
      [macro("CharSheet"+page+"@this"): ""]
    </body>
  </html>
}]
Create a CharSheetHeader macro button on Lib:Test and paste the following into it:
[h: currentPage = macro.args]
[h: pages = "Main,Weapons"]
<table>
  <tr>
    [foreach(page, pages,""), code: {
      [h,if (page == currentPage): class="currentPage" ; class="page"]
      [h: callback = "CharSheet@"+getMacroLocation()]
      <td class="[r: class]">
        [r: macroLink(page, callback, "none", "Page="+page)]
      </td>
    }]
  </tr>
</table>
Create a CharSheetMain macro button on Lib:Test and paste the following into it:
[h: propNames = "Strength, Dexterity, Constitution, Intelligence, Wisdom, Charisma"]
<table>
  <tr>
    <td>
      <img src='[r: getTokenImage(100)]'></img>
    </td>
    <td>
      <table id="stats">
        <tr>
          <th>Name</th>
          <th>Score</th>
        </tr>
        [h: class = "oddRow"]
        [foreach(prop, propNames, ""), code: {
          <tr class="[r:class]">
            <td>[r: prop]</td>
            <td>[r: getProperty(prop)]</td>
          </tr>
          [h: class = if(class=="oddRow", "evenRow", "oddRow")]
        }]
      </table>
    </td>
  </tr>
</table>
<hr>
<table>
  <tr>
    <td>
      [h: hpBarArgs = strformat("MaxLen=50; Value=%{HP}; MaxValue=%{MaxHP}; Label=HP")]
      [macro("TrafficLightBar@this"): hpBarArgs]
    </td>
  </tr>
  <tr>
    <td>
      [h: hpBarArgs = strformat("MaxLen=50; Value=%{XP}; MaxValue=%{NextLevelXP}; Label=XP; Color=120,120,255")]
      [macro("StatusBar@this"): hpBarArgs]
    </td>
  </tr>
</table>
Create a CharSheetWeapons macro button on Lib:Test and paste the following into it:
[h,macro("GetWeaponNumbers@this"): ""]
[h: wpList = macro.return]
<table>
  [foreach(weapon, wpList, ""), code: {
    [h,macro("GetWeapon@this"): weapon]
    [h: wProp = macro.return]
    <tr class="WeaponName">
      <th>
        [h: name = getStrProp(wProp, "Name")]
        [h: bonus = getStrProp(wProp, "Bonus")]
        [h: damage = getStrProp(wProp, "Damage")]
        [h: callback = "EditWeaponDialog@" + getMacroLocation()]
        [h: args = strformat("Number=%{weapon}; Name=%{name}; Damage=%{damage}; Bonus=%{bonus}")]
        [r: macroLink(name, callback, "none", args)]
      </th>
    </tr>
    <tr>
      <th>Damage</th>
      <td>[r: getStrProp(wProp, "Damage")]</td>
      <th>Bonus</th>
      <td>[r: getStrProp(wProp, "Bonus")]</td>
    </tr>
  }]
</table>
And the last change to make is the CharSheet_css macro button on Lib:Test an paste the following into it:
.oddRow { background-color: #FFFFFF }
.evenRow { background-color: #EEEEAA }
#stats th { background-color: #113311; color: #FFFFFF }
.WeaponName a {
    background-color: #55AA55;
    color: white;
    text-align: center;
}
.page a {
   background-color: #5555CC;
   color: white;
}
.currentPage a {
   background-color: #7777FF;
   color: white;
}
So what does this give us? A shiny new frame. Unlike Dialogs, Frames act like any of the other MapTool panels and can be docked on the sides, or with other windows (forming a tab group).
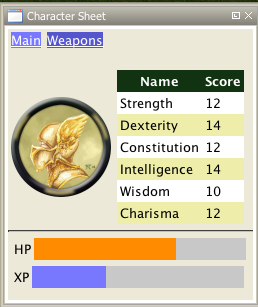
Where it says Main and Weapons on the top, they are links; if you click on Weapons, it will change the CharacterSheet frame to
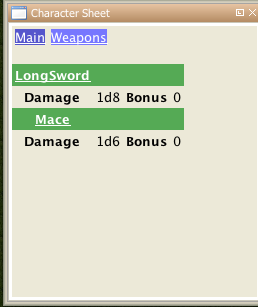
And as an added bonus, the weapon names are links. If you click on them, it will open up the edit dialog where you can edit them. (Note that this will not update the character sheet at this time, but that is left as an exercise for the reader).
This has just been a short example of what can be done. I am sure people will come up with some great ideas of how to use this.
The campaign file with the dialogs we have created can be found at campaign