Dice Box: Difference between revisions
(New page: ==Dice Box== ''Dice Box'' is a collection of MapTool macros that provide an visual, user friendly interface for making basic dice rolls. MapTool has an extensive set of chat commands that...) |
|||
| (51 intermediate revisions by 6 users not shown) | |||
| Line 1: | Line 1: | ||
#REDIRECT [[Bag_of_Tricks]] | |||
{{note|'''Outdated Article:''' This article was last updated in June, 2010 and is badly out of date. The old Dice Box macros became a part of the [[Bag of Tricks]].}} | |||
==Dice Box== | ==Dice Box== | ||
''Dice Box'' is a collection of MapTool macros that provide | ''Dice Box'' is a collection of MapTool macros that provide a visual, user friendly interface for making basic dice rolls. MapTool has an extensive set of chat commands that let users roll dice in the main chat window (dice commands that look like '''/roll 1d20+9'''). The Dice Box scripts add a visual, easy-to-understand window for rolling dice and sending the results to the chat window. | ||
The instructions below assume you are familiar with how to start MapTool and how to navigate around MapTool. If you aren't, please check out the [[Introduction_to_Mapping|Introduction to Mapping]] for a quick guide to getting started with MapTool. | |||
===Requirements=== | |||
# MapTool '''1.3.b66''' or later. It may work on previous versions, but is untested. | |||
# A Java [[Stack_Size|stack size]] higher than 512KB. | |||
===Getting the Dice Box Token=== | ===Getting the Dice Box Token=== | ||
# Download Dice Box from [http://www.houseofgenius.com/files/mtfw/dicebox/diceBox_v31.rptok my website]. The latest version is '''3.1'''. You should receive a file called '''diceBox_v31.rptok''' | |||
# Download the [http://www.houseofgenius.com/files/mtfw/dicebox/colordice.mttable table of colorful dice images]. This contains the images and is required for Dice Box to function. You should get a file named '''colordice.mttable'''. If it is renamed to colordice.zip, make sure to change the extension to "mttable". | |||
'''Tip''': Files with an '''.rptok''' extension are MapTool's format for saving tokens and all of the macros and information they may contain. Files with a '''.mttable''' extension are MapTool's format for tables within the system. | |||
==="Installing" Dice Box=== | ==="Installing" Dice Box=== | ||
[[Image:Db27_dragtomap.png|thumb|The token is dragged onto the MapTool map]] | |||
[[Image:Diceboxconfig.png|thumb|The '''Ownership''' tab]] | |||
[[Image:Dicebox_vistoplayers.png|thumb|The '''Config''' tab]] | |||
[[Image:Dicebox27.png|thumb|The Dice Box Appears!]] | |||
Though this section is called "Installing Dice Box," bear in mind that we're not actually ''installing'' anything - you won't need to run any programs besides MapTool, and your MapTool files will not be changed. However, for simplicity's sake, I used the term "installing." Anyway, here's how to get the Dice Box on your system: | |||
# Open MapTool. | |||
# Drag the file '''dicebox_v31.rptok''' from wherever you downloaded it, onto the MapTool map. You should see a token called '''Lib:Play''' appear on the map. '''Tip''': if you are familiar with MapTool's Resource Library, you can save your token there, too, and drag it from your Resource Library onto the map. Also, once you put the token on one map, ''don't put it on any others'' - the way Library Tokens work, they can only be on '''''one''''' map. So once you've put it on one map, that's all you need to do. | |||
# Double-click on the token to get the '''Edit Token''' window. | |||
# Go to the '''Ownership''' tab and make sure ''nothing'' is checked. | |||
# Go to the '''Config''' tab and make sure '''Visible to Players''' is checked. | |||
# Click '''OK''' to close the Edit Token window. | |||
# Go to '''Window > Tables''' | |||
# Click the "Import" button. | |||
# Navigate to where you saved the file '''colordice.mttable''' and select it. Click "Open." A new table called "NewDice" will appear in the Tables window. | |||
# Go to '''File > Save Campaign As''' and save your work so far as a Campaign File, giving it whatever name you like (such as "Basic.cmpgn"). | |||
# Select the Dice Box token, and in the selection window (if you don't see that window, go to '''Window > Selection''') and click the button labeled '''onCampaignLoad'''. The Dice Box frame will pop up! | |||
===Using Dice Box=== | |||
[[Image:Dicebox-output.jpg|thumb|Sample output of the Dice Box]] | |||
Using Dice Box is easy: | |||
1. Click on the pictures of the dice you need to roll. Each time you click, you'll add one more die of that type to the roll. The total for each kind of die is shown below or beside the corresponding image. | |||
( | 2. Add any fixed amount in the last box (for instance, if you want to add 7 to the total dice roll, put a 7 in the last box). | ||
7. | |||
3. Click on the '''Show Results To:''' link to switch between making the results visible to everyone, or visible only to the GM and yourself. Click on "Results" to change between a "tooltip" that shows only the ''total'' of each group of dice, or shows the total ''and'' the results of each individual die. | |||
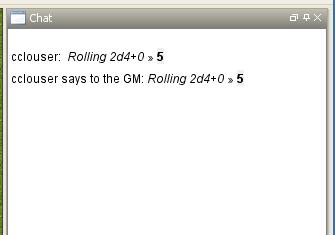
4. Once you've selected the dice you want to roll, click '''Roll'''. The result of the roll will appear in the chat window, as shown below: | |||
5. If you make a mistake, you can hit "Clear All" to clear out the dice you've selected, and start over. | |||
( | If you need to adjust the layout of the Dice Box (to fit your MapTool window better) click "Change Layout," and pick from one of the options. | ||
[[Category:Cookbook]] | |||
{{Languages|Dice_Box}} | |||
Latest revision as of 23:59, 8 March 2023
Redirect to:
Dice Box
Dice Box is a collection of MapTool macros that provide a visual, user friendly interface for making basic dice rolls. MapTool has an extensive set of chat commands that let users roll dice in the main chat window (dice commands that look like /roll 1d20+9). The Dice Box scripts add a visual, easy-to-understand window for rolling dice and sending the results to the chat window.
The instructions below assume you are familiar with how to start MapTool and how to navigate around MapTool. If you aren't, please check out the Introduction to Mapping for a quick guide to getting started with MapTool.
Requirements
- MapTool 1.3.b66 or later. It may work on previous versions, but is untested.
- A Java stack size higher than 512KB.
Getting the Dice Box Token
- Download Dice Box from my website. The latest version is 3.1. You should receive a file called diceBox_v31.rptok
- Download the table of colorful dice images. This contains the images and is required for Dice Box to function. You should get a file named colordice.mttable. If it is renamed to colordice.zip, make sure to change the extension to "mttable".
Tip: Files with an .rptok extension are MapTool's format for saving tokens and all of the macros and information they may contain. Files with a .mttable extension are MapTool's format for tables within the system.
"Installing" Dice Box
Though this section is called "Installing Dice Box," bear in mind that we're not actually installing anything - you won't need to run any programs besides MapTool, and your MapTool files will not be changed. However, for simplicity's sake, I used the term "installing." Anyway, here's how to get the Dice Box on your system:
- Open MapTool.
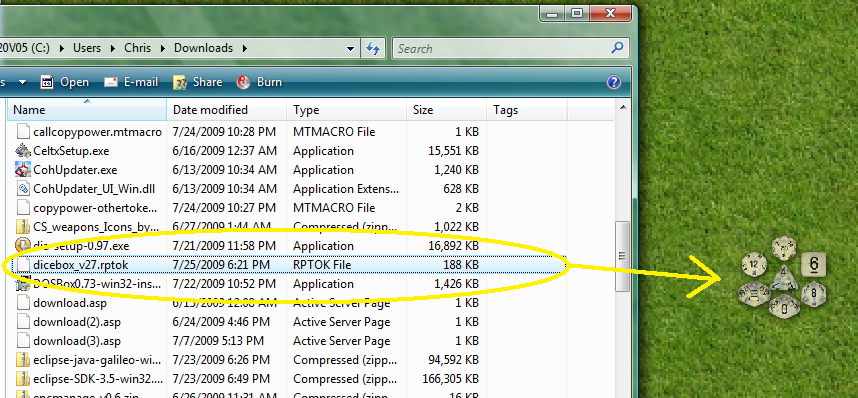
- Drag the file dicebox_v31.rptok from wherever you downloaded it, onto the MapTool map. You should see a token called Lib:Play appear on the map. Tip: if you are familiar with MapTool's Resource Library, you can save your token there, too, and drag it from your Resource Library onto the map. Also, once you put the token on one map, don't put it on any others - the way Library Tokens work, they can only be on one map. So once you've put it on one map, that's all you need to do.
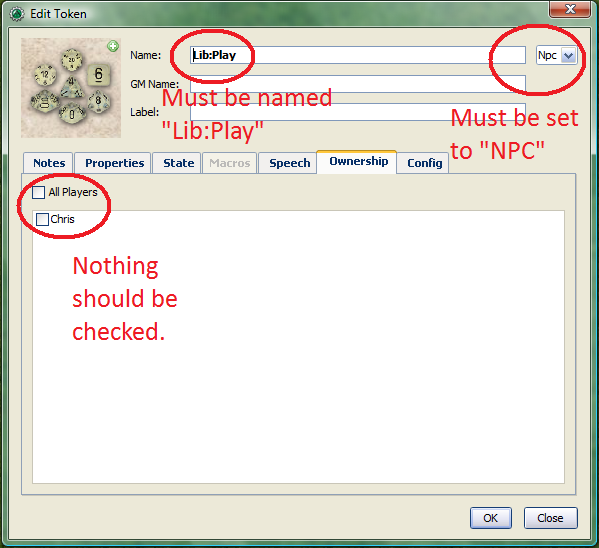
- Double-click on the token to get the Edit Token window.
- Go to the Ownership tab and make sure nothing is checked.
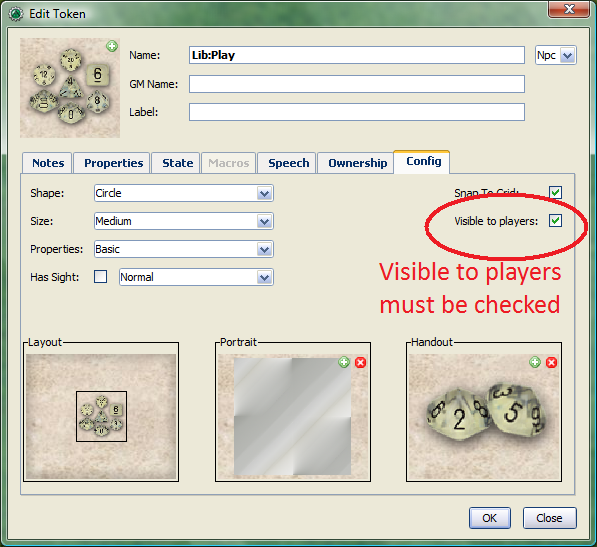
- Go to the Config tab and make sure Visible to Players is checked.
- Click OK to close the Edit Token window.
- Go to Window > Tables
- Click the "Import" button.
- Navigate to where you saved the file colordice.mttable and select it. Click "Open." A new table called "NewDice" will appear in the Tables window.
- Go to File > Save Campaign As and save your work so far as a Campaign File, giving it whatever name you like (such as "Basic.cmpgn").
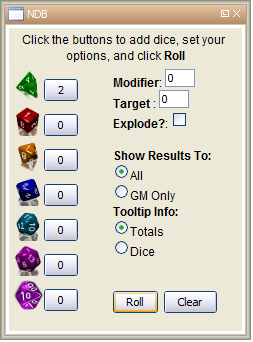
- Select the Dice Box token, and in the selection window (if you don't see that window, go to Window > Selection) and click the button labeled onCampaignLoad. The Dice Box frame will pop up!
Using Dice Box
Using Dice Box is easy:
1. Click on the pictures of the dice you need to roll. Each time you click, you'll add one more die of that type to the roll. The total for each kind of die is shown below or beside the corresponding image.
2. Add any fixed amount in the last box (for instance, if you want to add 7 to the total dice roll, put a 7 in the last box).
3. Click on the Show Results To: link to switch between making the results visible to everyone, or visible only to the GM and yourself. Click on "Results" to change between a "tooltip" that shows only the total of each group of dice, or shows the total and the results of each individual die.
4. Once you've selected the dice you want to roll, click Roll. The result of the roll will appear in the chat window, as shown below:
5. If you make a mistake, you can hit "Clear All" to clear out the dice you've selected, and start over.
If you need to adjust the layout of the Dice Box (to fit your MapTool window better) click "Change Layout," and pick from one of the options.