overlay (roll option): Difference between revisions
mNo edit summary |
No edit summary |
||
| (5 intermediate revisions by 3 users not shown) | |||
| Line 6: | Line 6: | ||
Because overlays don't have a close gadget like a frame or a dialog, you can use {{func|closeOverlay}} to close the overlay or you can toggle them on or off in the {{ui location|Window > Overlays}} menu. | Because overlays don't have a close gadget like a frame or a dialog, you can use {{func|closeOverlay}} to close the overlay or you can toggle them on or off in the {{ui location|Window > Overlays}} menu. | ||
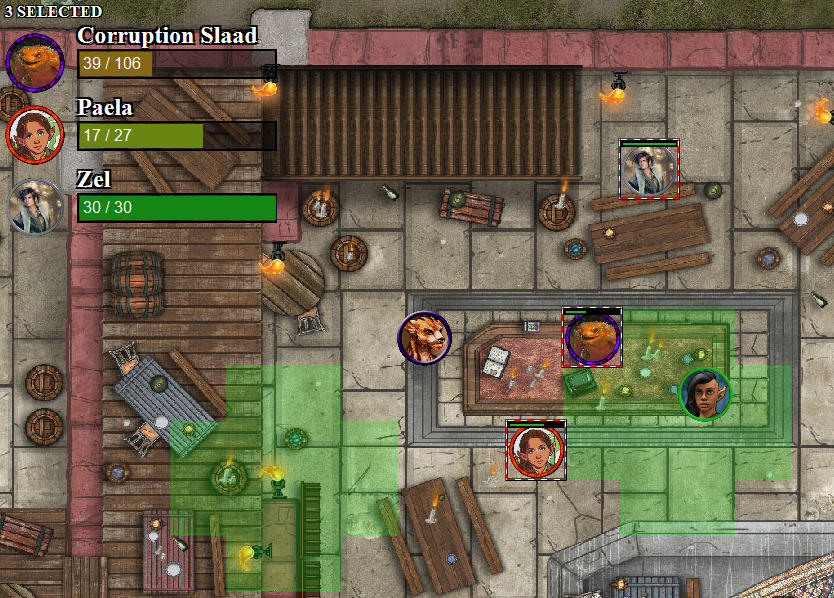
[[Image: | [[Image:Overlay_example.png|250px|An overlay showing selected units' health bars in the top left.]] | ||
|usage= | |usage= | ||
< | <syntaxhighlight lang="mtmacro" line> | ||
[overlay(overlayName [,"zorder;"]): { ... }] | [overlay(overlayName [,"zorder;"]): { ... }] | ||
</ | </syntaxhighlight> | ||
The title parameter '''overlayName''', should be a string that specifies the internal name of the overlay. It is also the name of the overlay as it will appear in {{ui location|Window > Overlays}} menu. | The title parameter '''overlayName''', should be a string that specifies the internal name of the overlay. It is also the name of the overlay as it will appear in {{ui location|Window > Overlays}} menu. | ||
The '''zorder''' optional parameter is an integer representing the order the overlays will be painted. Overlays with a low zorder index are painted first and are displayed beneath the other overlays; | The '''zorder''' optional parameter is an integer representing the order the overlays will be painted. Overlays with a low zorder index are painted first and are displayed beneath the other overlays; overlays with a high zorder index are painted last and will appear on top of the other overlays. | ||
|examples= | |examples= | ||
The following code simply prints 'Hello World' in large white letters at the top left of the map view: | The following code simply prints 'Hello World' in large white letters at the top left of the map view: | ||
< | <syntaxhighlight lang="mtmacro" line> | ||
[overlay("MyOverlay"): { <h1 style='color:white;'>Hello, World!</h1> }] | [overlay("MyOverlay"): { <h1 style='color:white;'>Hello, World!</h1> }] | ||
</ | </syntaxhighlight> | ||
|also= | |also= | ||
Latest revision as of 23:59, 14 March 2023
[overlay():] Roll Option
Places a transparent HTML5 overlay over the map view. Players can click through the overlay to affect the map as normal, but clickable effects on the overlay will work as intended. Using HTML5, CSS, and JavaScript, overlays enable graphical user interfaces akin to Diablo and WoW right in MapTool.
Because overlays don't have a close gadget like a frame or a dialog, you can use closeOverlay() to close the overlay or you can toggle them on or off in the Window > Overlays menu.
Usage
[overlay(overlayName [,"zorder;"]): { ... }]The title parameter overlayName, should be a string that specifies the internal name of the overlay. It is also the name of the overlay as it will appear in Window > Overlays menu.
The zorder optional parameter is an integer representing the order the overlays will be painted. Overlays with a low zorder index are painted first and are displayed beneath the other overlays; overlays with a high zorder index are painted last and will appear on top of the other overlays.
Examples
The following code simply prints 'Hello World' in large white letters at the top left of the map view:
[overlay("MyOverlay"): { <h1 style='color:white;'>Hello, World!</h1> }]See Also
[frame():]
[frame5():]
[dialog():]
[dialog5():]
Whitelisted CDNs
A demo overlay campaign hosted on GitHub. Remove the '.zip' from the filename to open as a campaign in MapTool.
Version Changes
- 1.7.0 - Introduced.
Implementation Notes
To make overlays responsive to the mouse, mouse events are first captured from the JFXPanel containing the overlays. If the mouse event is a drag/movement/etc, the event gets dispatched to the current zone renderer via passMouseEvent. So, it's as if the overlay wasn't there.
In case of a mouse click or press, the click is first ran through validateAndPassEvent to see if it should be dispatched to the current zone renderer or not. The validation is done by the webView, which check the value of --pointermap for the html element clicked. If the value is --pointermap:block, the mouse event is not forwarded; if it is --pointermap:pass, it is forwarded, and if it is --pointermap:blockopaque, the transparency of the point clicked determines if the click goes through or not.
